

WPMU DEV’s Reseller is an end-to-end platform to sell hosting, domains, templates, SEO, and more through your own white-label portal, on your own domain. Learn how to easily set up automated Reseller for your business in this step-by-step guide.

Offering white label and reseller services such as web hosting and domains can be a profitable way to add extra and automated recurring income to your business if you specialize in web development, web design, or digital marketing.
WPMU DEV’s Reseller platform provides end-to-end automated white label deployment and billing for reselling services and is exclusive to Agency members.
Are you not a member of the WPMU DEV Agency? Find out more about our top-tier, priority access plan by clicking here.
This beginner’s guide will walk you through the steps of configuring Reseller within your Agency account using your main WordPress site management tool, The Hub.
Watch the video below for a quick overview and use the jump links for step-by-step instructions on setting up Reseller.
You will learn:
- How To Get Started with Reseller
- Establishing Your Reseller Account
- Step 1) Set Up Client Billing and Invoicing
- Step 2) Create Your Reseller Products
- Step 3) Set Up Your White Label Client Portal
- Step 4) Integrate Reseller with Your Site
- Your Clients’ Onboarding Experience With Reseller
Getting Started with Reseller
For some time, it has been possible to resell and white label WPMU DEV hosting.
Reseller provides agencies and WordPress professionals with a complete suite of tools to generate recurring revenue without managing servers, dealing with downtime and other technical issues, or having to manually onboard customers.
Reseller also brings all the moving parts below seamlessly together to create an effortless and fully-automated reseller experience:
- White label client billing, invoicing, and management
- Reseller products, including hosting, domains (coming soon!), site templates, premium plugins, etc.
- White label client portal
- White label client reports
- Client support with customizable branding (coming soon!)
Additionally, you can add your own products and services to the mix like SEO, PPC, and more, giving you unlimited flexibility.
Simply set up Reseller to suit your business model and brand it all as your own. WPMU DEV’s all-in-one platform will run, maintain, and support everything, leaving you free to grow your business and focus exclusively on your clients.
Setting Up Your Reseller Account
Ensure that you have established a Stripe account before beginning the Reseller setup process.
Stripe is the default payment processor for our integrated Clients & Billing client management tool and you will need this to invoice your clients and get paid.
Got your Stripe account? Great! Then log into The Hub and click on the Reseller tab in the top menu.

We recommend watching the “get started” video and following the checklist for the fastest and easiest way to set up Reseller.

There are four main steps involved in setting up Reseller, so let’s go through these now:
First step: Establish a system for billing and invoicing clients.
The Hub’s Client Billing and Management portal is an incredibly easy-to-use, built-in billing management platform that lets you create and sell product and service packages to your clients, process payments, set up custom plans, recurring subscriptions, branded invoices, and invite clients directly from your Hub or Hub Client plugin installed on your own site.

The process of establishing Clients & Billing consists of two stages.
- Connect your Stripe account to Clients & Billing.
- Configure Clients & Billing to set up your business profile and preferences (e.g. billing currency) and add your own branding to everything, including your emails, invoices, etc.
Should you require assistance with this stage, click on the above links and follow our guides or consult the Clients & Billing documentation for further details.
Step 2) Create Your Reseller Products
Once you’ve decided what packages to offer (we give you a ton of different options for add-ons, services, and upgrades) and Client Billing has been set up and configured, the next step is to create and add the products and services you plan to resell to your clients.
Adding new products, creating plans that link to our hosting options, and determining their pricing is a straightforward process.
Click on the Reseller tab in The Hub’s main menu and you will see additional tabs inside this screen that allow you to create white label reseller hosting products, and domain reselling (coming very soon!).

In this section, you will also find a tab for global settings, as well as links for reporting problems and providing feedback, and the Reseller Setup Guide.

Let’s go through an example and create a hosting reseller product using Reseller’s product setup wizard so you can see how easy this is.
Select the Hosting Reseller tab and choose the Add New Product option to open the initial screen of the Product Setup wizard.

Product Setup
The product info you enter here (i.e. product name, image, description, and features list) will be added to the pricing table made visible to your clients, so it’s important to fill this in correctly.
Enter your product info and click ‘Next’ to continue.

Reseller Configurations
Next, configure your product by selecting the hosting plan you will resell as your own.

Note: With each product that you create, you can also specify additional customization options.
These include:
WordPress User Role
Select the user role you would like to assign to clients when this product is purchased.
Reseller lets you choose from various roles, including Super Admin (for managing Multisite site templates). This is useful if you don’t want users to have complete control of all WordPress functions on their newly purchased site.
So, if you want to restrict users from being able to install plugins and themes on their site, for example, you can associate a hosting plan with the role of Editor or a role with even less permissions (e.g. Author, Contributor, Subscriber).

Client Role
You can choose to keep the default client role as set in The Hub > Reseller > Settings or change the client role after the product has been purchased.

Note: Client Role is different from the WordPress User Role set above and affects access to features in The Hub.
Learn more about Client Roles.
Site Templates
Under the Site Templates setting, you have the option of allowing clients to choose a site template, forcing a selected template on new sites, or disabling templates.
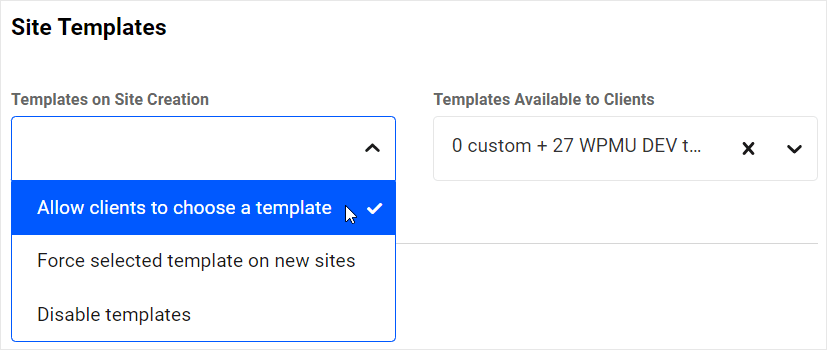
If template-based options are selected, you can then choose to use your own client site template(s), and/or any of the pre-configured site templates from our library.

Reseller Tip: Site templates allow you to sell fully white-labeled websites to your clients. To do this, simply create custom templates from one or more white-labeled sites in your account (Hub > Site Templates > Create Template), then make only those templates available to your clients.

Learn more about site template options.
Auto Suspension
With Reseller, you’ll never lose sleep over unpaid client invoices!
Reseller lets you configure whether or not to automatically suspend sites if an invoice has not been paid after a specified number of days. You can also disable the option altogether, and specify whether or not to automatically unsuspend sites when pending invoices are paid.

Learn more about Auto Suspension.
Auto Deletion
As an additional feature of its powerful automation capabilities, Reseller gives you the option of automatically deleting sites with unpaid invoices.

You can choose to not auto delete sites, or delete them where invoices remain unpaid after a specific time period set by you.
Note that the number of days you specify to trigger auto deletion must be greater than the number of days you have set for auto suspension to take effect.

Learn more about Auto Deletion.
Pricing
The last step is to set up your hosting product’s pricing.
The Pricing screen allows you to create different plans, set your subscription terms, and charge whatever amount you want on top of your wholesale purchase pricing.
Click the Continue button when done to create your product.

Your first hosting product is now done and the product details will display in your Hosting Reseller screen.

After adding a product, you can perform additional functions such as viewing or editing it, add a pricing plan, duplicate it to easily create a new product variation, and even archive it if it’s no longer being used.

Rinse and repeat the above steps by clicking on the Add New Product button to continue adding all of the hosting products you plan to resell.

If you need help with this step, see our documentation.
Step 3) Set Up Your White Label Client Portal
This is where all the magic happens for your clients.
The client portal is your white labeled branded version of our Hub site management interface. It’s powered by The Hub Client plugin, which is needed for Reseller and included with the Agency membership, and runs on your own WordPress website on your own domain.
It’s your dedicated portal where clients will sign-in when they buy from you to manage their account details, pay you, and purchase services including hosting and more, directly from your site…all fully controlled and customized by you.

Portal creation is instant as it’s a copy of your existing Hub interface, and there are numerous design, branding, and customization options.
Setting up a white-labeled client portal will enable your clients to not only manage their subscriptions and invoices, but also purchase reseller products directly from you and automatically create sites hosted with WPMU DEV.

You have complete control over setting up your clients’ experience in the portal.
To set up a client portal with your own branding, simply install and activate The Hub Client plugin on your site, configure settings for branding, navigation, login, and signup, and add the products you created in the previous step.
For detailed instructions on installing and using the plugin refer to The Hub Client plugin documentation.
Step 4) Integrate Reseller With Your Site
The final step to complete the automation process is to activate and set up Reseller on your client portal with information about your products and services.
To do this, make sure you have installed The Hub Client plugin on your site, then go to “The Hub Client > Reseller” page and activate Hosting Reseller.

Next, add/import the products you created in Step 2 into The Hub Client by clicking either on the Add Product or Import all products buttons.
Note: Editing products in The Hub will automatically update the information in your pricing tables for existing products, so you won’t need to reimport the product in The Hub Client.

Clicking on the Add Product button allows you to select a product and pricing variations, and configure visibility settings for its pricing table.

Alternatively, you can import all products you have created in The Hub by clicking on the Import all products button…

After importing, a table will display information about each of your added products.
Note: If you have not added any products, you will see the option to add a product or import all products below the Hosting Products table. After adding a product, the Import all products button will be replaced with the Customize pricing table button.

Click on the down arrow to view more details about each product (or click on the up arrow to hide this information).

After adding your products, click on the Customize pricing table button to create and customize a pricing table with your Hosting Reseller products to match your site and brand.

Note: An alternative option to using The Hub Client’s pricing table is to copy and add checkout links generated by Reseller to your existing setup where you’d like customers to purchase your products.

Once your billing, products, and portal are ready, you can easily embed your new products and pricing table on your site via shortcode or Gutenberg block where clients can access the information and purchase your products and services.

You’re now ready to resell WPMU DEV!
Your Clients’ Onboarding Experience With Reseller
Now that you know how to set up Reseller, let’s take a look at the ‘turn-key’ client onboarding experience:
A new user selects a hosting plan from your site…

They’ll create a new account and log in to your portal…

Then create a site, choose a template, set up site credentials, server location, and securely check out…

Your clients can easily create a new site with or without templates, depending on how you have configured your product packages…

The client will be presented with your fully-branded payment screen as the last step of the process. Once payment is made, their site will then be automatically created.

After payment is successfully processed, Reseller will do its magic and create a brand new, fully configured site on an optimized hosting plan in just a few minutes.
Once the site is done, your clients will then have immediate access to their sites, via your client portal.

It’s all 100% automated, white-labeled under your own brand, and completely hands-off if you want it to be.
Welcome to your new WPMU DEV reseller business!
Want Ka-Ching? Then Reseller’s Your Thing!
As mentioned earlier, Reseller is only available with our Agency plan, which includes unlimited site licenses and tools, Pro plugin suite, free yearly hosting credit, and exclusive access to our lowest hosting prices. The plan also includes a full 30-day money-back guarantee, so you can try it completely risk-free today.
Become a WPMU DEV Reseller today and start automating your existing agency setup, or tap into a wealth of potential new revenue streams selling niche hosting services.
If you are already an Agency member, what are you waiting for? Jump in, take a look, and get started right now.
Also, watch this space, we have big plans to continue building additional ways (and improving) how our platform can help WordPress professionals drive recurring revenue without the hassle.
PS: Domain reseller automation is up next! Adding yet another source of income to your business, and value to your clients.
Starting a reseller business can be a lucrative opportunity for agencies, web developers, and freelancers looking to expand their offerings and increase their revenue streams. A reseller business allows you to sell products or services from another company as if they were your own, often at a discounted rate. This guide will provide you with the necessary steps to set up a successful reseller business.
Step 1: Choose the Right Product or Service
The first step in setting up a reseller business is to choose the right product or service to sell. Consider your target market and what they need. For example, if you are a web developer, you may want to resell hosting services or website templates. If you are an agency, you may want to resell marketing tools or software. Make sure the product or service you choose aligns with your existing offerings and adds value to your customers.
Step 2: Find a Reliable Supplier
Once you have chosen the product or service you want to resell, you need to find a reliable supplier. Look for a supplier that offers high-quality products or services, competitive pricing, and excellent customer support. You want to ensure that your customers will be satisfied with their purchase, so it’s important to choose a supplier that you can trust.
Step 3: Set Up Your Reseller Account
After finding a supplier, you will need to set up a reseller account with them. This typically involves filling out an application and providing information about your business. Some suppliers may require you to purchase a certain amount of product upfront, while others may offer a pay-as-you-go model. Make sure you understand the terms and conditions of the reseller agreement before signing up.
Step 4: Create a Pricing Strategy
Once you have your reseller account set up, you need to create a pricing strategy. You want to make sure you are making a profit while still offering competitive pricing to your customers. Consider the cost of the product or service, your overhead expenses, and the value you are providing to your customers when setting your prices.
Step 5: Market Your Reseller Business
Now that you have everything set up, it’s time to start marketing your reseller business. Use your existing channels, such as your website, social media, and email list, to promote your new offerings. Consider offering special promotions or discounts to entice customers to try out your new products or services.
Step 6: Provide Excellent Customer Service
Finally, make sure you provide excellent customer service to your reseller customers. This includes responding promptly to inquiries, addressing any issues that arise, and providing ongoing support. Happy customers are more likely to become repeat customers and refer others to your business.
In conclusion, setting up a reseller business can be a great way for agencies, web developers, and freelancers to expand their offerings and increase their revenue. By following these steps, you can set up a successful reseller business that provides value to your customers and helps grow your business.

Recent Comments