
WordPress allows you to add a new page in multiple ways. We’ll cover a few different methods, two of which will save you a lot of time. We’ll also show you how to make new pages with the Block Editor and Divi. Both visual builders make building new pages easier than classic WordPress.
TL;DR
- There is a simple way to add a new page via the dashboard. Then, use the Block Editor to adjust page settings and build your page using prebuilt patterns.
- But if you don’t want to build from scratch, you could use Divi to create several pages and site templates (an entire website) in under two minutes. You can also create new pages using premade Divi layouts.
Making a new page in WordPress is easy and is one of the first things you should learn to do. In this post. will show you how to do it, including some of the best ways to quickly get a new page designed and ready for publishing.
How to Add a New Page in WordPress
Adding a new page in WordPress only takes a few clicks. You can create a new page and give it a title and URL slug in no time. What takes longer is manually building out the page. Later in the article, we’ll show you a few ways to get a head start with your page design.
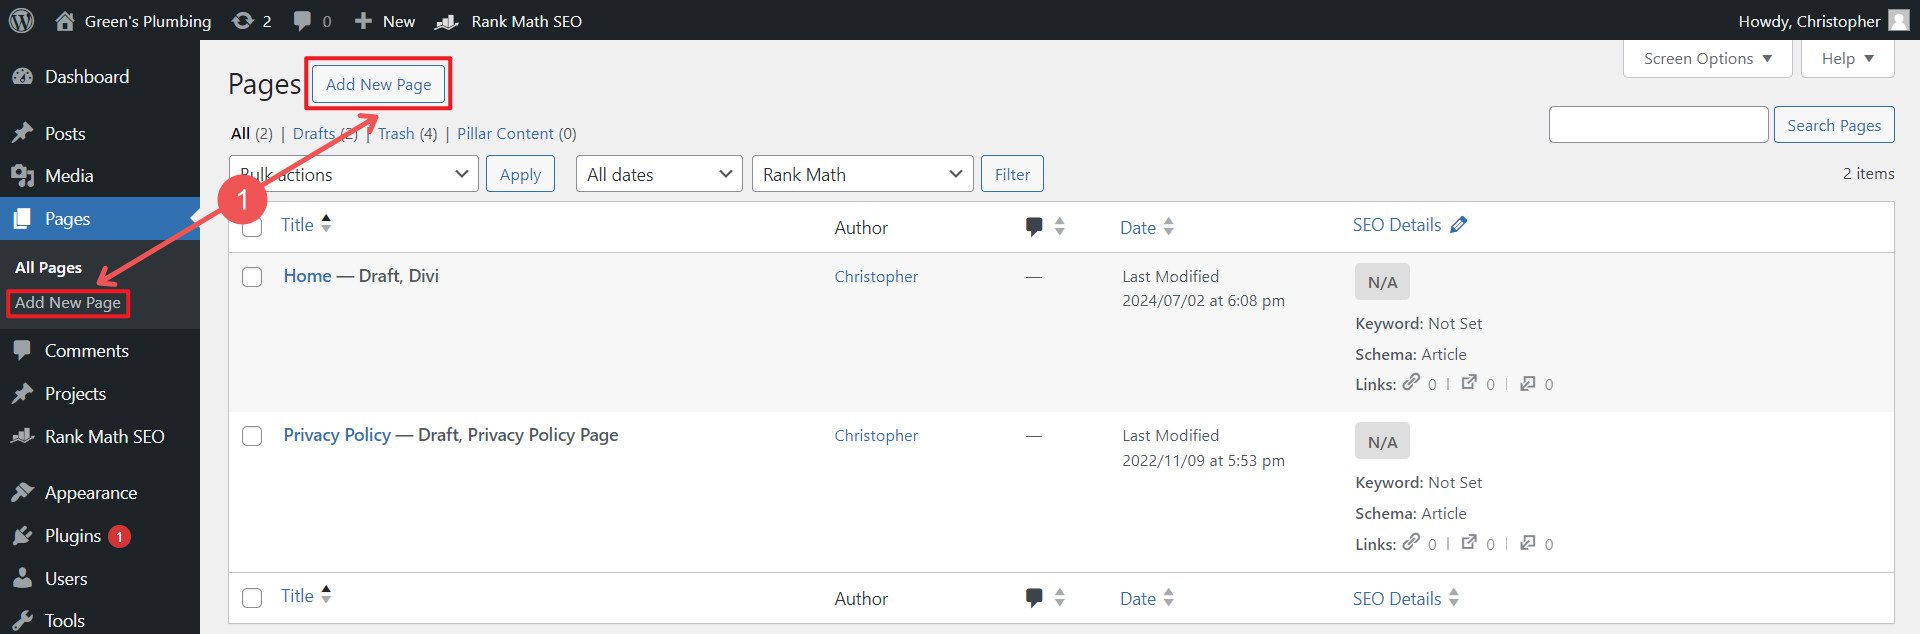
First, hover over “pages” from your WordPress dashboard in the sidebar and select “Add New Page.” You can also do this after clicking “Pages” and the “Add New Page” button near the top.
The WordPress Block Editor will open with a blank page. Once you understand the basics, using the Block Editor is easy. Before you start adding content blocks to build your page content, take some time to set up your page settings. Look at several things, including adding a title, changing the URL slug, selecting an author, and setting your preferences for the featured image, comments section, page excerpt, and other attributes.
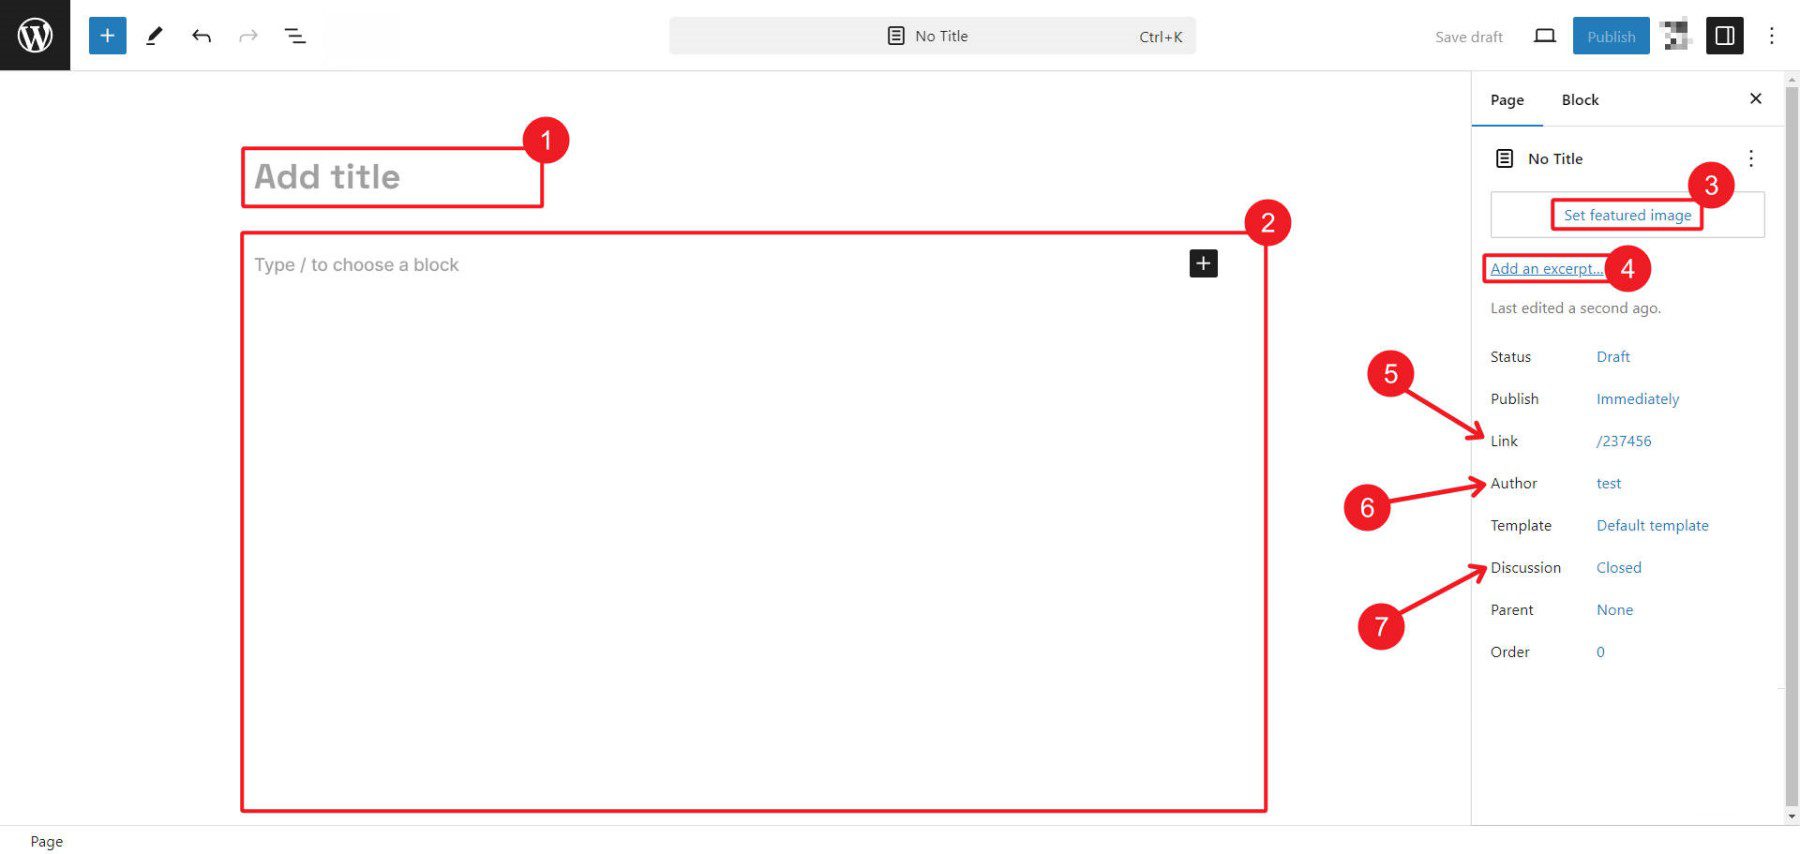
Here are some resources to help set up your WordPress page settings.
When you are done editing your page’s meta fields and settings, save it as a draft.
Now, you’re ready to start designing your page.
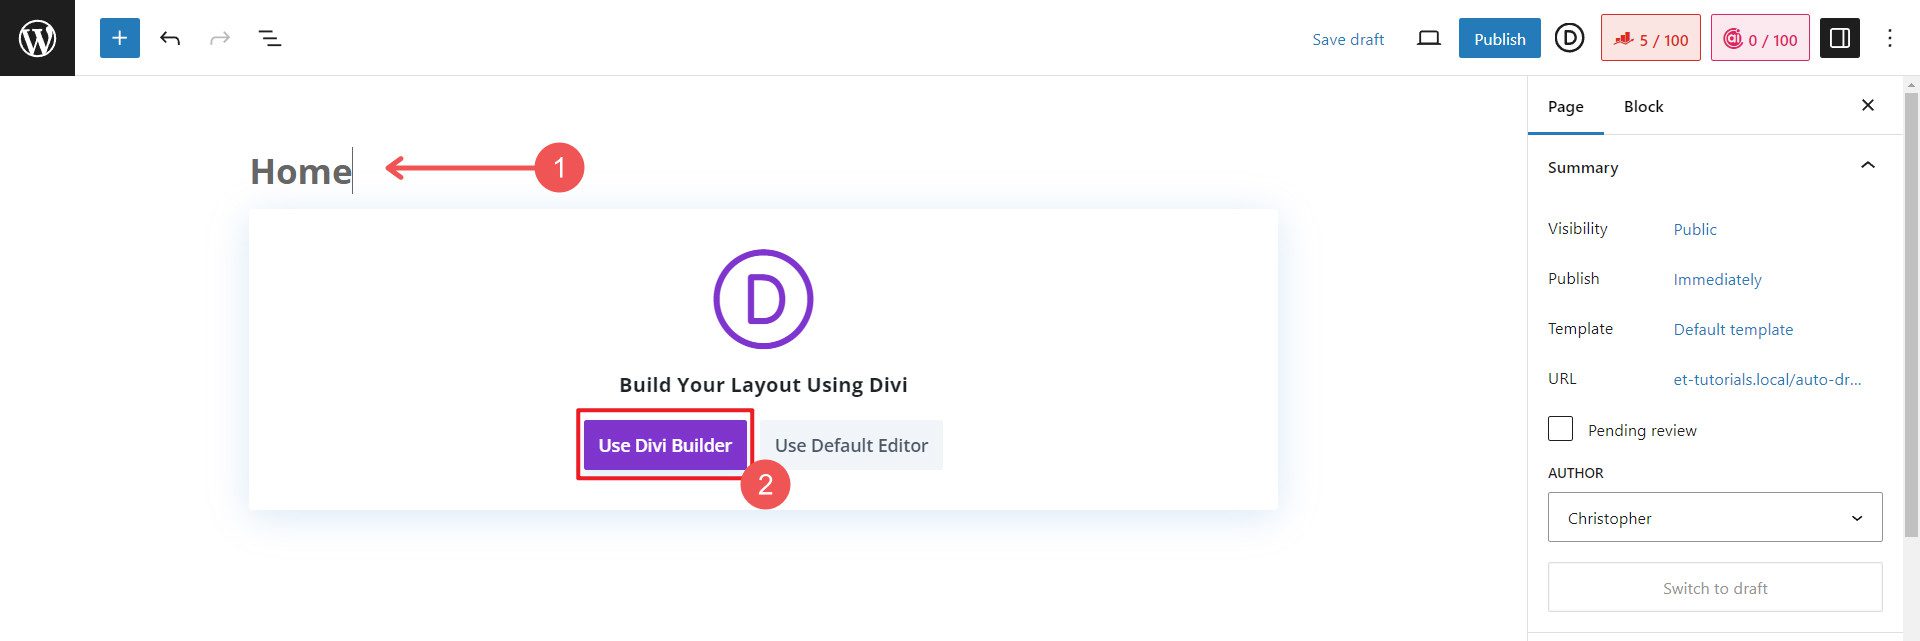
If you use Divi, you’ll be asked if you want to build the page using Divi’s visual builder or the default editor (only the block editor will show if you aren’t using Divi).
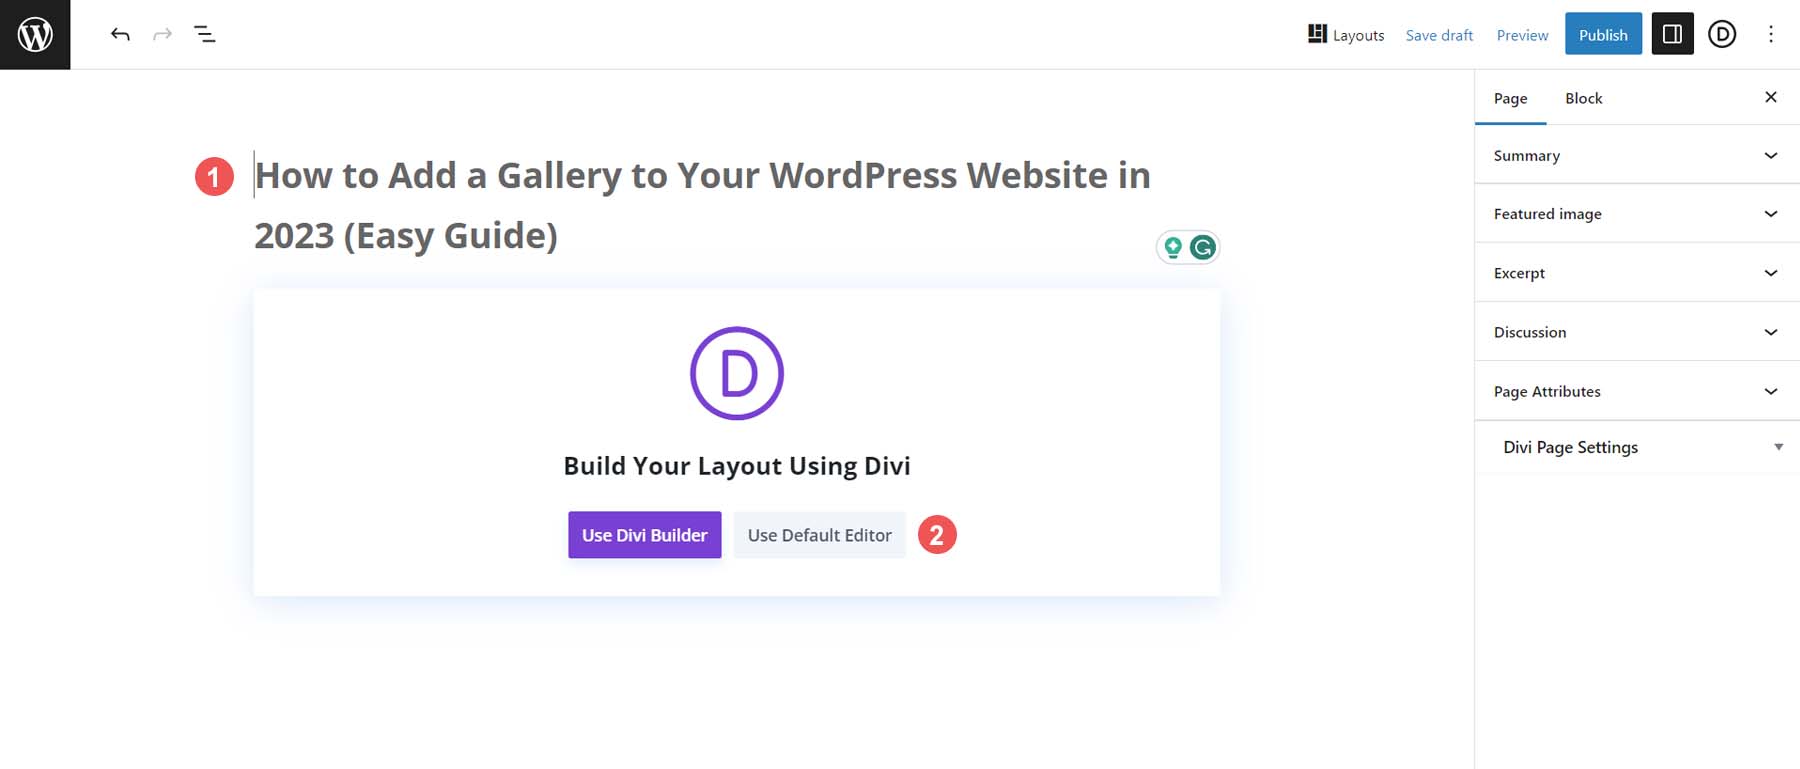
Select “Use Divi Builder” if you are building with the Divi Theme
How to Build a Page Using Premade Design Elements
Using premade design elements and page layouts helps WordPress users get their pages up and running quickly. You can build your pages using professional pre-designed templates, layouts, or content sections to jumpstart the design process while retaining the ability to customize things as you go along.
Building a WordPress Page Using a Premade Pattern
If you’re using the Block Editor, you have access to collections of premade content blocks (basically sections of page content) called Patterns. You can find pre-built patterns for your website in several places. The first is already on your WordPress website—Core Block Patterns are loaded with every installation of WordPress. Another is found on pattern directories like WordPress.com and WordPress.org. Lastly, some plugins will load more pattern options for you to use.
Step-by-Step Guide
We’ll start by finding a pattern we like. You can look through the Core Block Patterns already on your website or look for more unique (and less used) patterns elsewhere. I you are using a Block Theme, you may have access to more patterns loaded in with your theme.
Step 1: Find Pattern
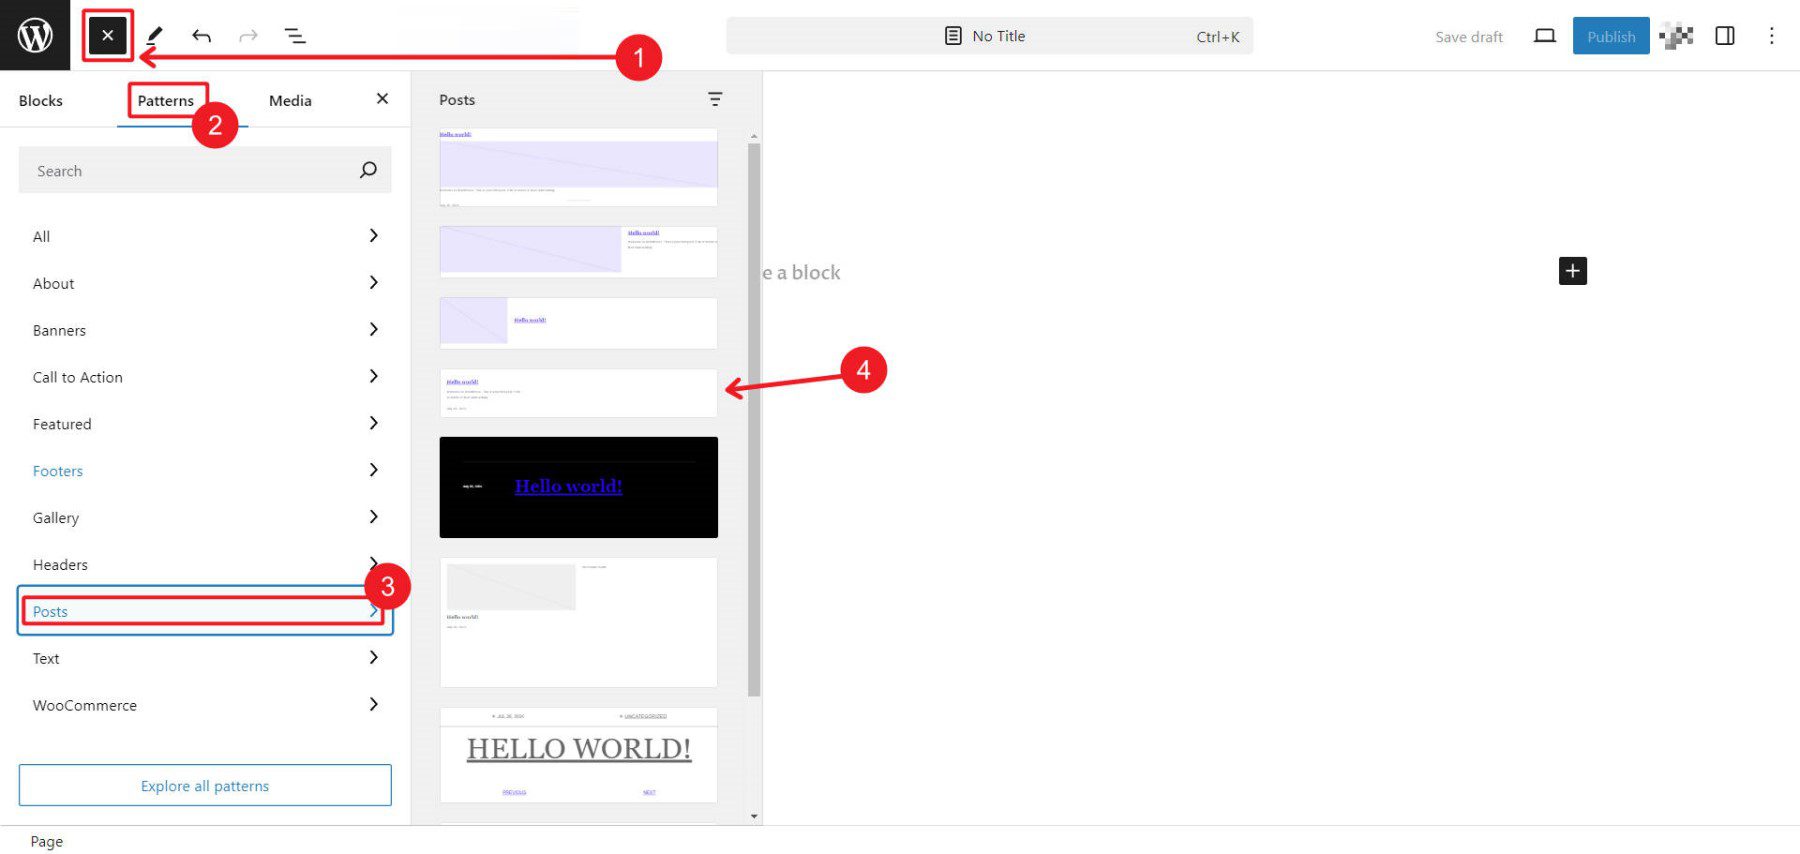
To find default patterns or patterns built for your block theme, navigate to your page, click the Block Inserter, switch tabs from Blocks to Patterns, find the category of patterns you want to insert, and look through the available patterns. When you find one, click it to add it to the page.
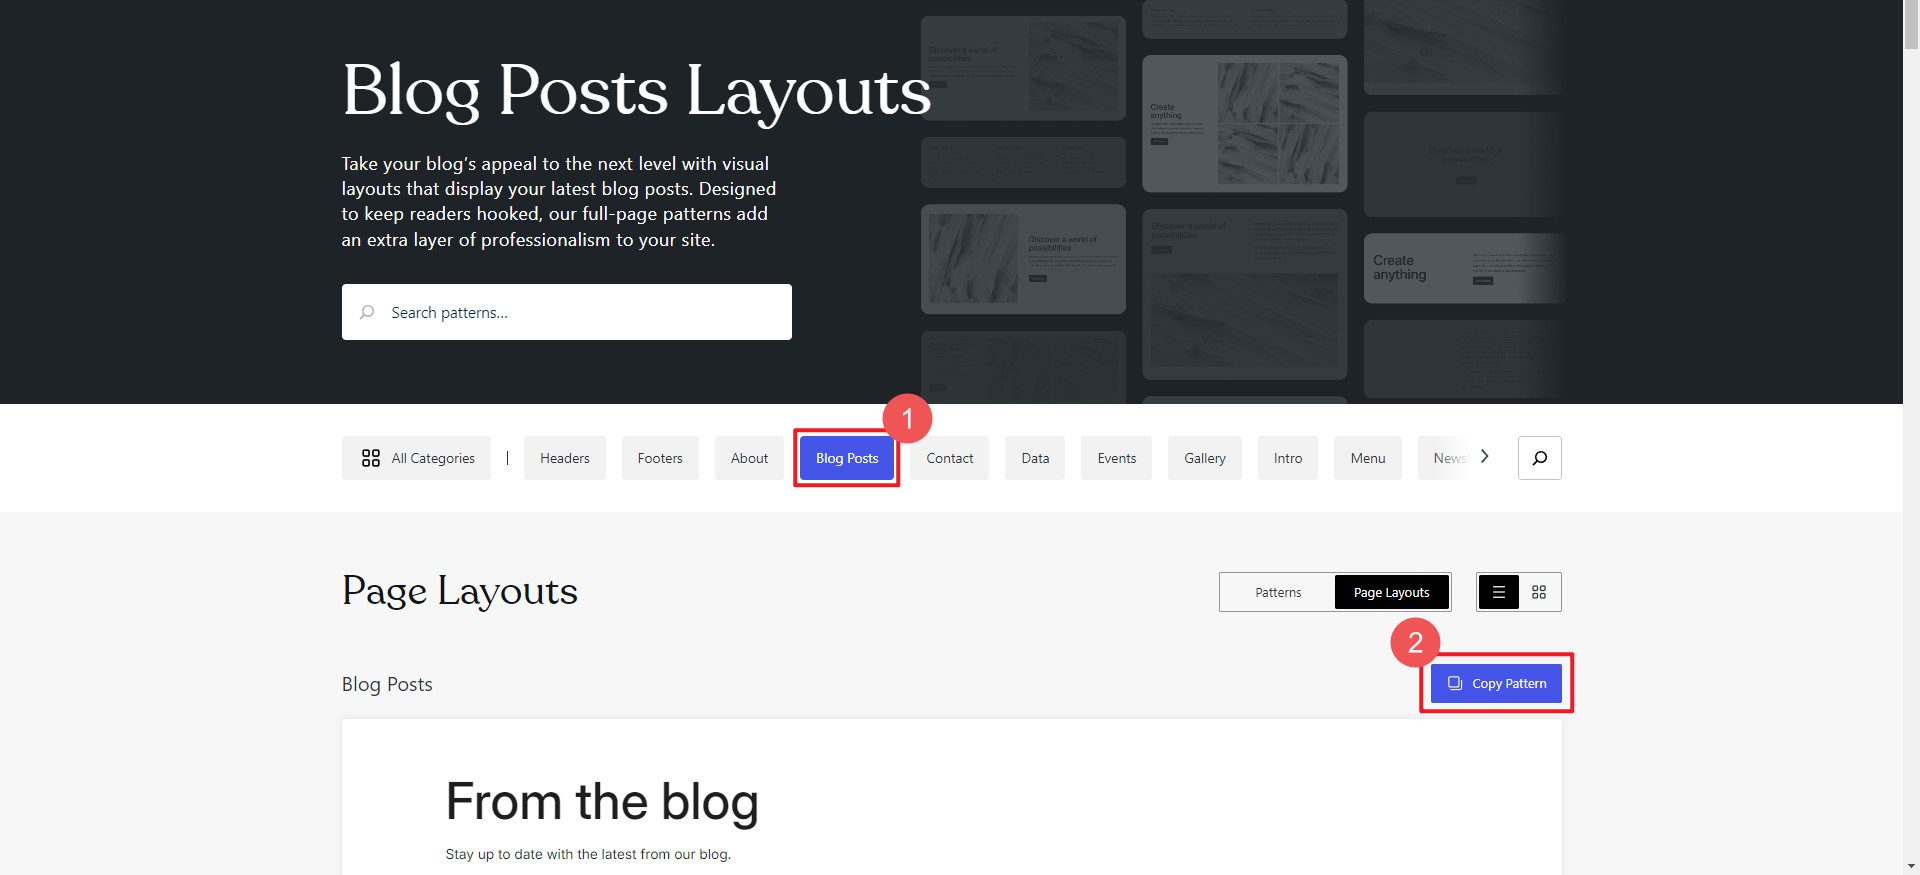
If the default patterns aren’t enough, you can search through some repositories of publicly shared patterns. We’ll look at WordPress.com for something to use. Search for a pattern via pattern categories or by searching a keyword. When you find one you like, click it and find the Copy Pattern button.
Step 2: Add Pattern to Template or Page
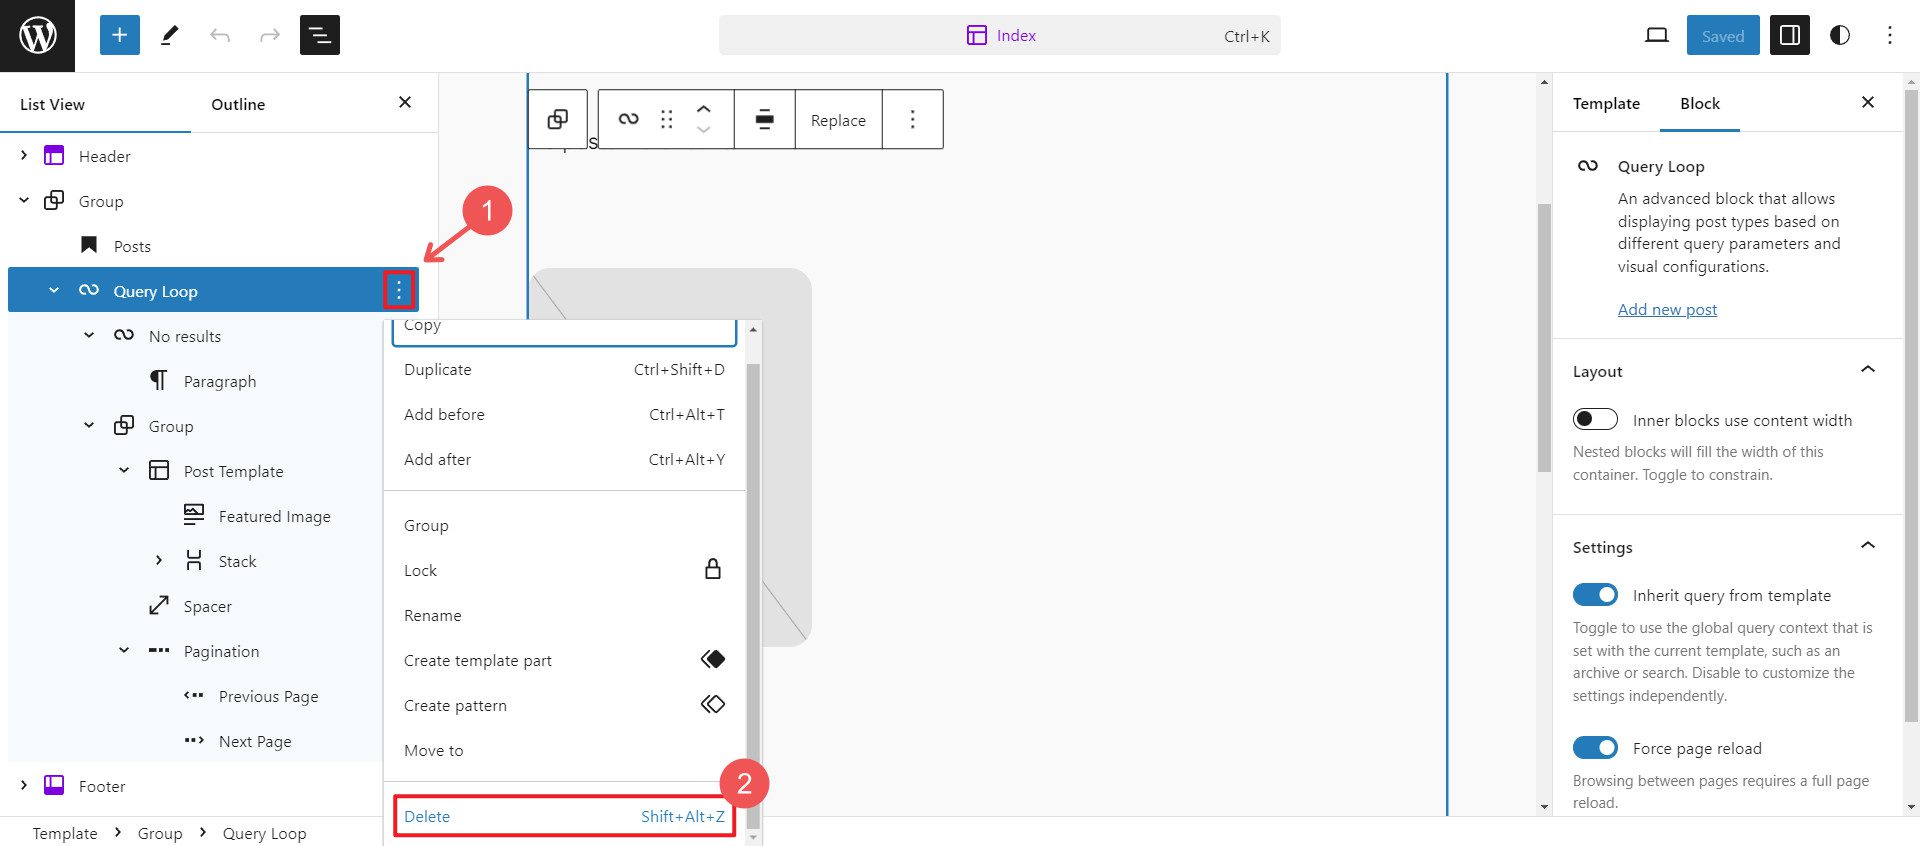
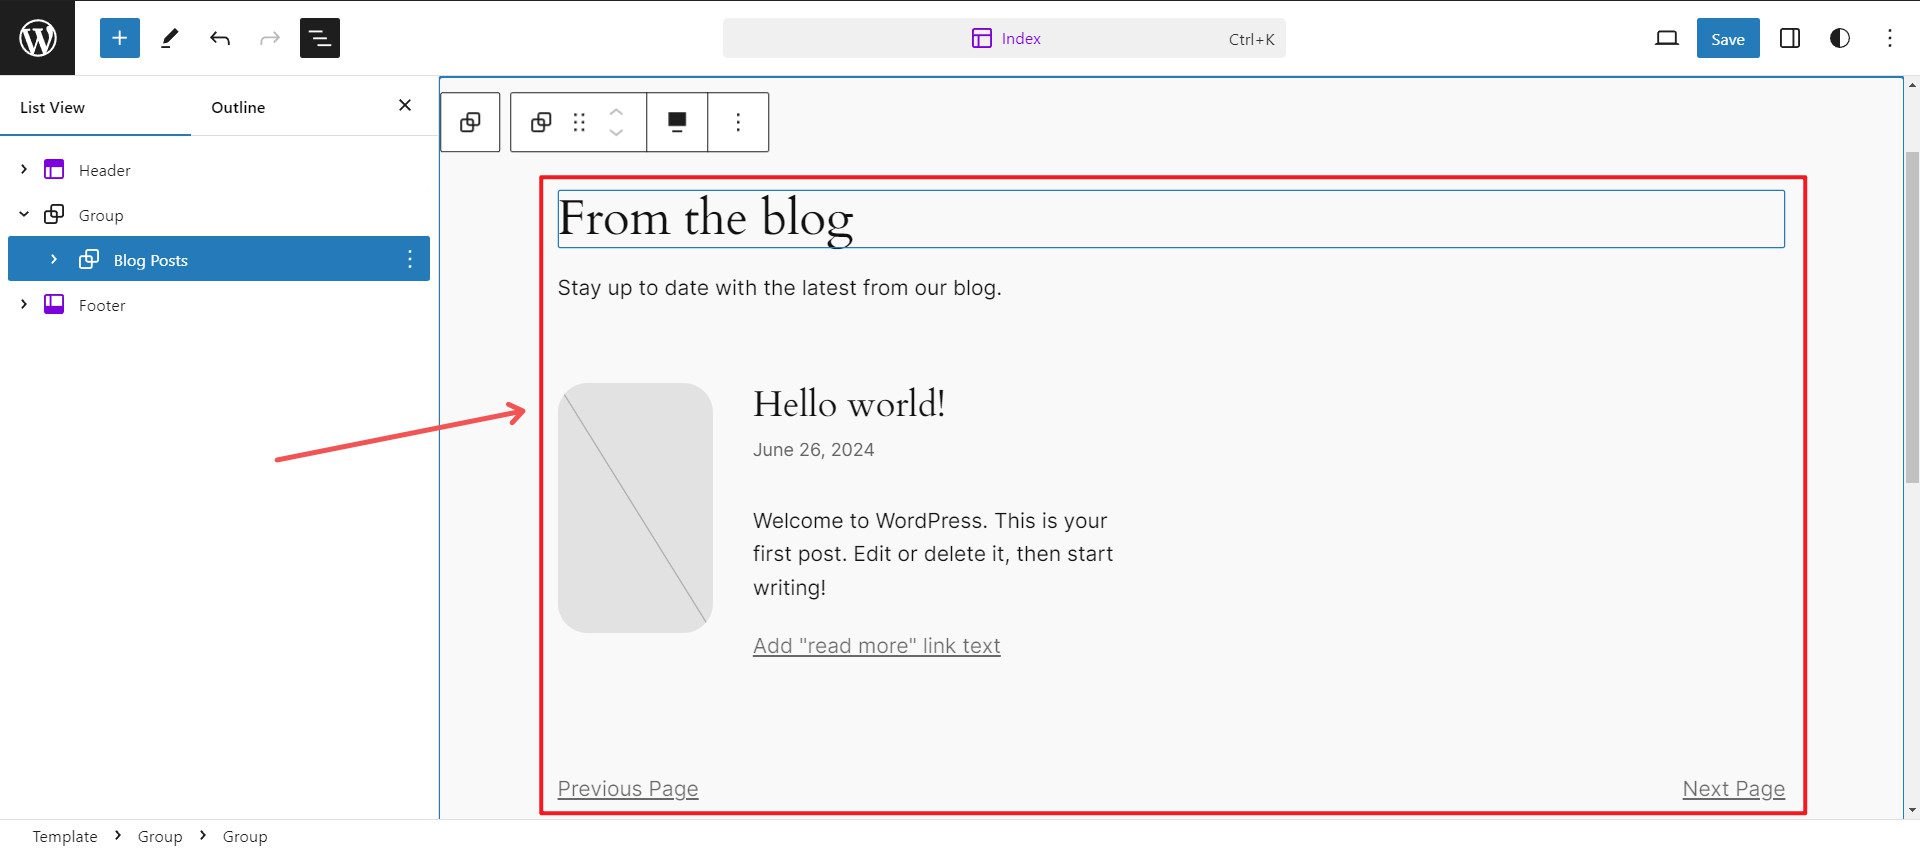
Find the page or template where you’d like to use the pattern. In this example, we want to delete a Posts section from our template and replace it with a pattern we like more.
Next, we need to paste the premade pattern into our copied pattern. Click into the editor where you want the pattern inserted, and press Ctrl + V to paste the pattern.
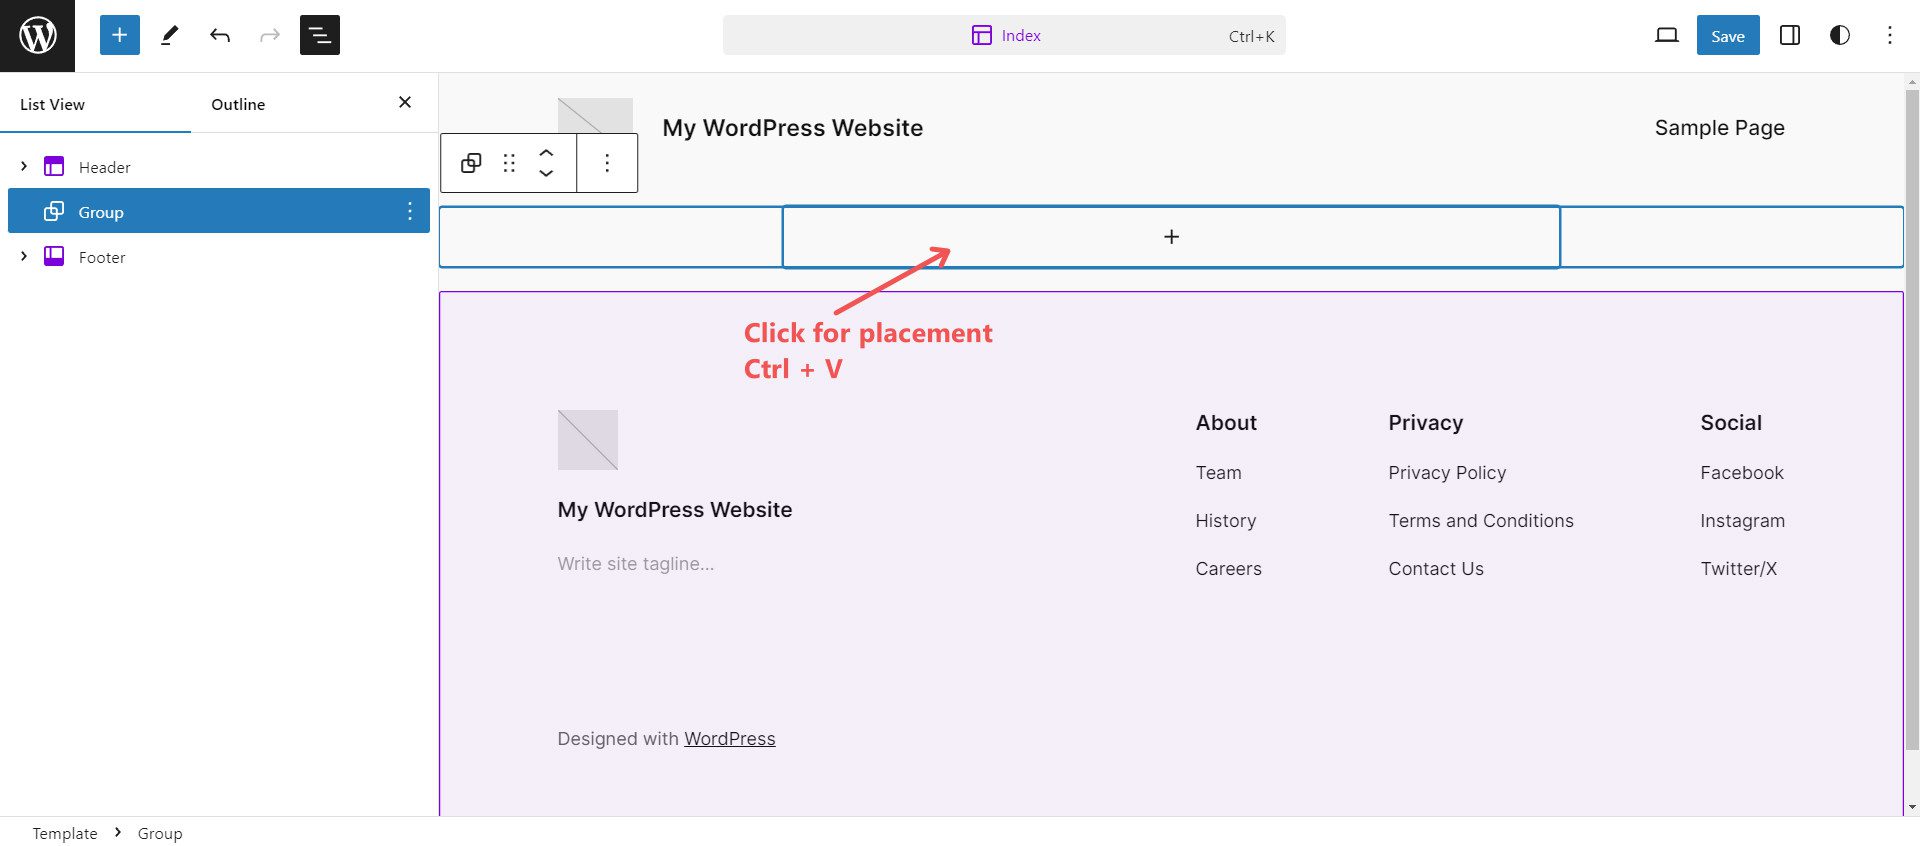
You should see the pattern immediately applied to the page and can now edit it with all the normal block settings found in the pattern.
Finding patterns that you like is a little harder than you’d expect. We’ll look at Divi, which offers hundreds of free template packs and a more consistent experience finding layouts. Plus, tons of third-party layout packs are available in the marketplace if you’re itching for more options.
Auto-Generating Pages, Templates, or an Entire Website with Divi
Before we show you how to load individual page templates onto a Page using Divi, we wanted to show you how Divi Quick Sites can build all your site’s pages and theme builder templates in 2 minutes. This is the fastest way to create an entire website because it builds several pages simultaneously. And if you are using Divi AI, it’ll even write page content for you, so you have a solid first draft of text to go along with a completely customized design for each page.
It’s really simple—Quick Sites uses starter sites or AI to create a whole website for you.
Step-by-Step Guide
Here’s how to select a starter site and get everything you need in the blink of an eye.
Step 1: Open Divi Quick Sites
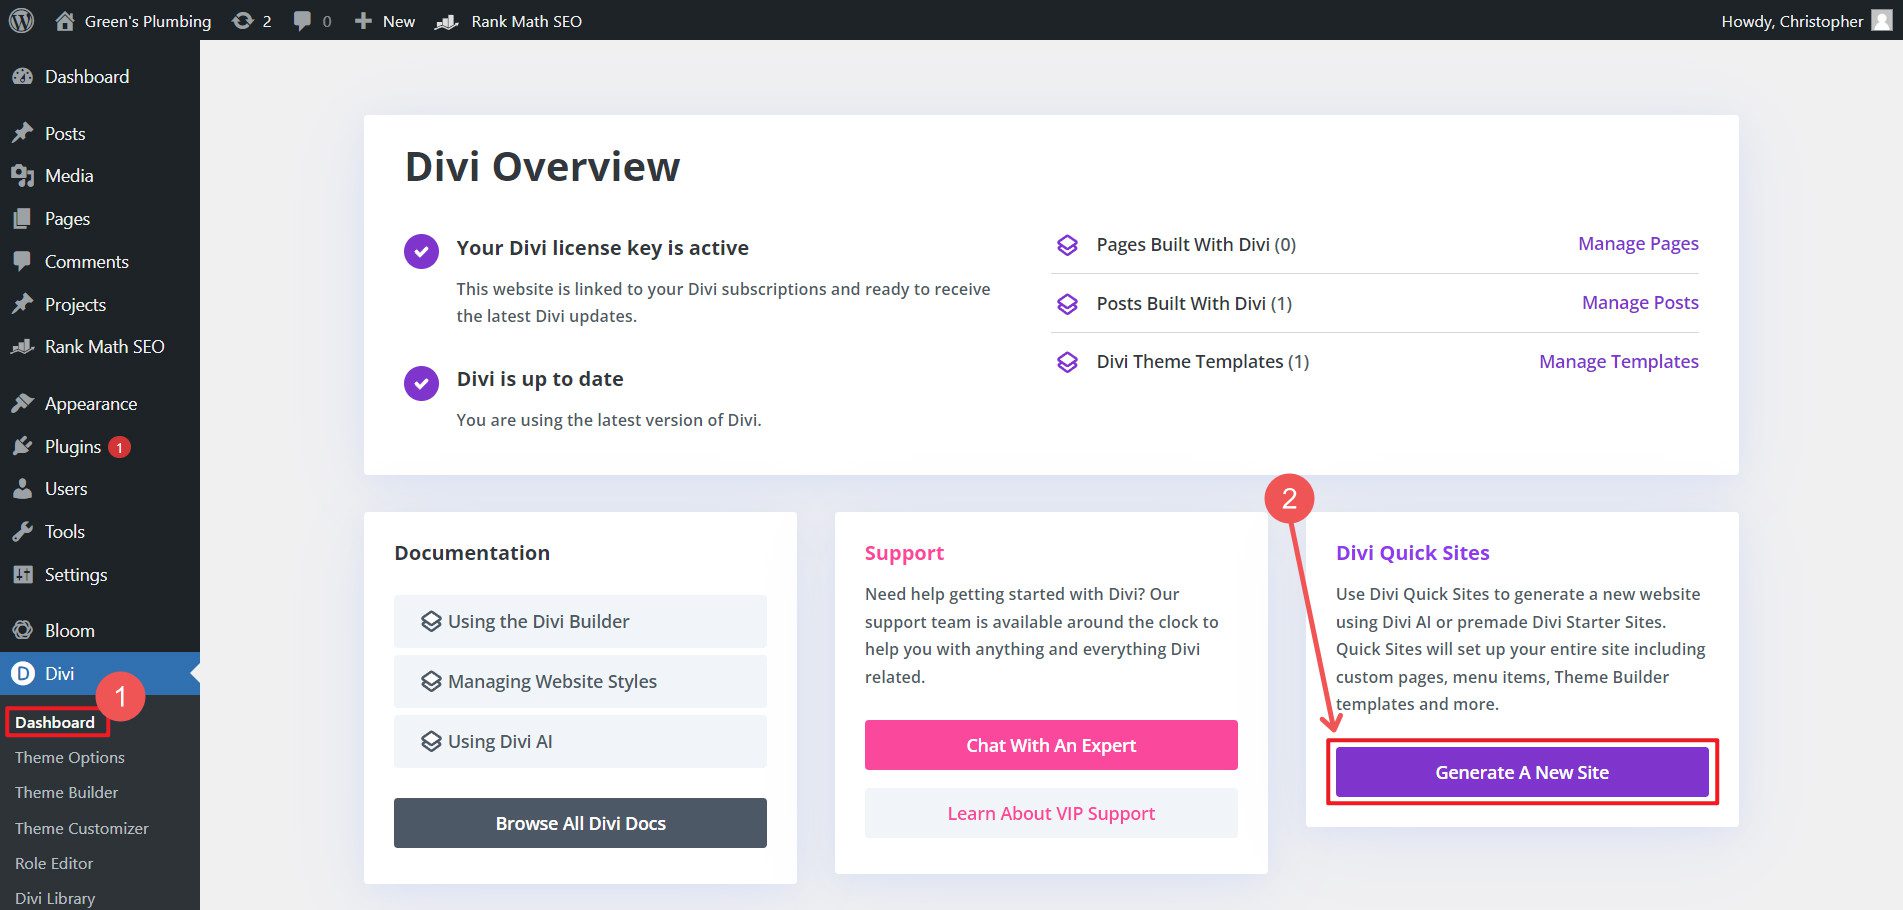
In the admin dashboard, hover over Divi and click “Dashboards.” Click “Generate A New Site” under Divi Quick Sites.
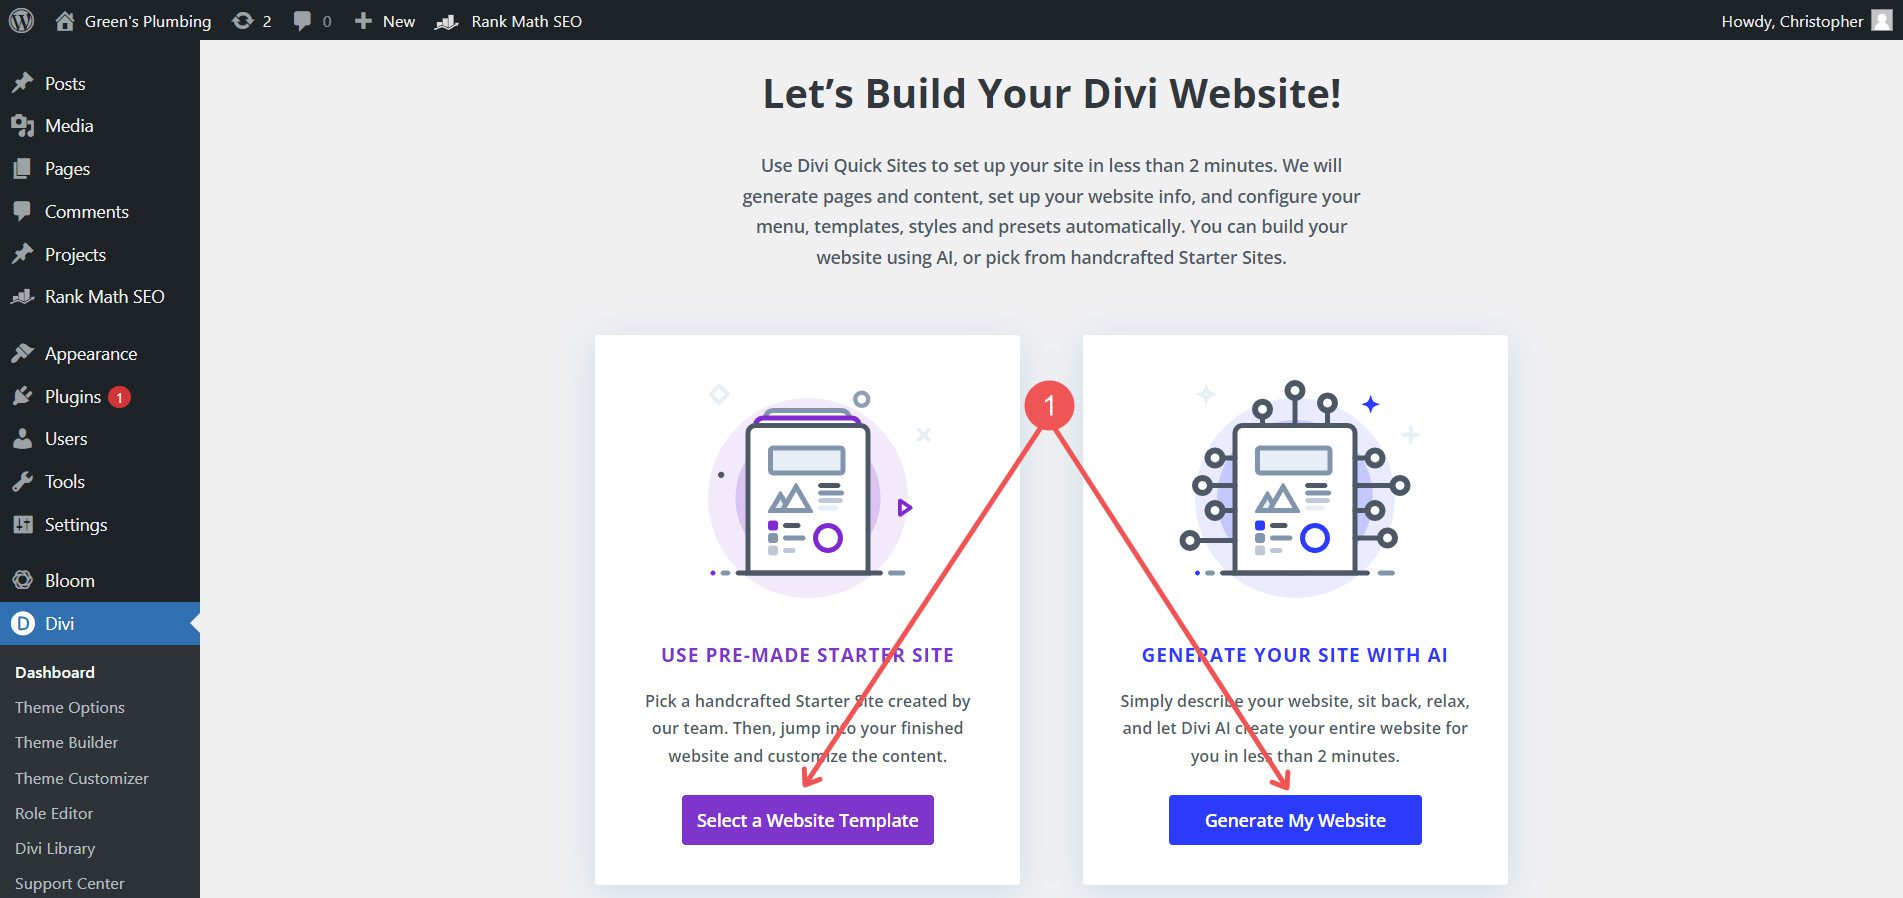
You’ll have two options: 1) Use Premade Starter Site or 2) Generate Your Site with AI. Starter sites are completely pre-designed websites. This includes predesigned Pages and Theme Builder templates. You can exclude certain pages you know you won’t need or have it create placeholders for additional pages you have in mind. Theme Builder templates cover your blog archive page, header, footer, and 404 pages.
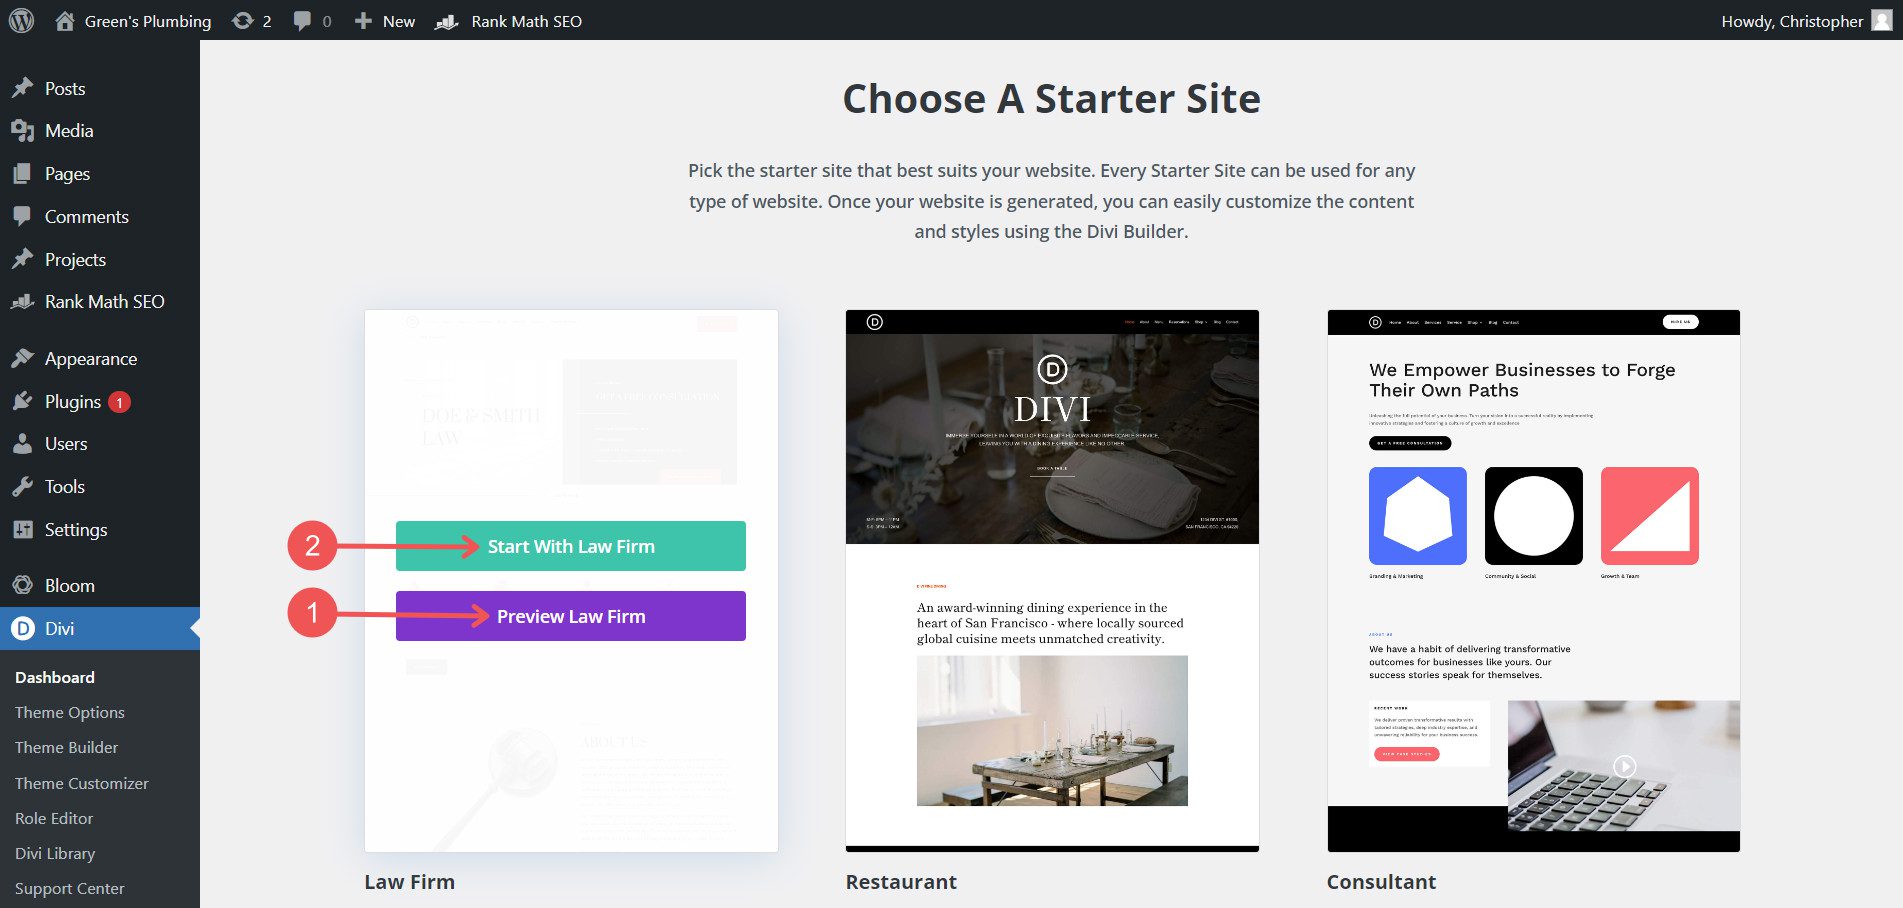
Step 2: Choose a Starter Site
There are several starter sites to choose from. You can preview any one of them, and when you’ve found what you need, click “Start” on the set you like.
Step 3: Add in Site Information
You’ll be asked for a few pieces of information that Divi will use throughout your site. Give it your Site Name, Site Slogan, and Logo. Also, state which pages you’d like to use on your site and include others that don’t have full builds (saves you from creating them later). If you select that you want a shop page, Divi will load WooCommerce for you. Since it is a dependency, you would have needed to install it yourself manully otherwise—this saves you the step.
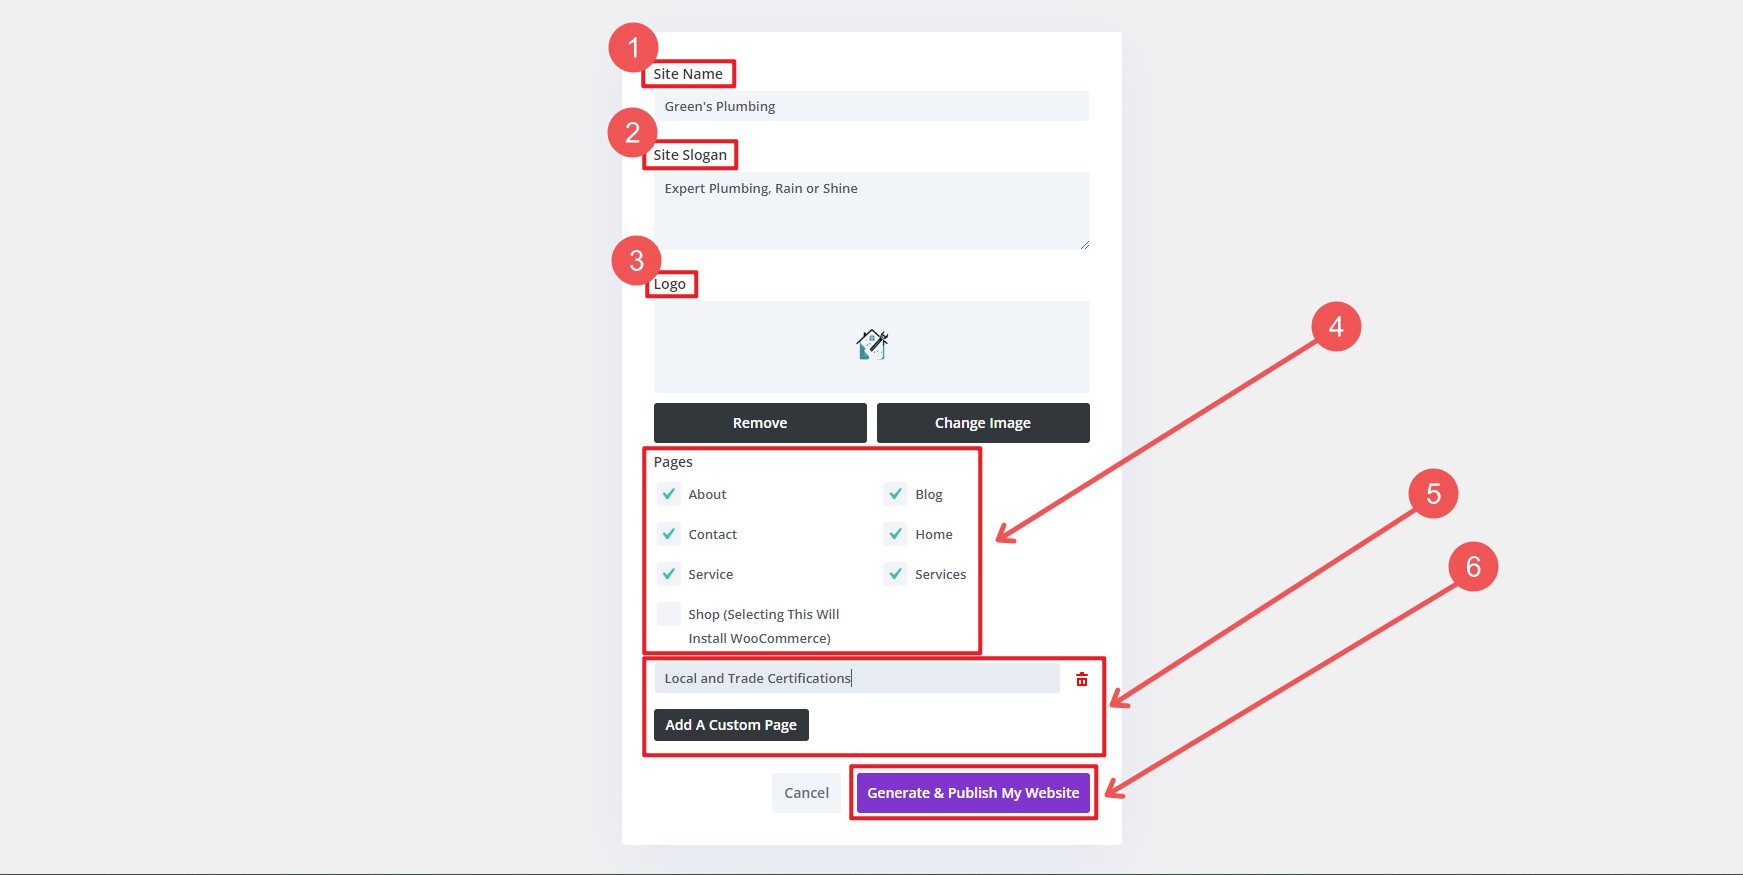
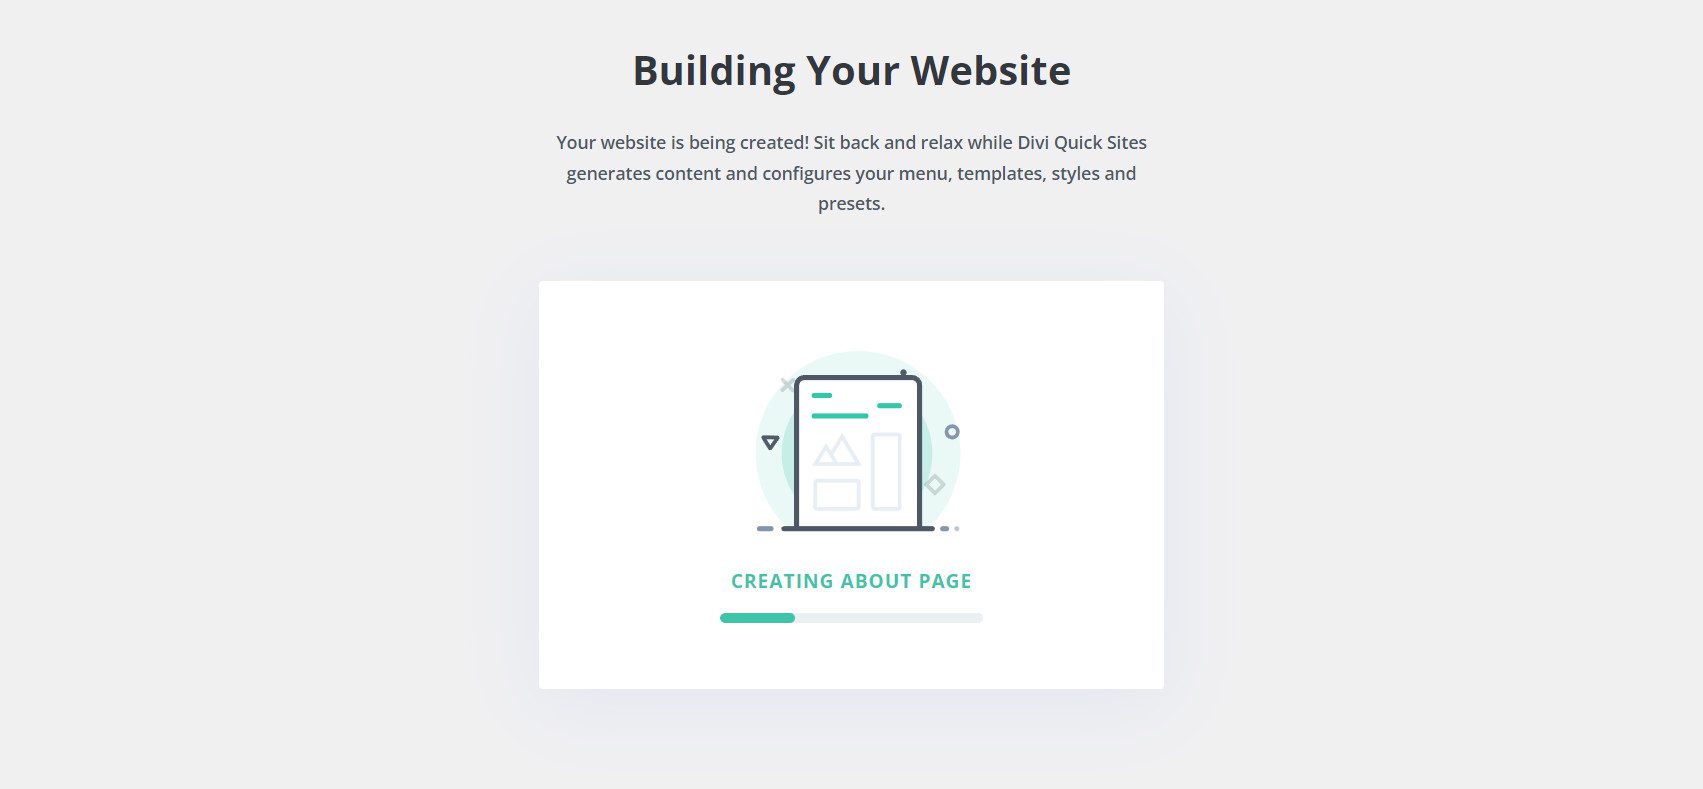
It’ll take just a little bit. But in the end, you will have many new pages created for you with premade designs—a perfect starting point.
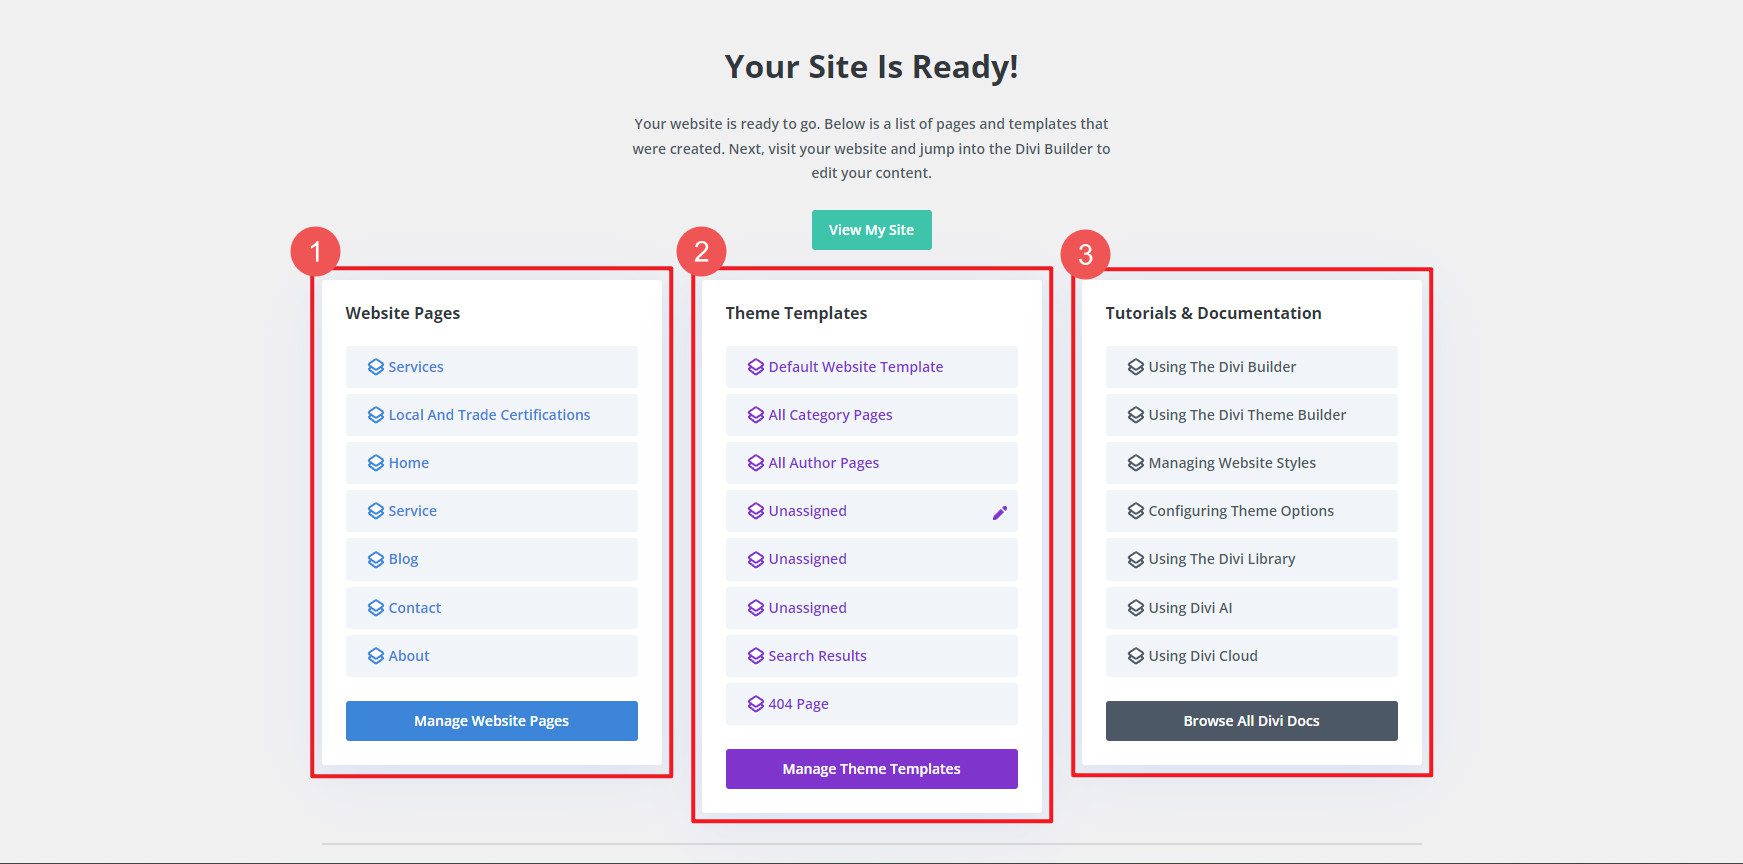
Once done, you’ll see a report of what was done for you. In this example, Divi Quick Sites created seven (7) pages and five (5) theme templates. What could have taken me a few hours, Divi Quick Site took only minutes.
The existing method of using Divi layouts from our free layout packs on individual pages is still an option. We’ll cover that next.
Building WordPress Pages with Divi’s Premade Layouts
Besides Divi’s Starter Sites and its AI website builder, Divi also offers a vast library of pre-built templates, called layouts, covering numerous industries. These layouts provide a quick starting point for professional-looking pages without designing from a blank screen. Here’s how to use Divi’s premade layouts for your new page.
Step-by-Step Guide
To build a new Page in WordPress with a premade Divi Layout, you need only a WordPress site with the Divi Theme installed.
Step 1: Accessing Divi Library
In your WordPress dashboard, navigate to Pages > Add New Page.
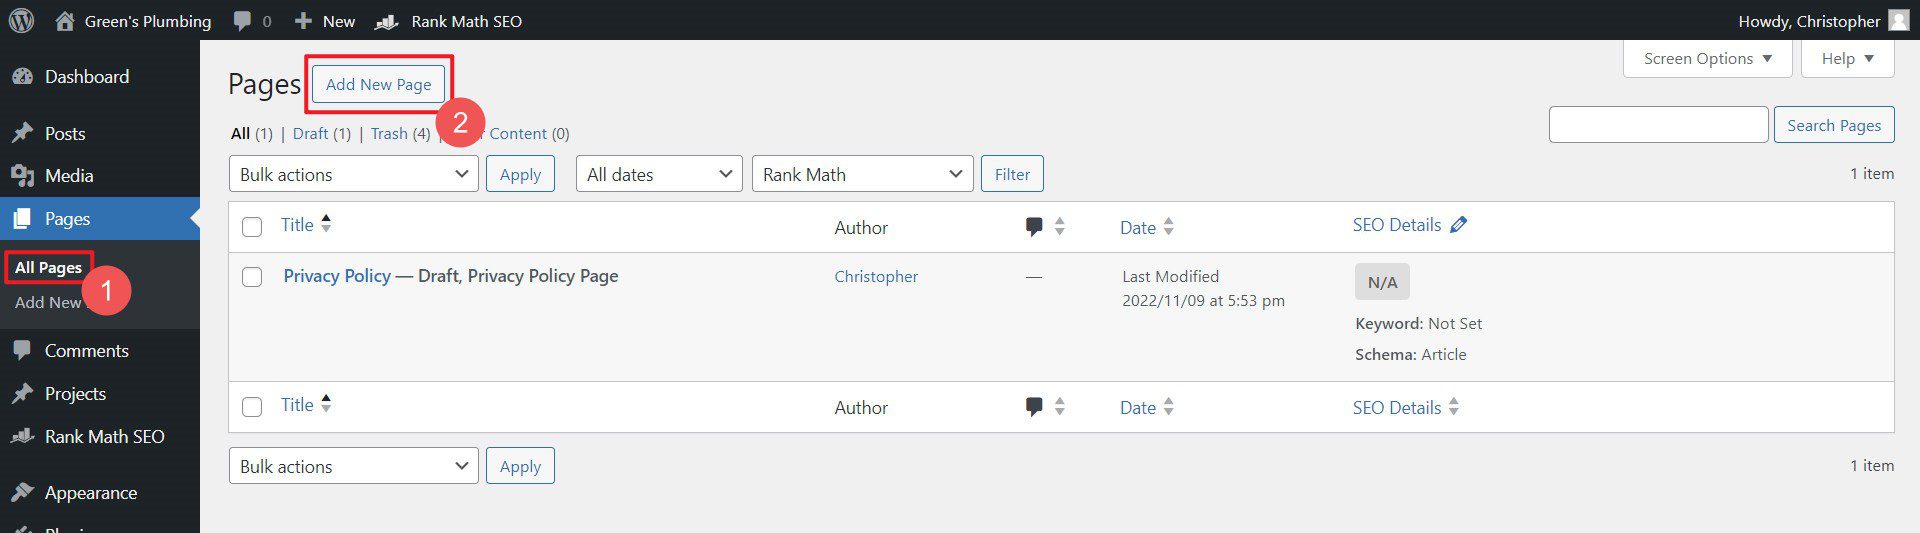
Here, you can create a new page, open it in the Divi Builder, and then elect to build the page from a layout.
Step 2: Applying a Template
In the Divi Builder, click Choose a Premade Layout.
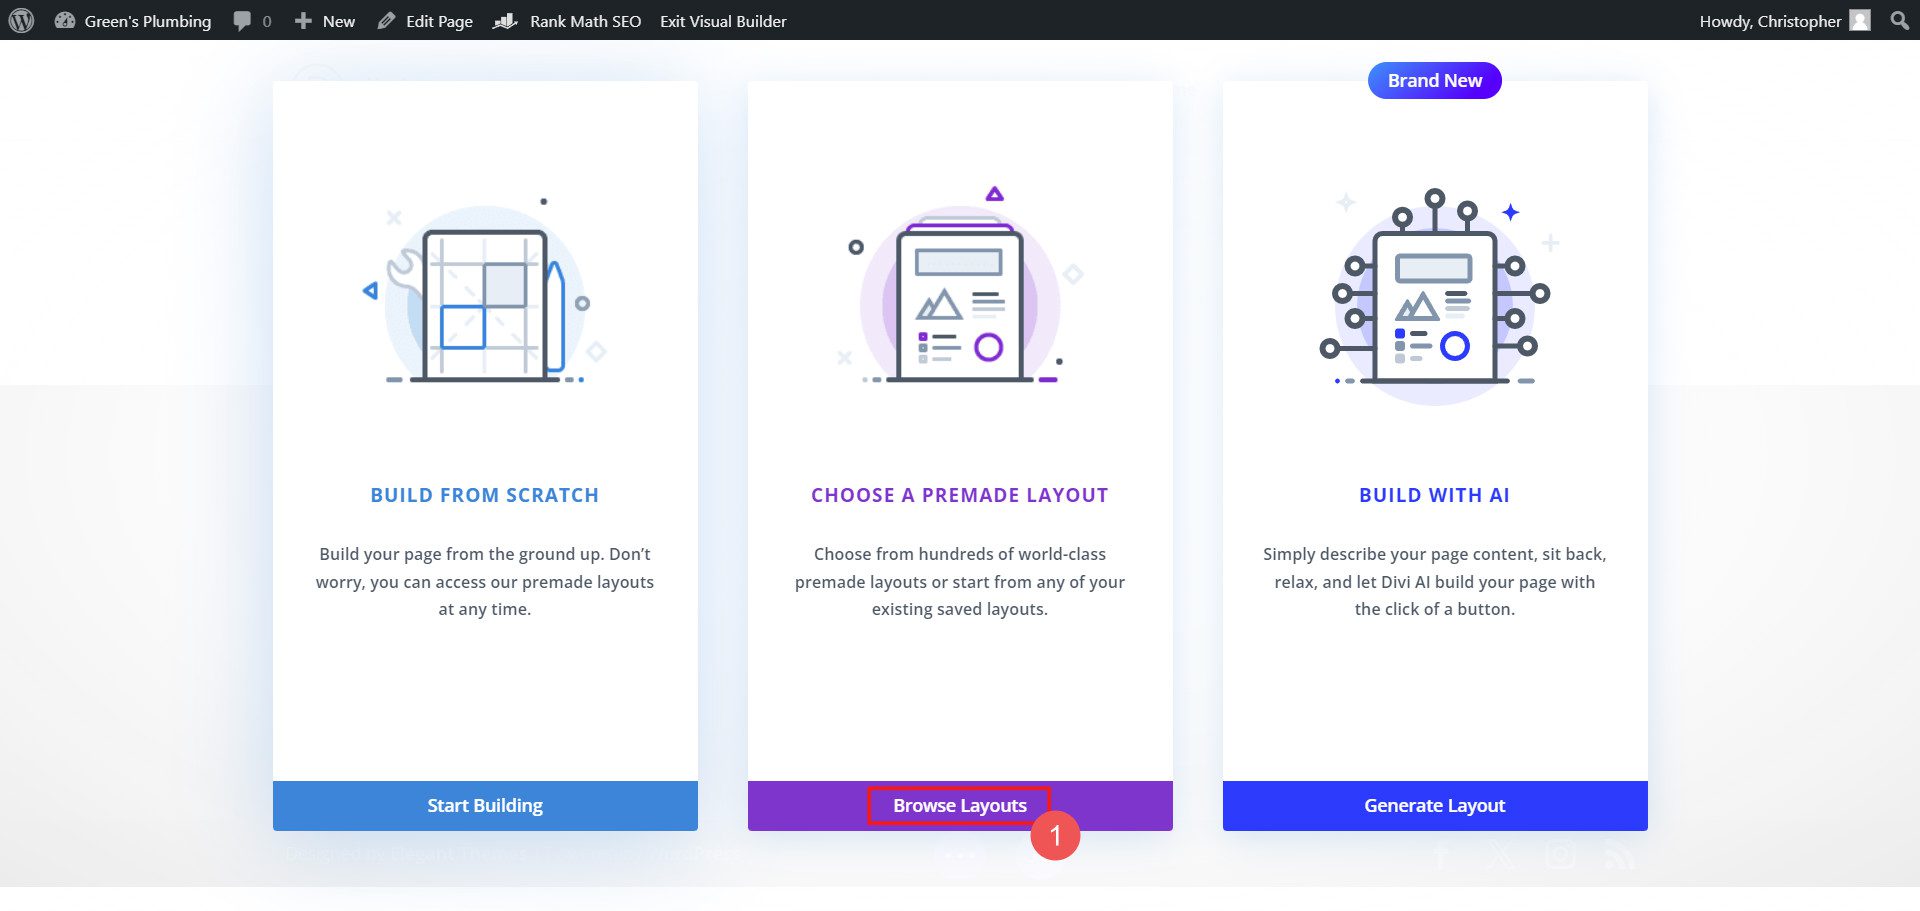
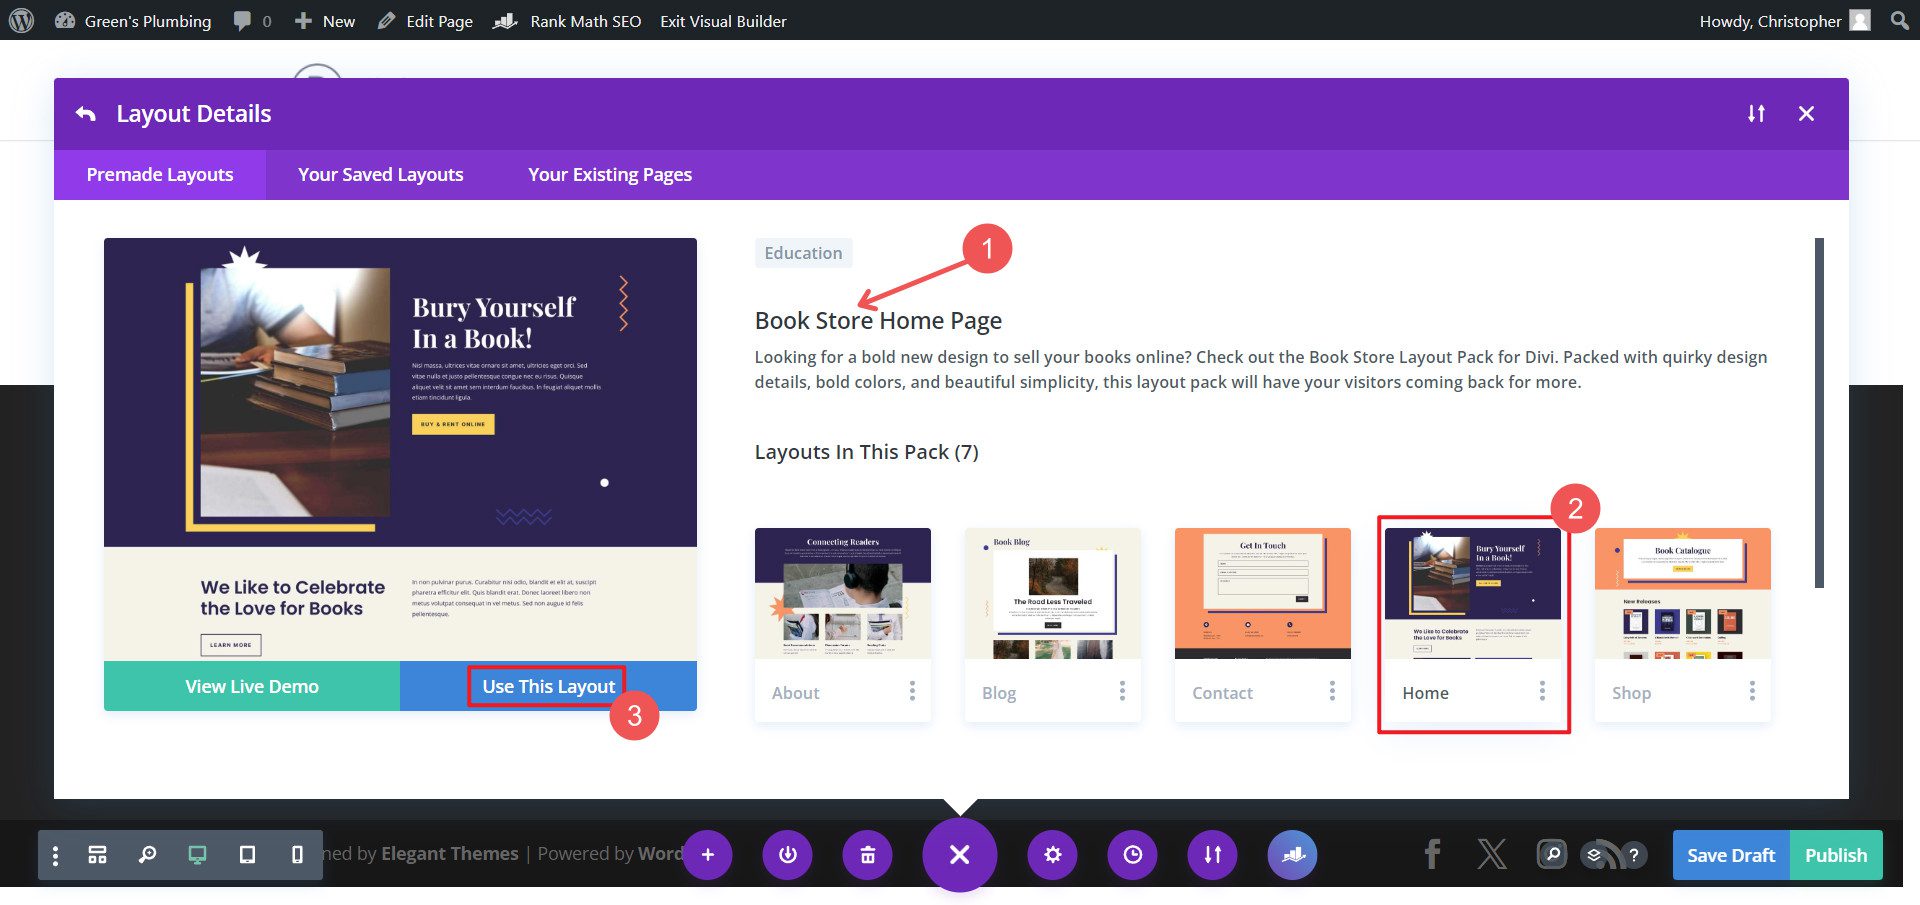
Browse the layout library or search for a specific layout pack. Choose a page from that pack and Use This Layout.
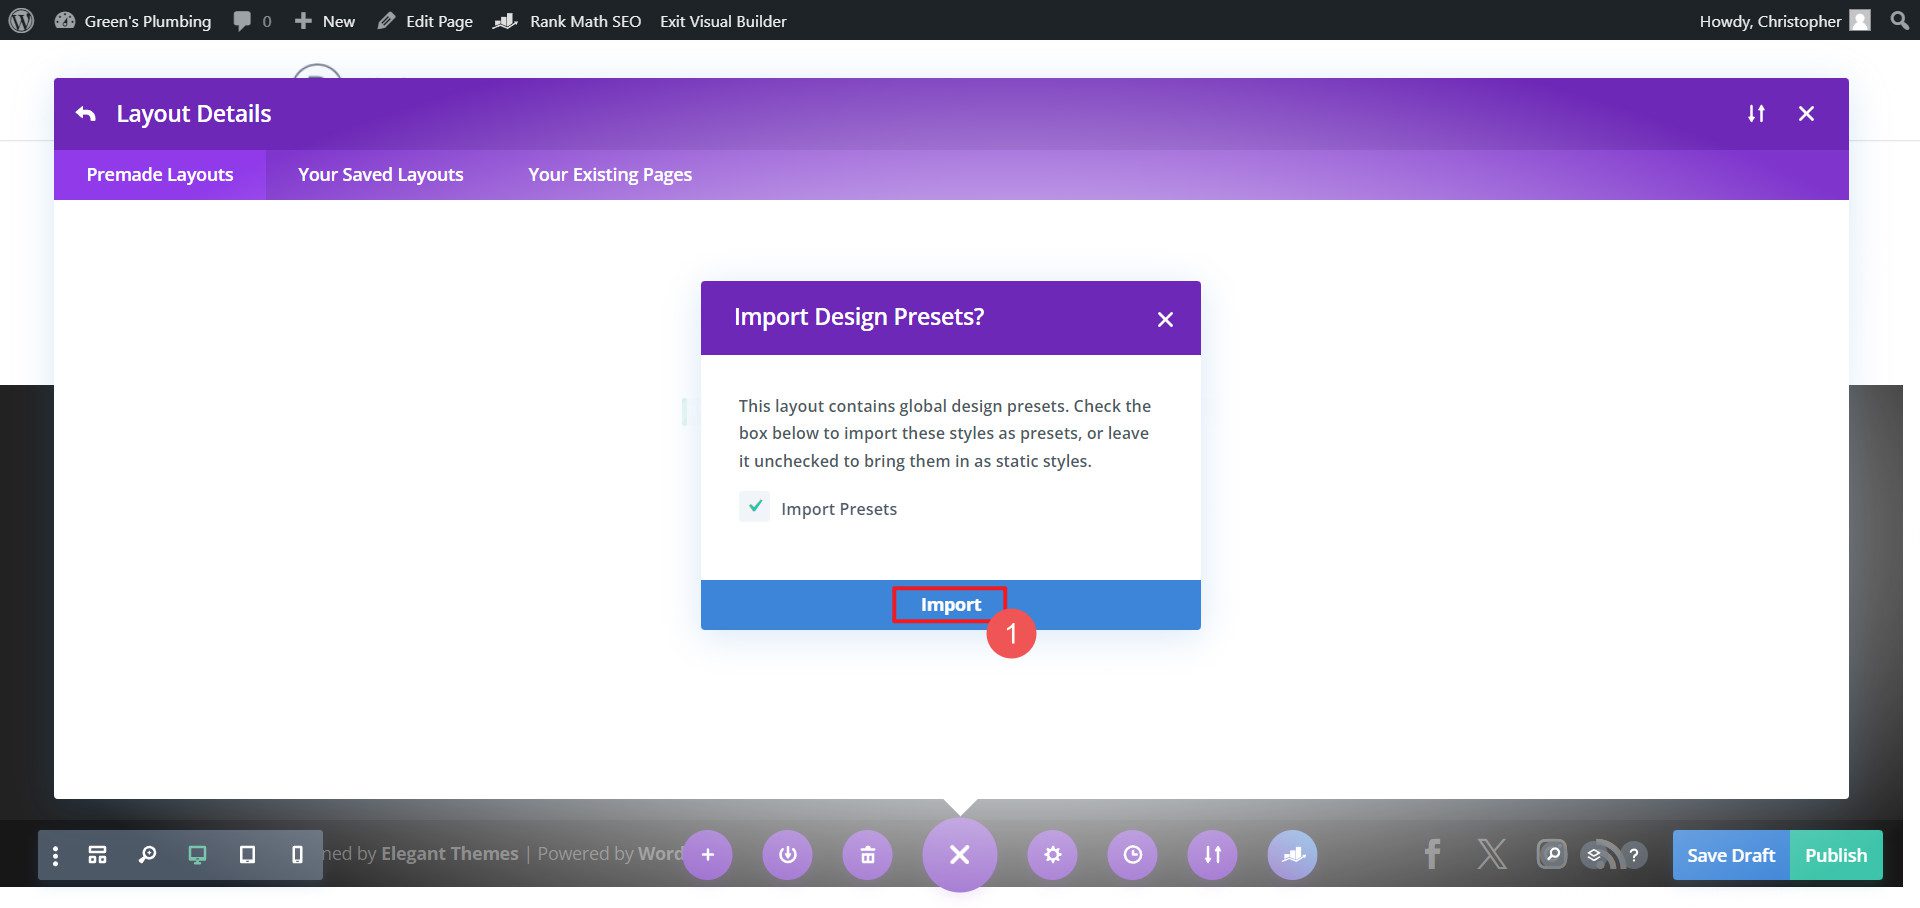
If you’re using other designs from this layout pack on other pages, you can choose to Import Presets to keep a consistent design. You can also edit these global presets to suit your needs (which is a good way to customize a template to your needs and branding).
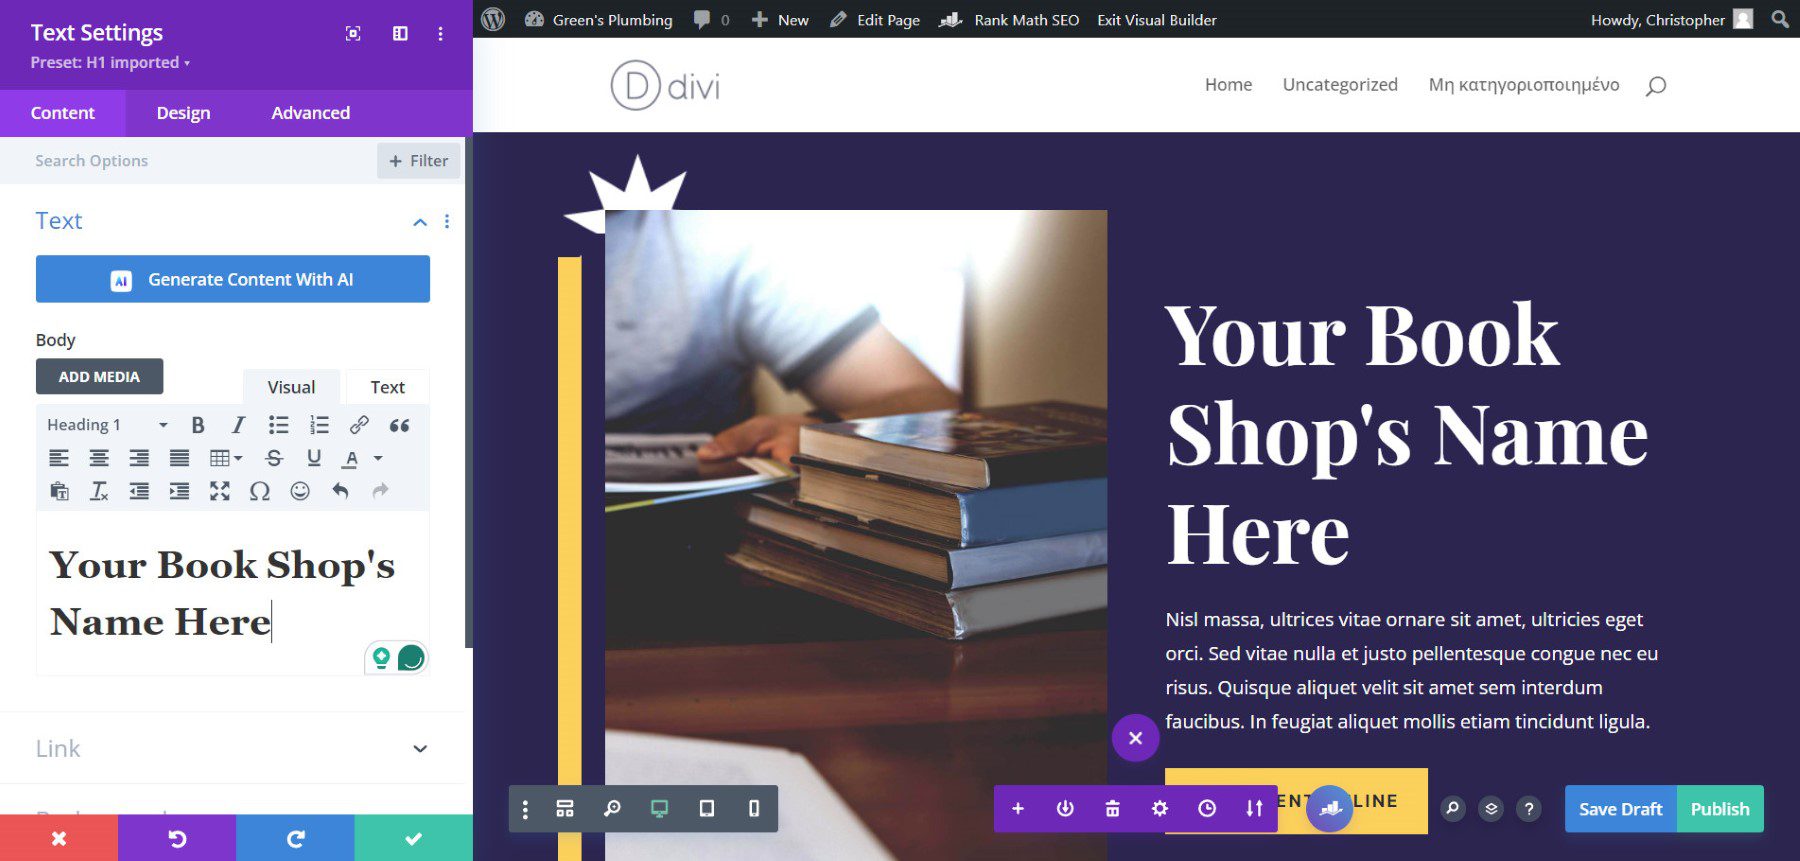
Step 4: Customizing the Template
- Click on any module to edit its content (text, images, etc.)
- Use the settings panel for each module to customize styles, colors, and fonts
- Add, remove, or rearrange sections and modules as needed
- Utilize Divi’s responsive controls to ensure the page looks good on all devices
Building Page Layouts with Divi AI
Of course, using Divi AI’s website builder is an easier way to create pages that perfectly match your brand. Not only can Divi AI generate an entire website with AI, it can also generate page layouts or even sections on the fly. Each page includes stunning design, usable text content, on-brand images (from AI or Unsplash), and other design elements. Plus, you can still make customizations to your AI generated content using Divi AI and countless design options in the Divi Builder. With this kind of customization, you never have to worry if someone else uses the same layout.
Try Divi Quick Sites to Create Pages in an Instant
New to WordPress? You’ll enjoy how simple it is to make entire websites with Divi. Divi Quick Sites constructs all your webpages and templates (including those for WooCommerce sites) using Starter Sites or custom AI builds (if you still have Divi AI credits or an active Divi AI subscription).
Everyone can try Divi AI for free to generate up to 4 AI websites (assuming credits haven’t been used on other Divi AI features). Get a Divi AI membership for unlimited section, text, image, code, layout, and now website generation.
The post How to Make a New Page with WordPress in 2024 (Simple Guide) appeared first on Elegant Themes Blog.
# A Step-by-Step Guide to Creating a New Page in WordPress in 2024
Creating a new page in WordPress is a fundamental skill for anyone looking to build a website, whether for personal use, a business, or a blog. WordPress, being one of the most popular content management systems (CMS) in the world, offers a user-friendly interface that allows you to create and manage pages with ease. This guide will walk you through the step-by-step process of creating a new page in WordPress in 2024.
## Step 1: Log into Your WordPress Dashboard
To get started, you need to log into your WordPress admin dashboard. You can do this by navigating to `yourwebsite.com/wp-admin` and entering your username and password. Once logged in, you will be taken to the dashboard, which is the control center for your WordPress site.
## Step 2: Navigate to the Pages Section
On the left-hand side of the dashboard, you will see a menu. Look for the “Pages” option. Click on it to expand the menu. You will see two options: “All Pages” and “Add New.” Click on “Add New” to start creating your new page.
## Step 3: Choose a Title for Your Page
Once you are on the “Add New Page” screen, the first thing you will see is a field to enter the title of your page. Choose a descriptive and relevant title that reflects the content of the page. This title will also be used as the page’s URL slug, so keep it concise and SEO-friendly.
## Step 4: Add Content to Your Page
Below the title field, you will find the content editor. WordPress uses a block editor called Gutenberg, which allows you to add various types of content blocks. Here’s how to add content:
1. **Text Block**: Click the “+” icon to add a new block, then select “Paragraph” to add text.
2. **Headings**: Use the “Heading” block to create headings and subheadings for better organization.
3. **Images**: To add images, select the “Image” block and upload your image or choose one from the media library.
4. **Other Media**: You can also add videos, galleries, buttons, and more by selecting the appropriate block type.
Take advantage of the formatting options available in the block editor to make your content visually appealing.
## Step 5: Customize Your Page Settings
On the right-hand side of the editor, you will find the “Document” settings panel. Here, you can customize various aspects of your page:
– **Permalink**: Edit the URL slug if necessary to make it more SEO-friendly.
– **Featured Image**: Set a featured image that represents your page visually.
– **Page Attributes**: Choose a parent page if you want to create a hierarchy, and select a template if your theme offers multiple page layouts.
– **Discussion**: Control comments settings by allowing or disallowing comments on this page.
## Step 6: Preview Your Page
Before publishing, it’s a good idea to preview how your page will look. Click the “Preview” button located at the top right of the editor. This will open a new tab showing your page as it will appear to visitors. Review the layout, content, and any media you’ve added to ensure everything looks good.
## Step 7: Publish Your Page
Once you are satisfied with your page, it’s time to publish it. Click the “Publish” button, and a confirmation dialog will appear. Click “Publish” again to confirm. Your page is now live and accessible to visitors!
## Step 8: Add Your Page to the Menu (Optional)
If you want your new page to be easily accessible, consider adding it to your site’s navigation menu. To do this:
1. Go to “Appearance” in the left-hand menu and select “Menus.”
2. Choose the menu you want to edit (if you have multiple menus).
3. Find your newly created page in the list of pages and check the box next to it.
4. Click “Add to Menu,” then drag and drop it to your desired position in the menu.
5. Click “Save Menu” to apply the changes.
## Conclusion
Creating a new page in WordPress is a straightforward process that can significantly enhance your website’s content and user experience. By following these steps, you can easily add new pages, customize them to fit your needs, and ensure they are accessible to your visitors. As you continue to build your website, remember to keep your content fresh and engaging to attract and retain your audience. Happy publishing!


Recent Comments