
Option Group Presets in Divi 5 simplify managing styles, offering a more efficient and scalable design approach. You no longer need to apply the same styles to multiple elements. With Option Group Presets, you can create and apply Option Group Presets — such as borders, shadows, and spacing — across multiple elements, mix and match them, and easily make global updates.
In this post, we’ll dive deeper into how Option Group Presets change the way you design in Divi 5, explore the benefits of this new approach, and show you how to use it. If you’re looking to streamline your workflow and build more maintainable design systems, this is a game-changer you won’t want to miss.
Check out the following video to see the new feature in action. 👇
Understanding The Basics Of Option Group Presets
Before we dive into the implementation of Option Group Presets, let’s discuss some basics to help you better understand this new advanced feature.
Option Group Presets Explained
Option Group Presets in Divi 5 allow users to create reusable design styles that can be applied to multiple elements across a website. Unlike Element Presets (which have been around in Divi for a while), these presets work across all elements, enabling consistent styling for backgrounds, borders, typography, and more.
They can be layered, combined, and updated globally, making maintaining a cohesive design system easier while reducing repetitive styling work.
Even More Global Control
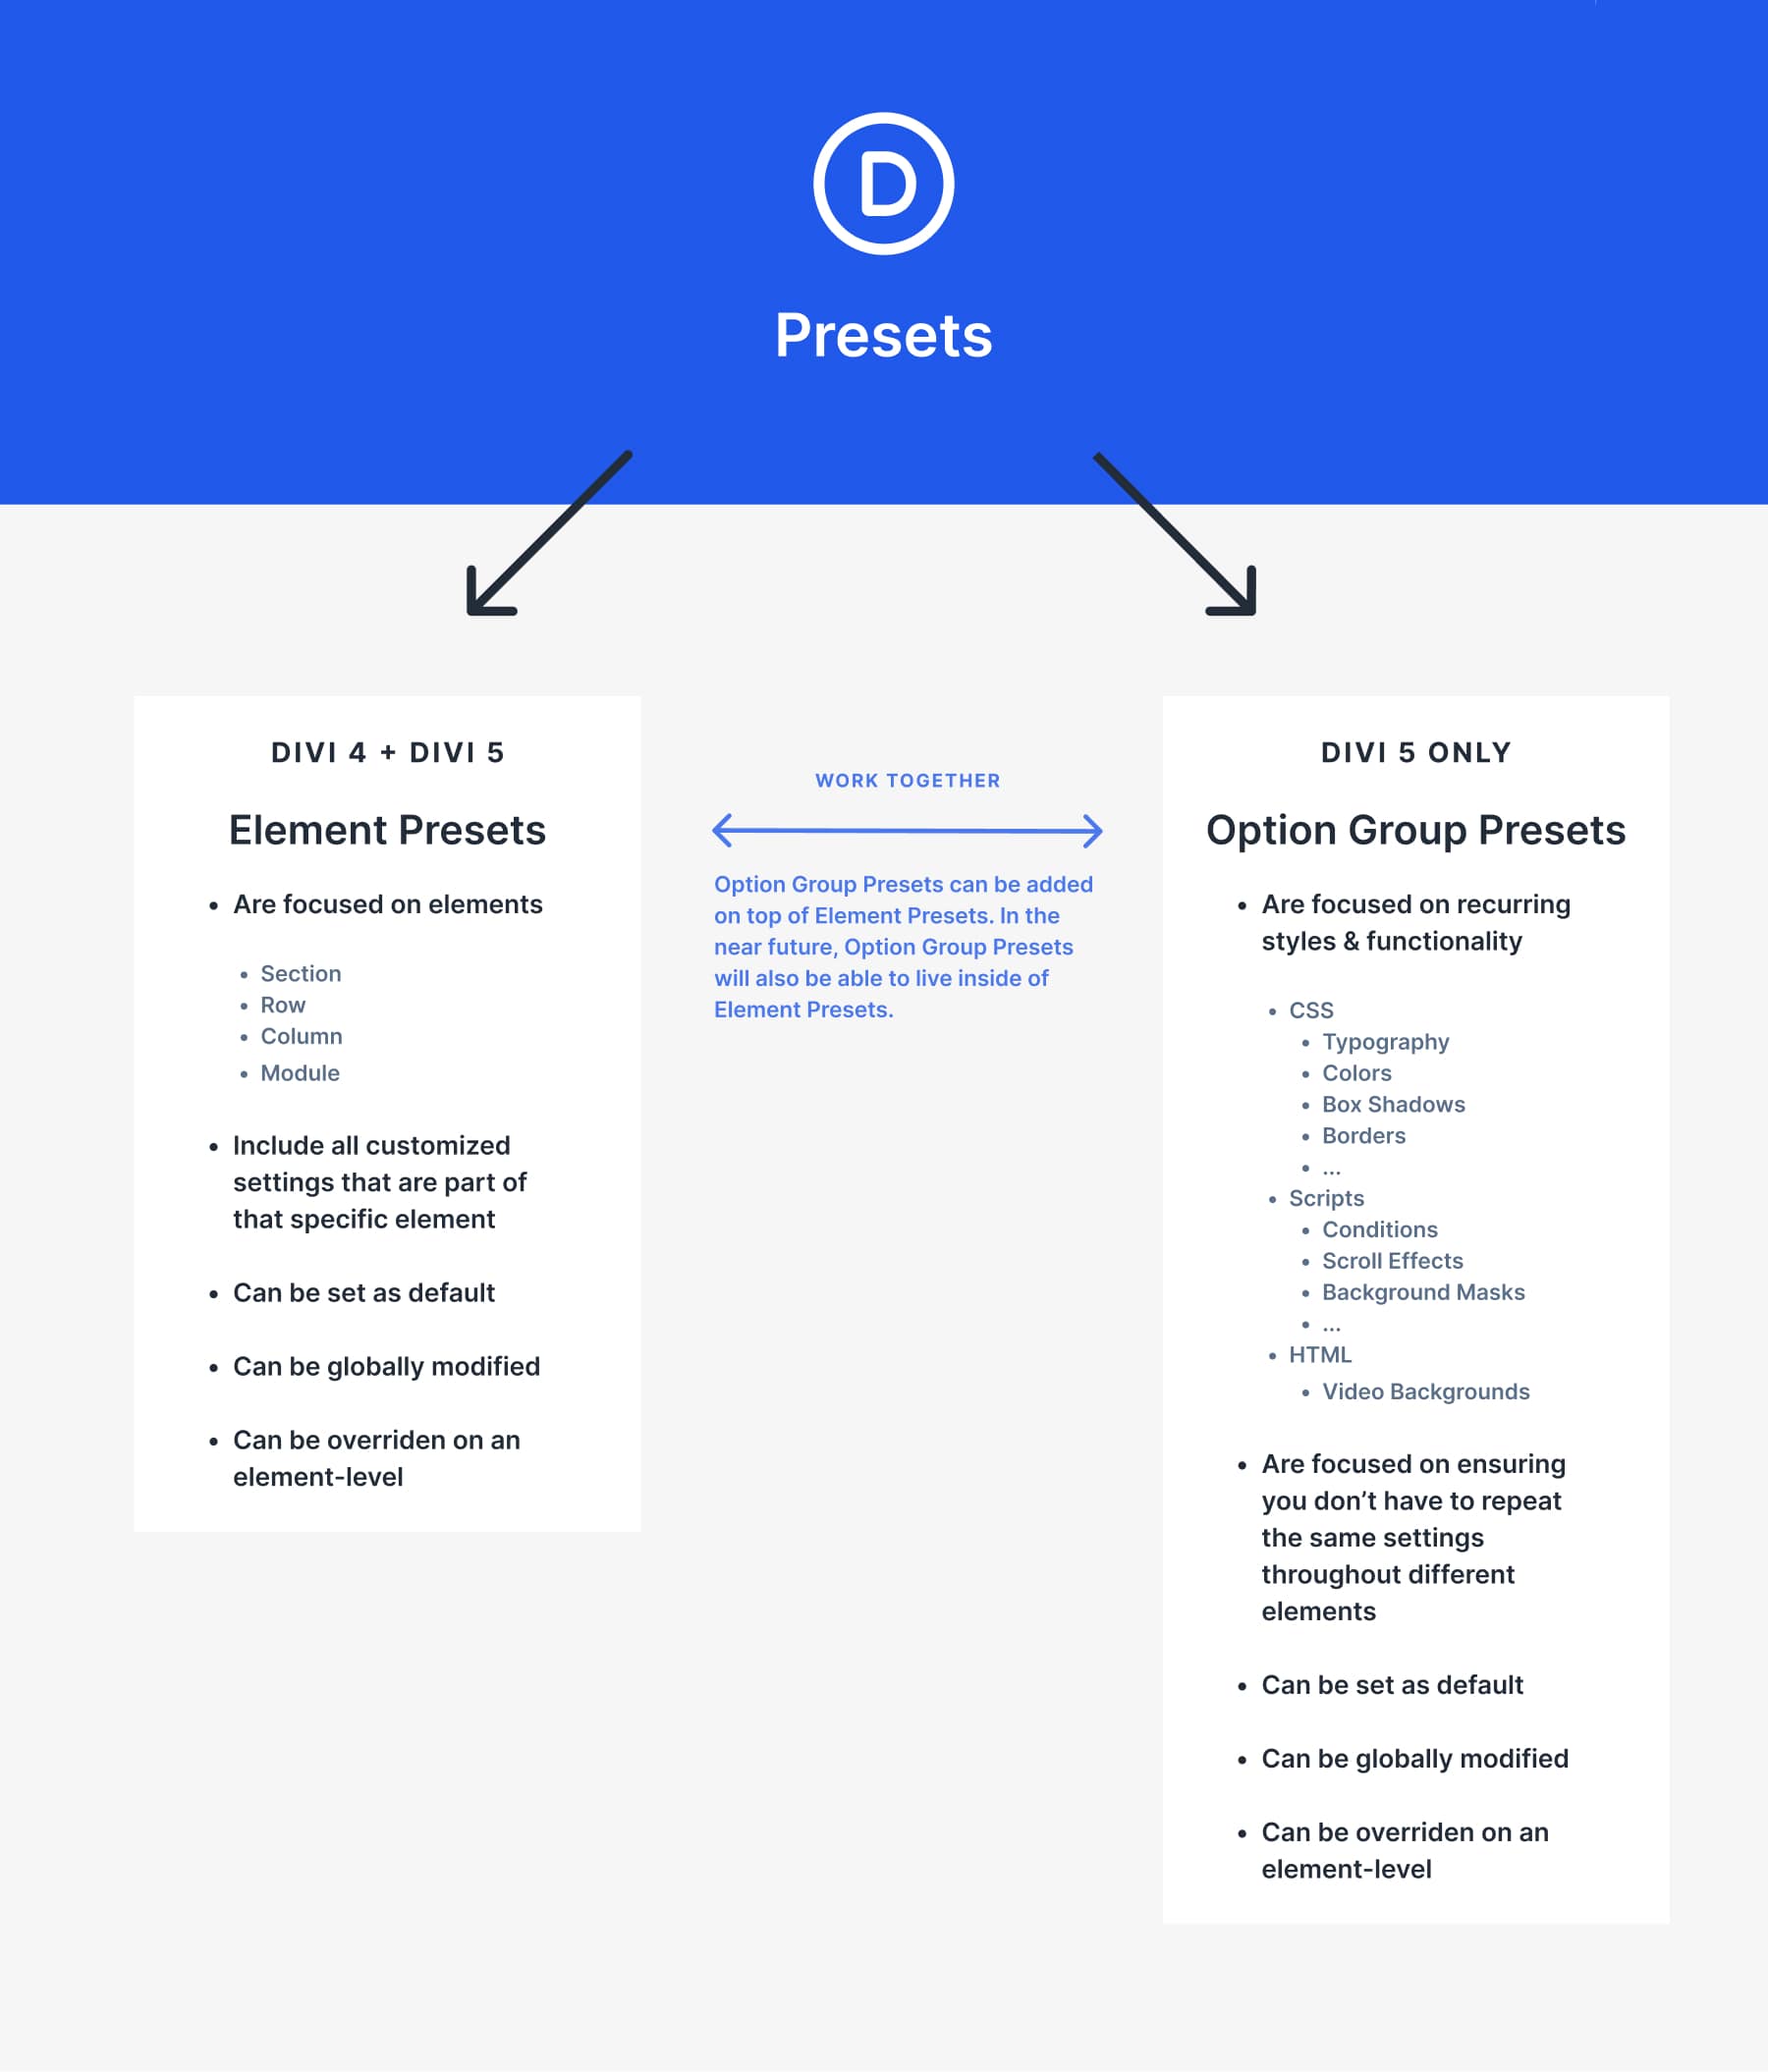
Before Option Group Presets, styling elements in Divi required either manual adjustments or applying an Element Preset that controlled all design settings for a specific element (section, row, column, module). While Element Presets are still crucial and help maintain consistency, they mainly focus on the entire element instead of the style itself. And that style can be applied to any element. You don’t need to repeat the style in each element anymore since you can retract it from one specific source.
With Option Group Presets, Element Presets become even more efficient. They can be combined to produce the most effective result.
When Should You Create Option Group Presets?
There are different ways to implement Option Group Presets, but generally, the quicker you create them, the better. Starting early with Option Group Presets in your website build helps you save time when making edits.
Soon, Option Group Presets will be able to live inside element presets as well, so it’ll feel natural to create them before you build your Element Presets. Now, let’s say you’re building a brand new website from scratch; the way you will be able to approach this build is as follows:
- Design your first page
- Turn styles into Option Group Presets
- Include Option Group Presets inside your Element Presets
This process isn’t linear, and you’ll most likely find yourself going back and forth between Option Group Presets and Element Presets until you’re happy with your first page draft.
Styles You Can Use Option Group Presets For
Any style with an Option Group Preset icon in the top right corner can be turned into one.
Option Group Presets can be created from and applied to various design settings, including typography, colors, backgrounds, borders, spacing, shadows, effects, sizing, layout, positioning, and animations. These presets enable designers to create a structured and reusable design system without requiring repeated manual adjustments.
One of the great things about Divi’s Option Group Presets, which sets it strongly apart from competitors, is that it isn’t only focused on CSS. It also includes effects built using scripts. You can notice this in the more interactive features that Divi provides, such as condition options, HTML background videos, scroll effects, and more.
Any design instance that you’ll use more than once is worth turning into a preset. This will make updating your design easier.
How To Implement Option Group Presets
Now that we’ve talked about the basics, let’s focus on the implementation of Option Group Presets. To keep everything as simple and straightforward as possible, we’re going to focus on creating a simple Border Preset. The way you’d approach creating any other presets is the same as this use case.
Example: Creating A Border Preset
Creating an Option Group Preset is very straightforward; let’s go through the process of creating a border preset step by step. We’re using the homepage layout that comes with the Design Portfolio Layout Pack, but feel free to use any other layout of your choice.
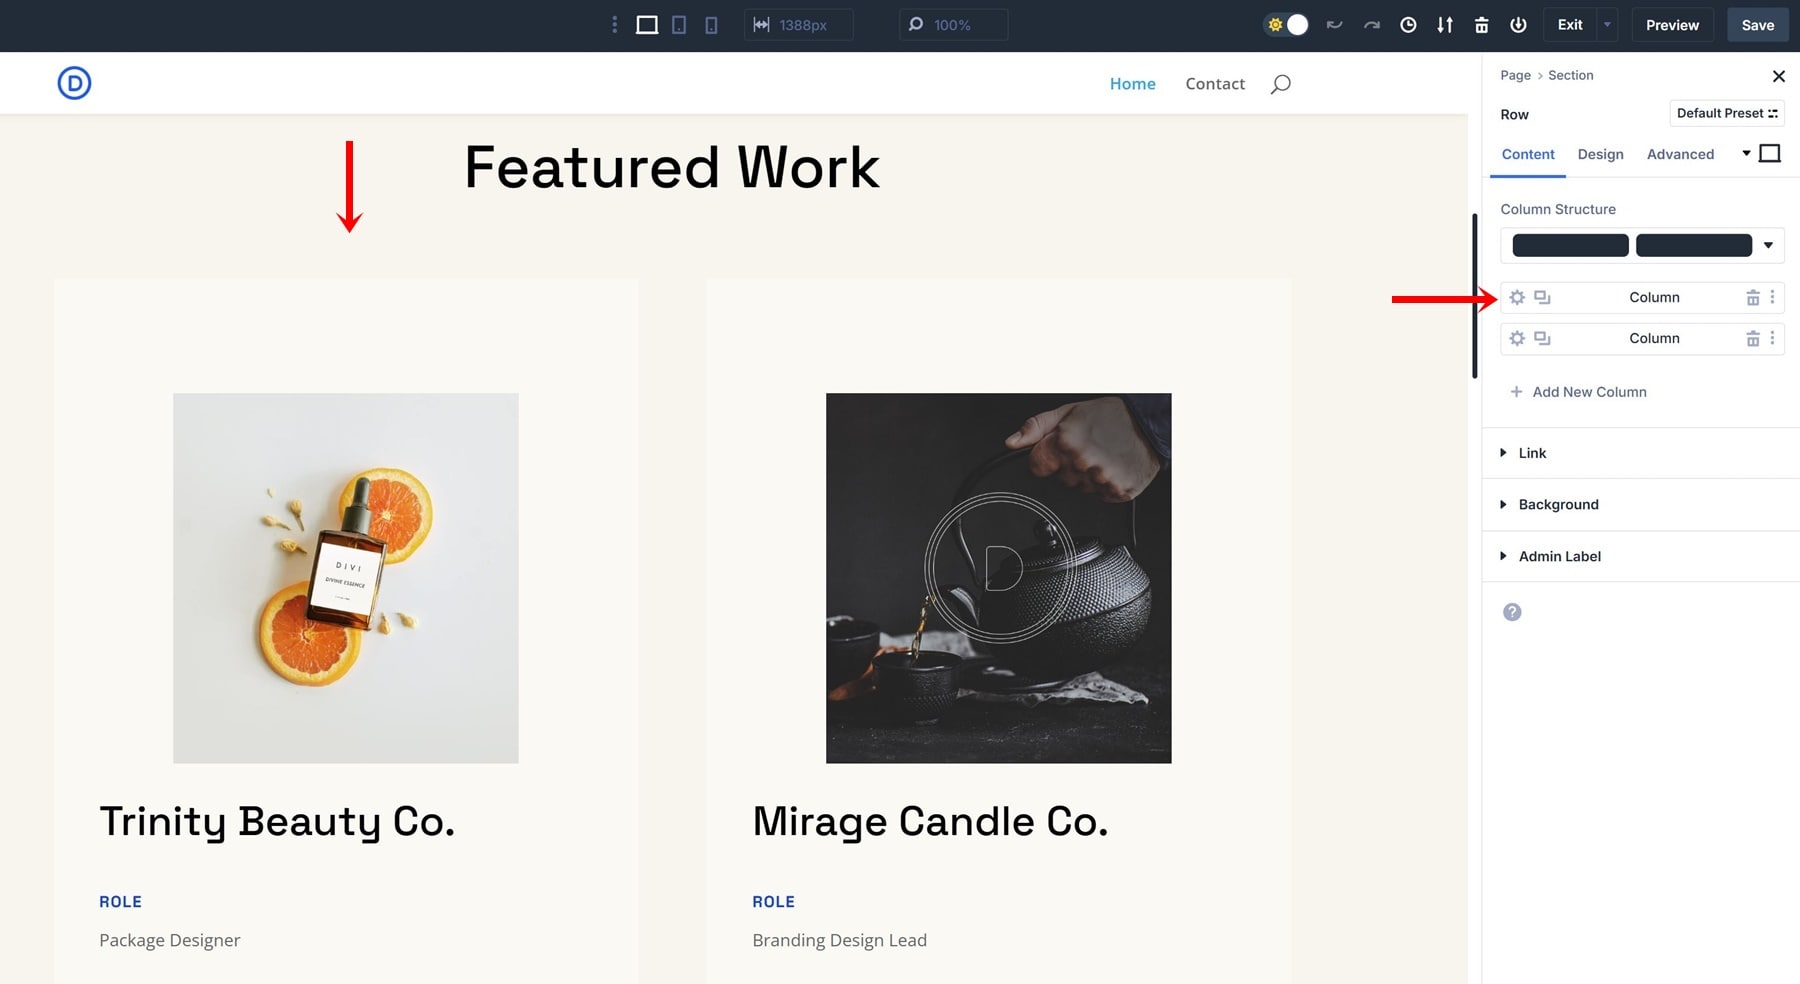
Step 1: Open An Element’s Settings (Column Settings)
In the Divi Builder, select any module you want to style (e.g., a column).
Step 2: Navigate to the Design Tab
Inside the module settings, click on the Design tab. Scroll down and find the Border section.
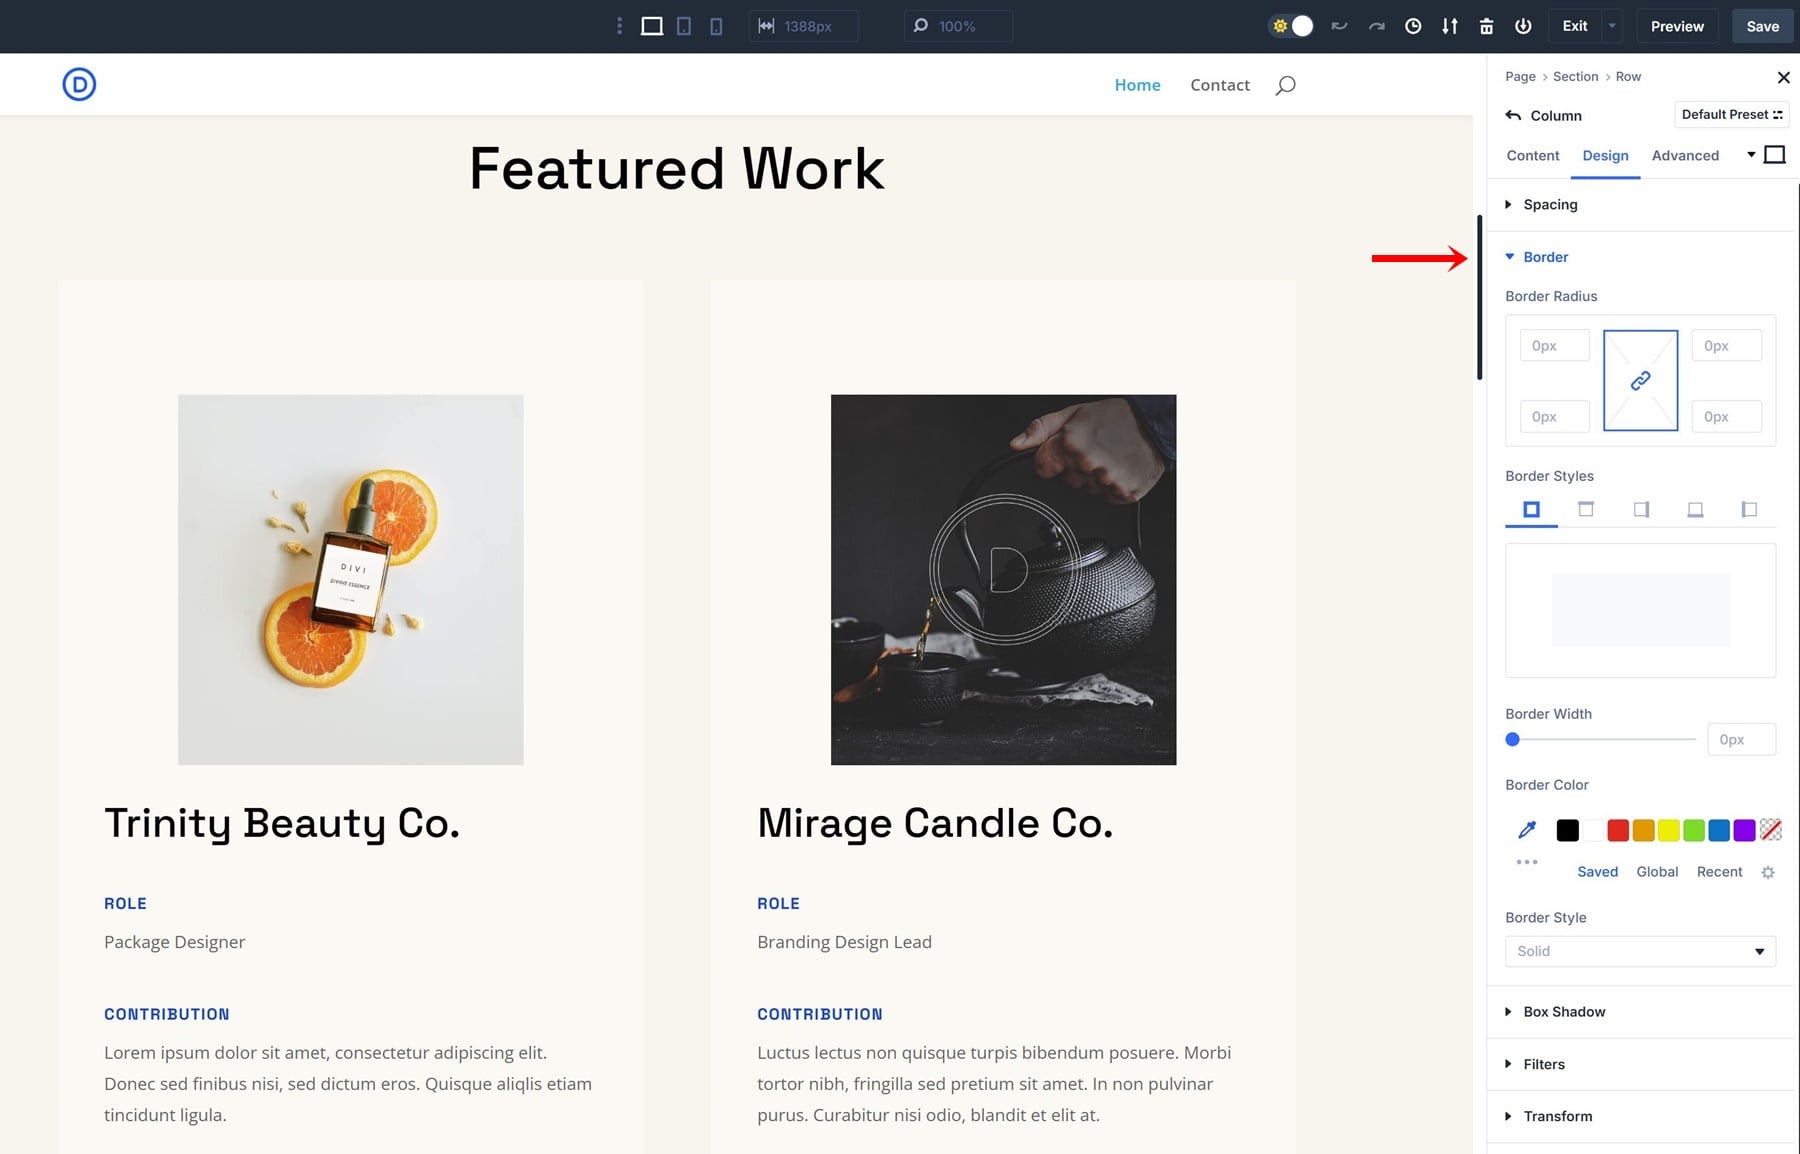
Step 3: Add A Border
Choose a Border style from the available options. To keep things simple, the only thing we’ll do is add a 1px border in black.
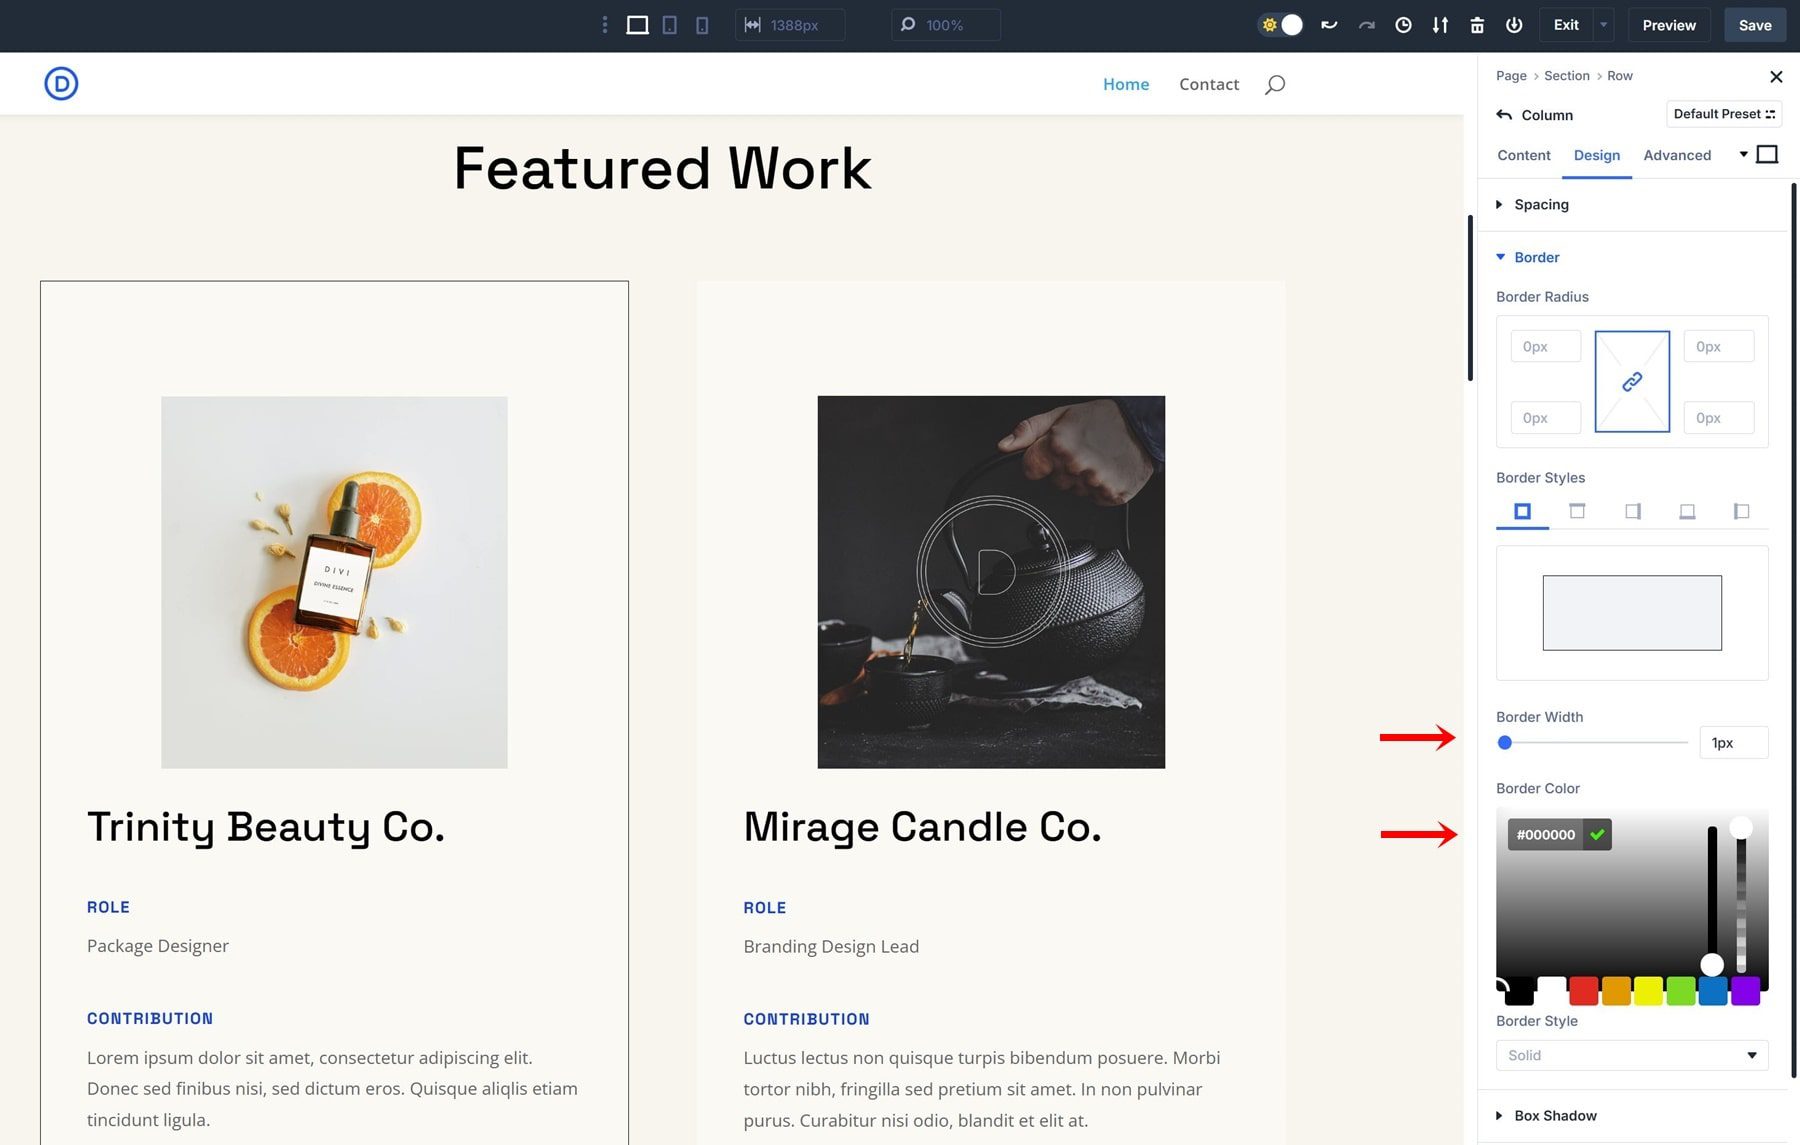
Step 4: Save As An Option Group Preset
Click the icon in the top right corner of the border settings to create a new preset. Give your preset a descriptive name (e.g., Border – Lined). Click Save Preset to finalize it.
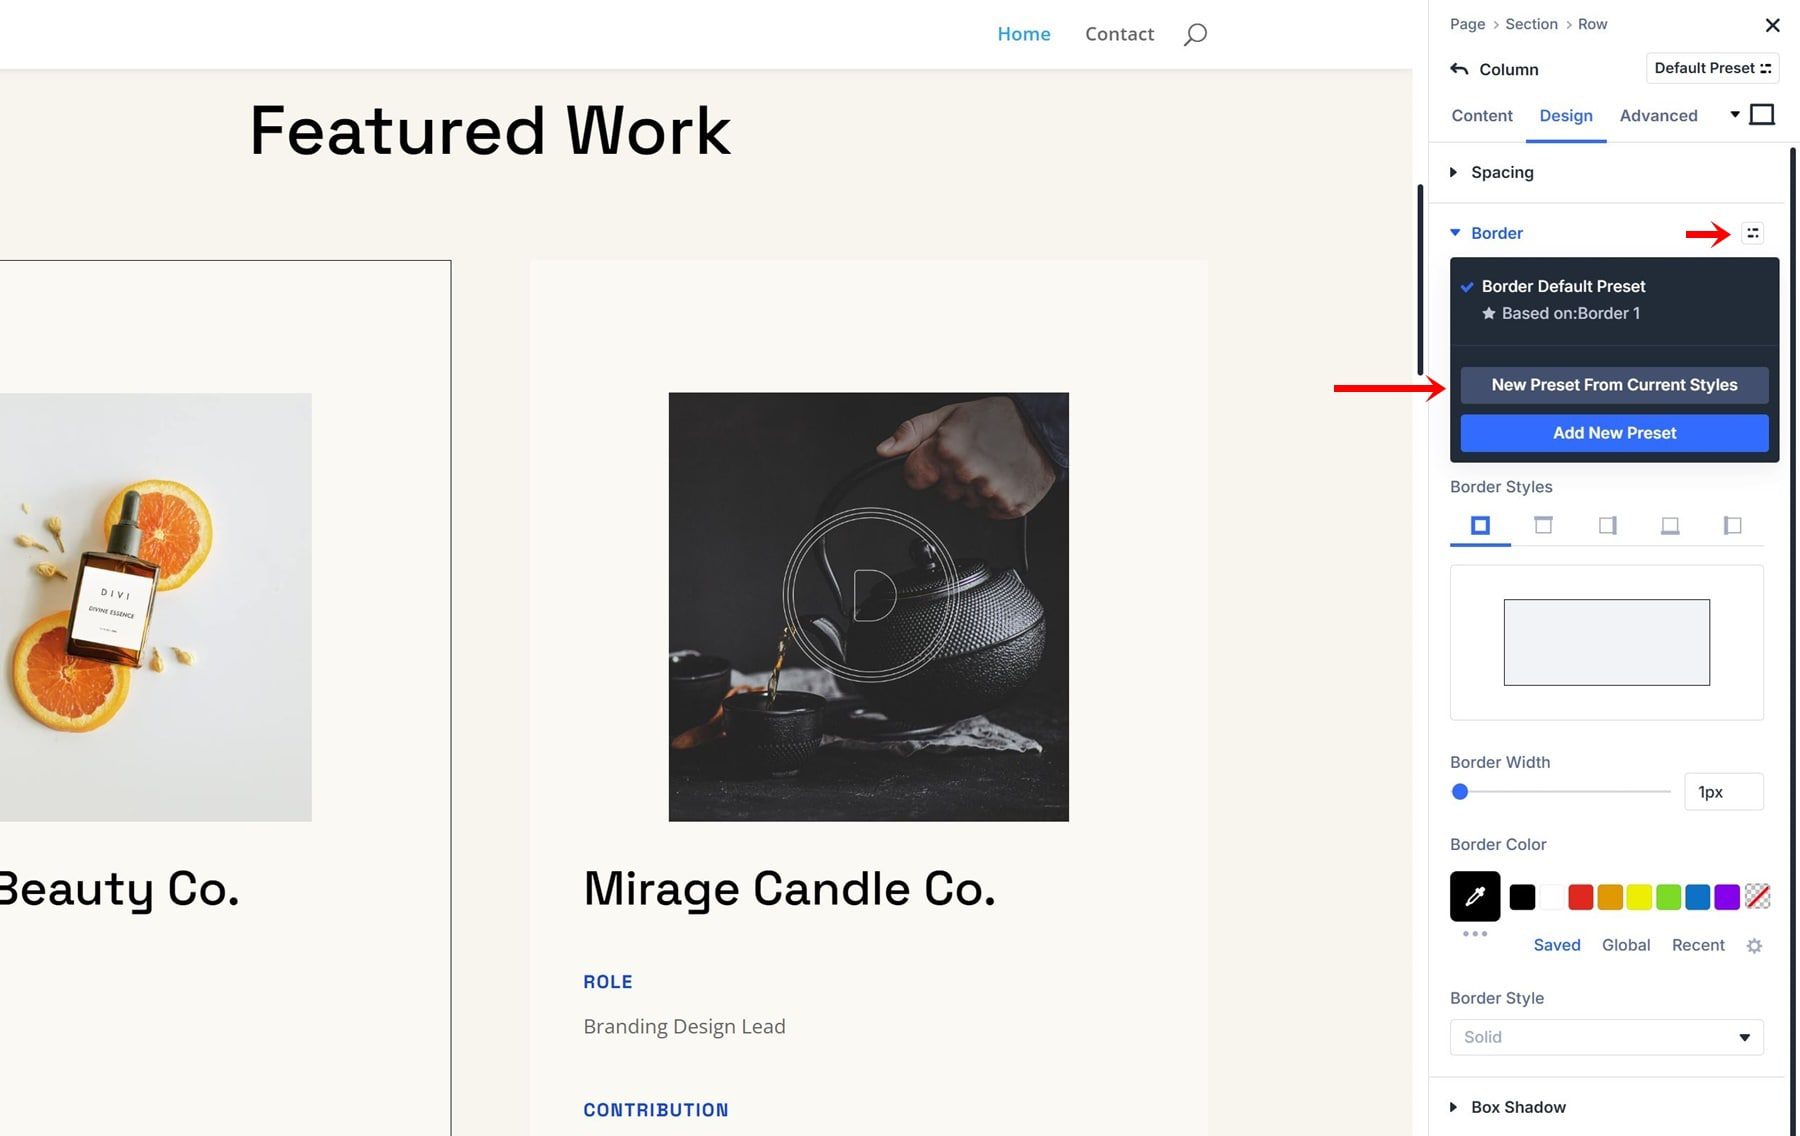
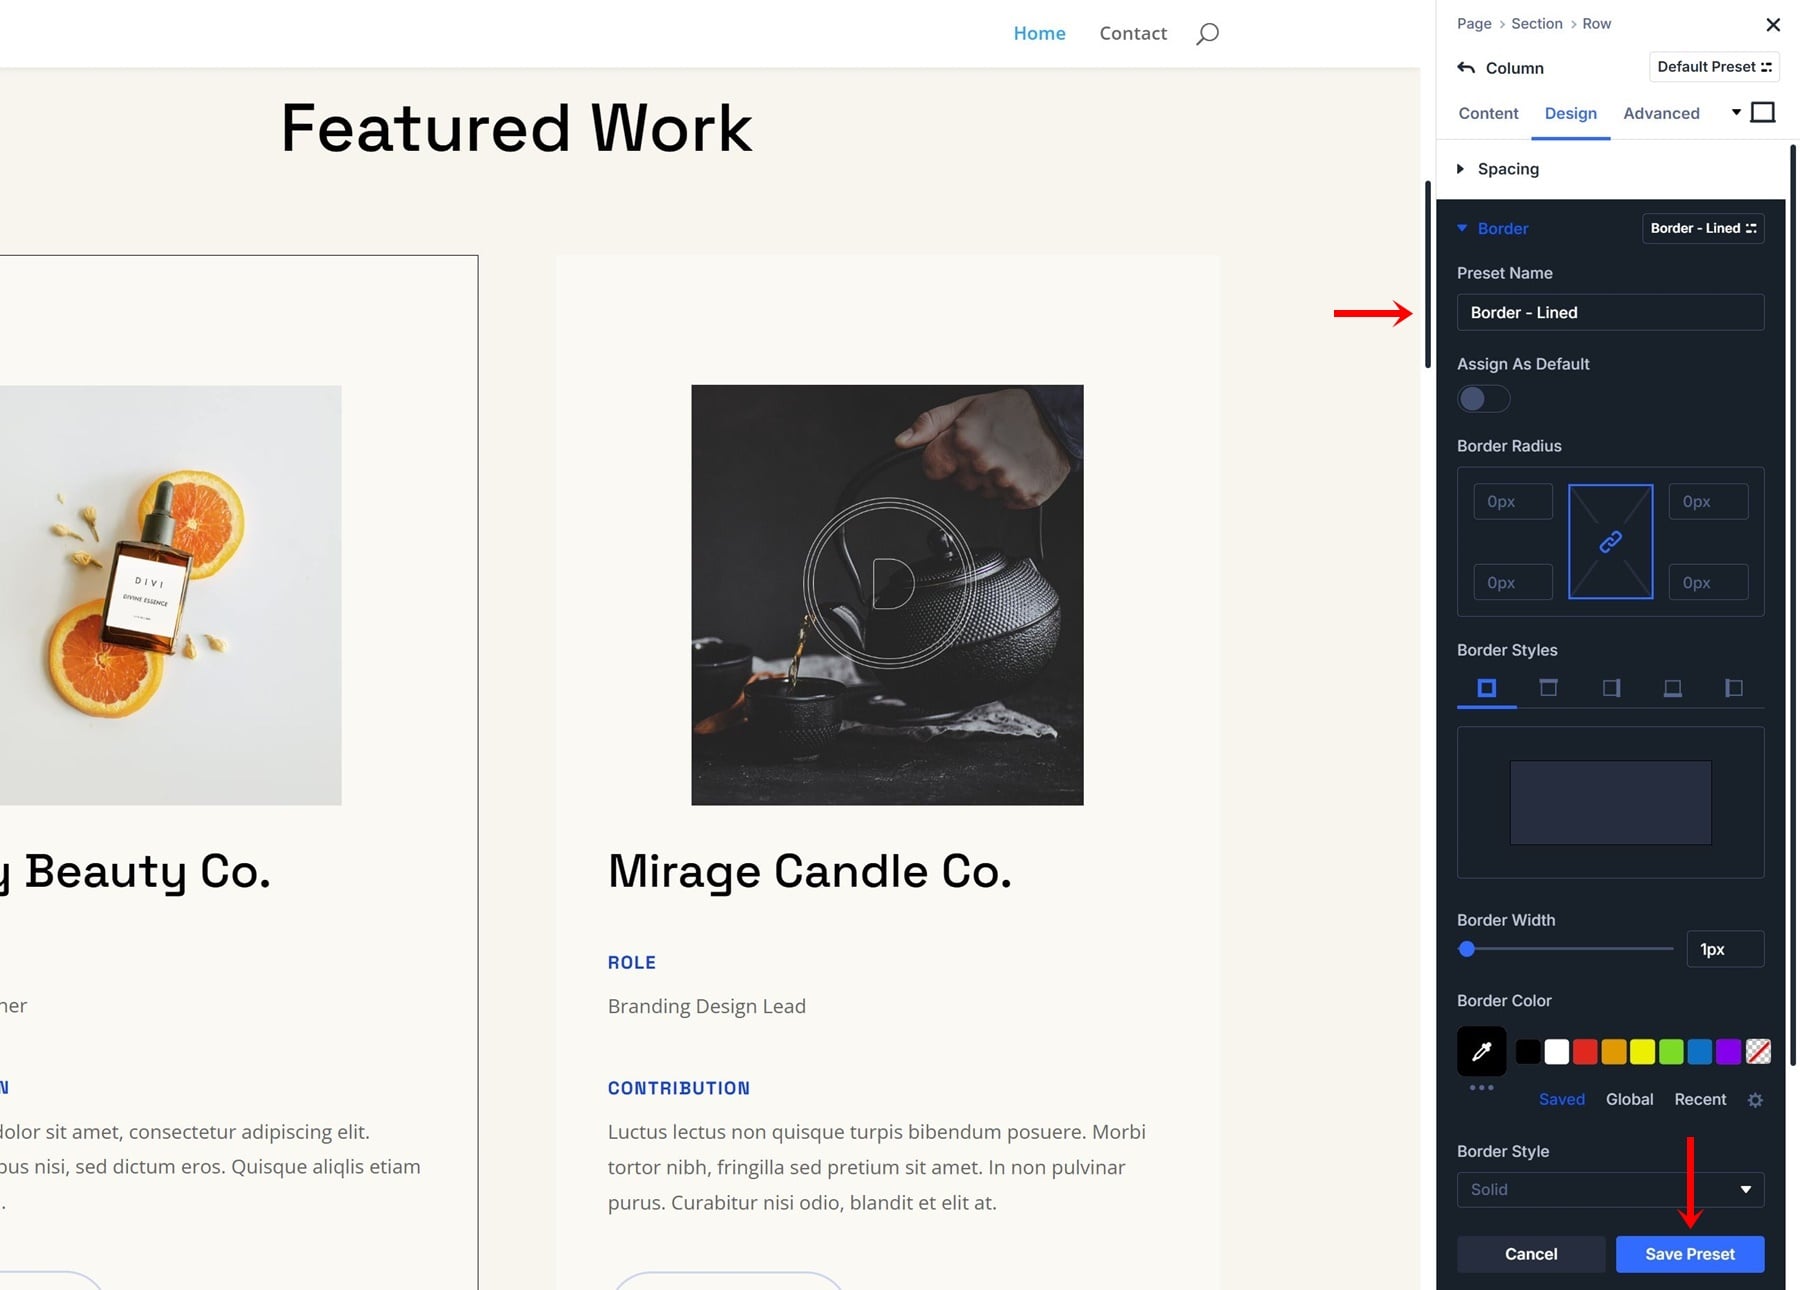
Applying The Border Preset To Other Elements
Now that you’ve created an Option Group Preset, it’s time to apply it to other elements. Whether you’re styling sections, rows, columns, or modules, presets allow you to achieve a uniform design with minimal effort. Follow these steps to apply your saved Border Preset:
Step 1: Select Any Other Element
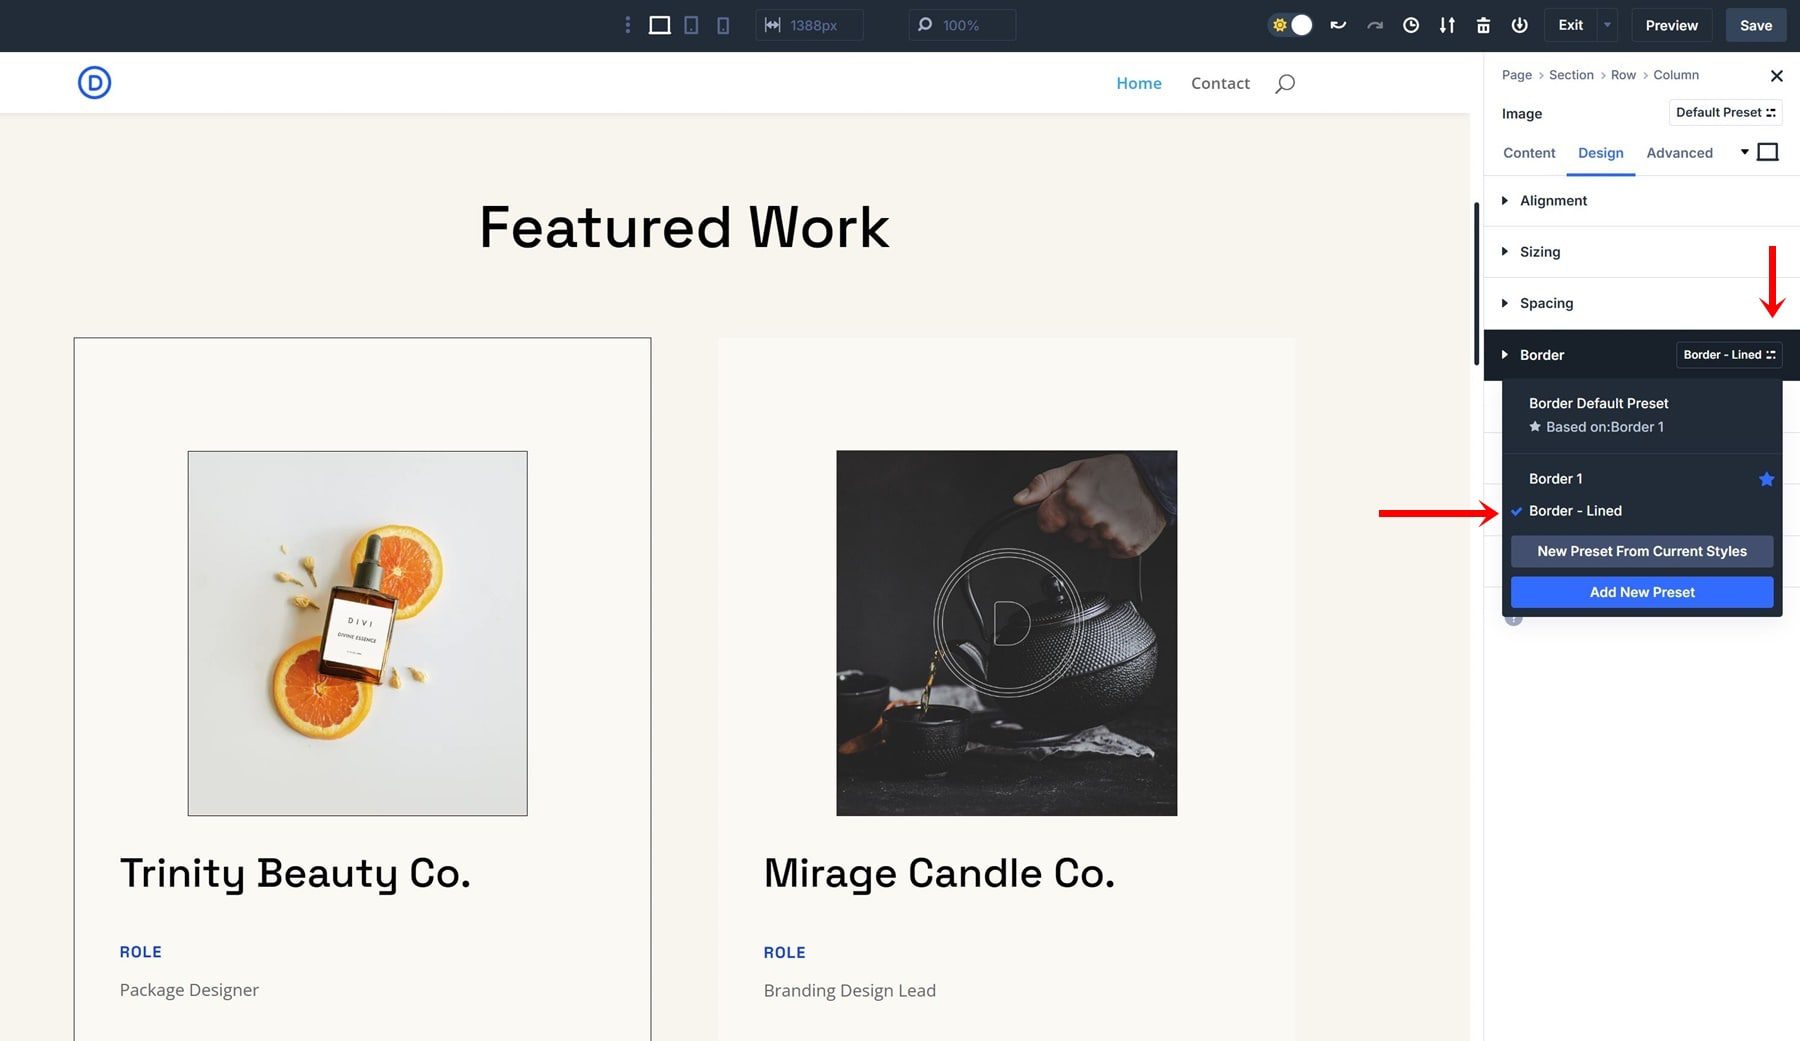
Open any other module you want to style (e.g., an Image Module). In the Design tab, navigate to the border settings.
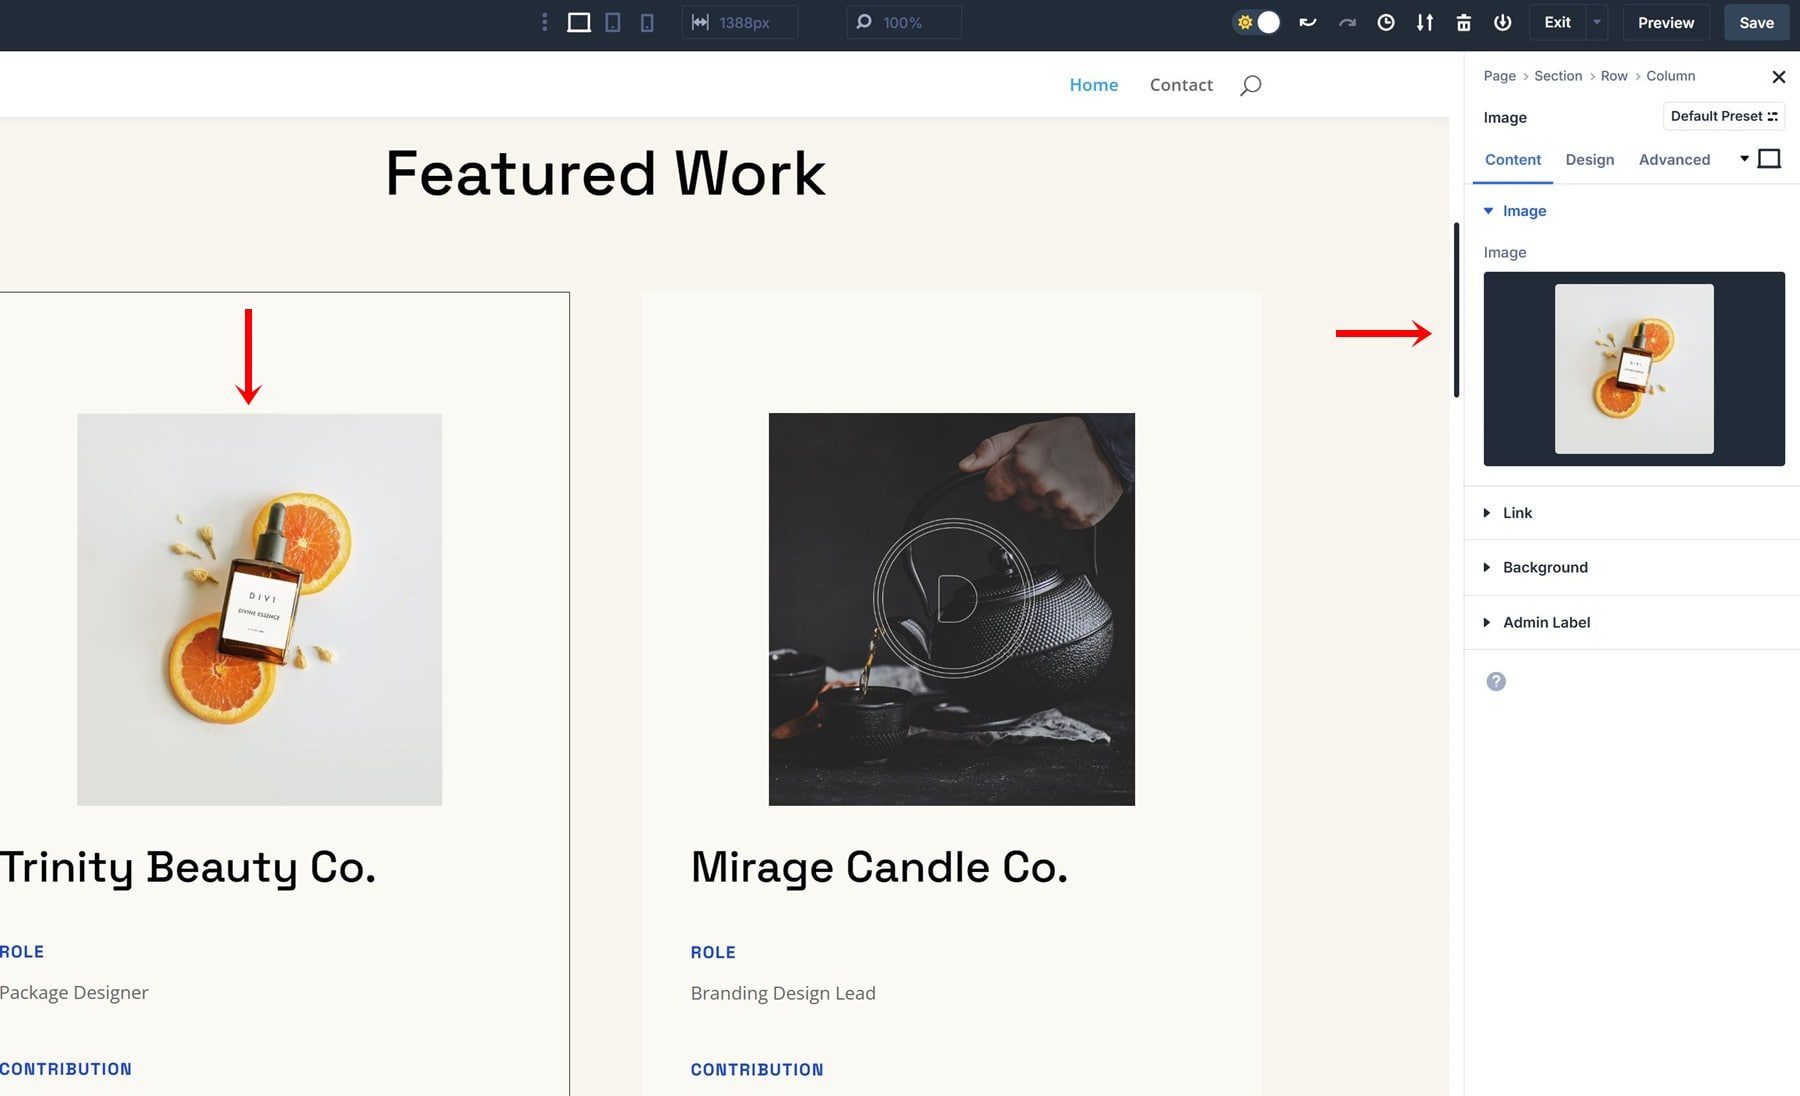
Step 2: Apply Border Preset
Locate the Option Group Preset icon, and select the preset you created in the previous part of this post.
Combine Option Group Presets With Element Presets
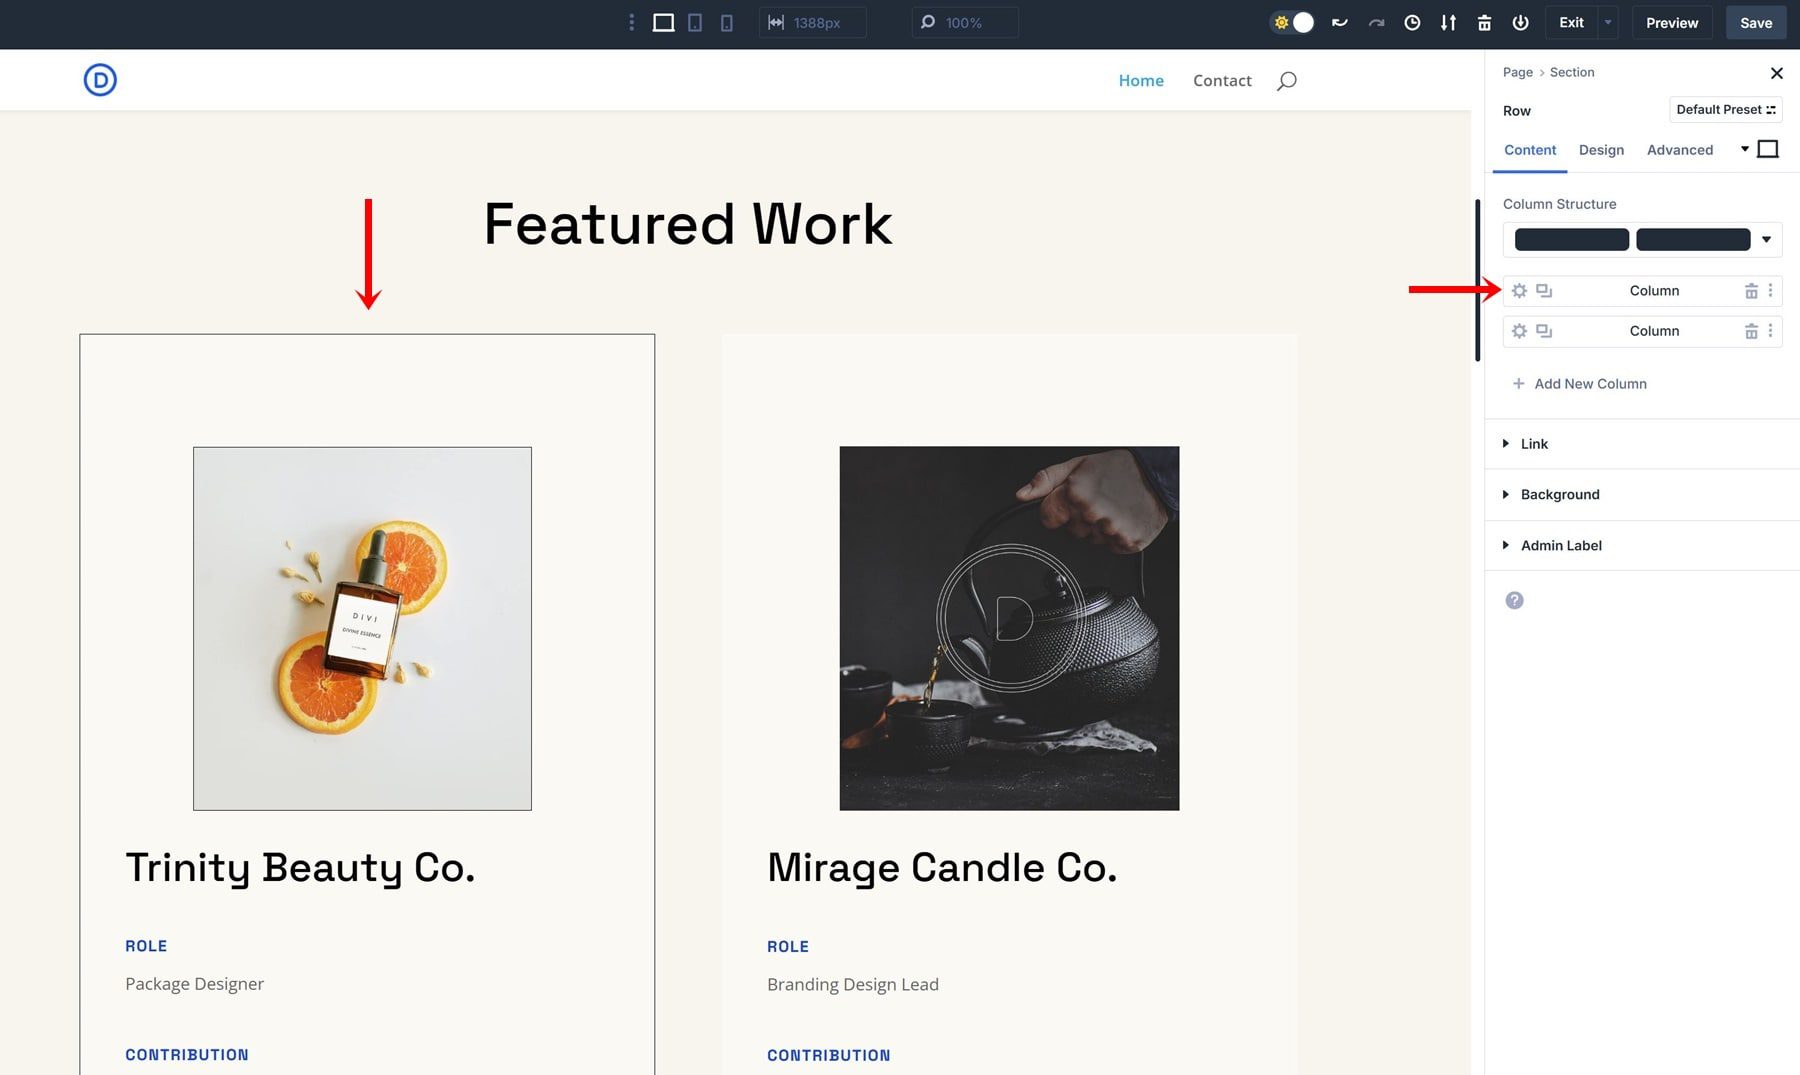
In certain cases, you might want to apply certain settings on an element level only. Let’s say you have 2 columns next to each other, and you want them to share all the same settings but not the same border. In this case, you can use a shared Column Preset for both columns but apply a different Border Preset to each.
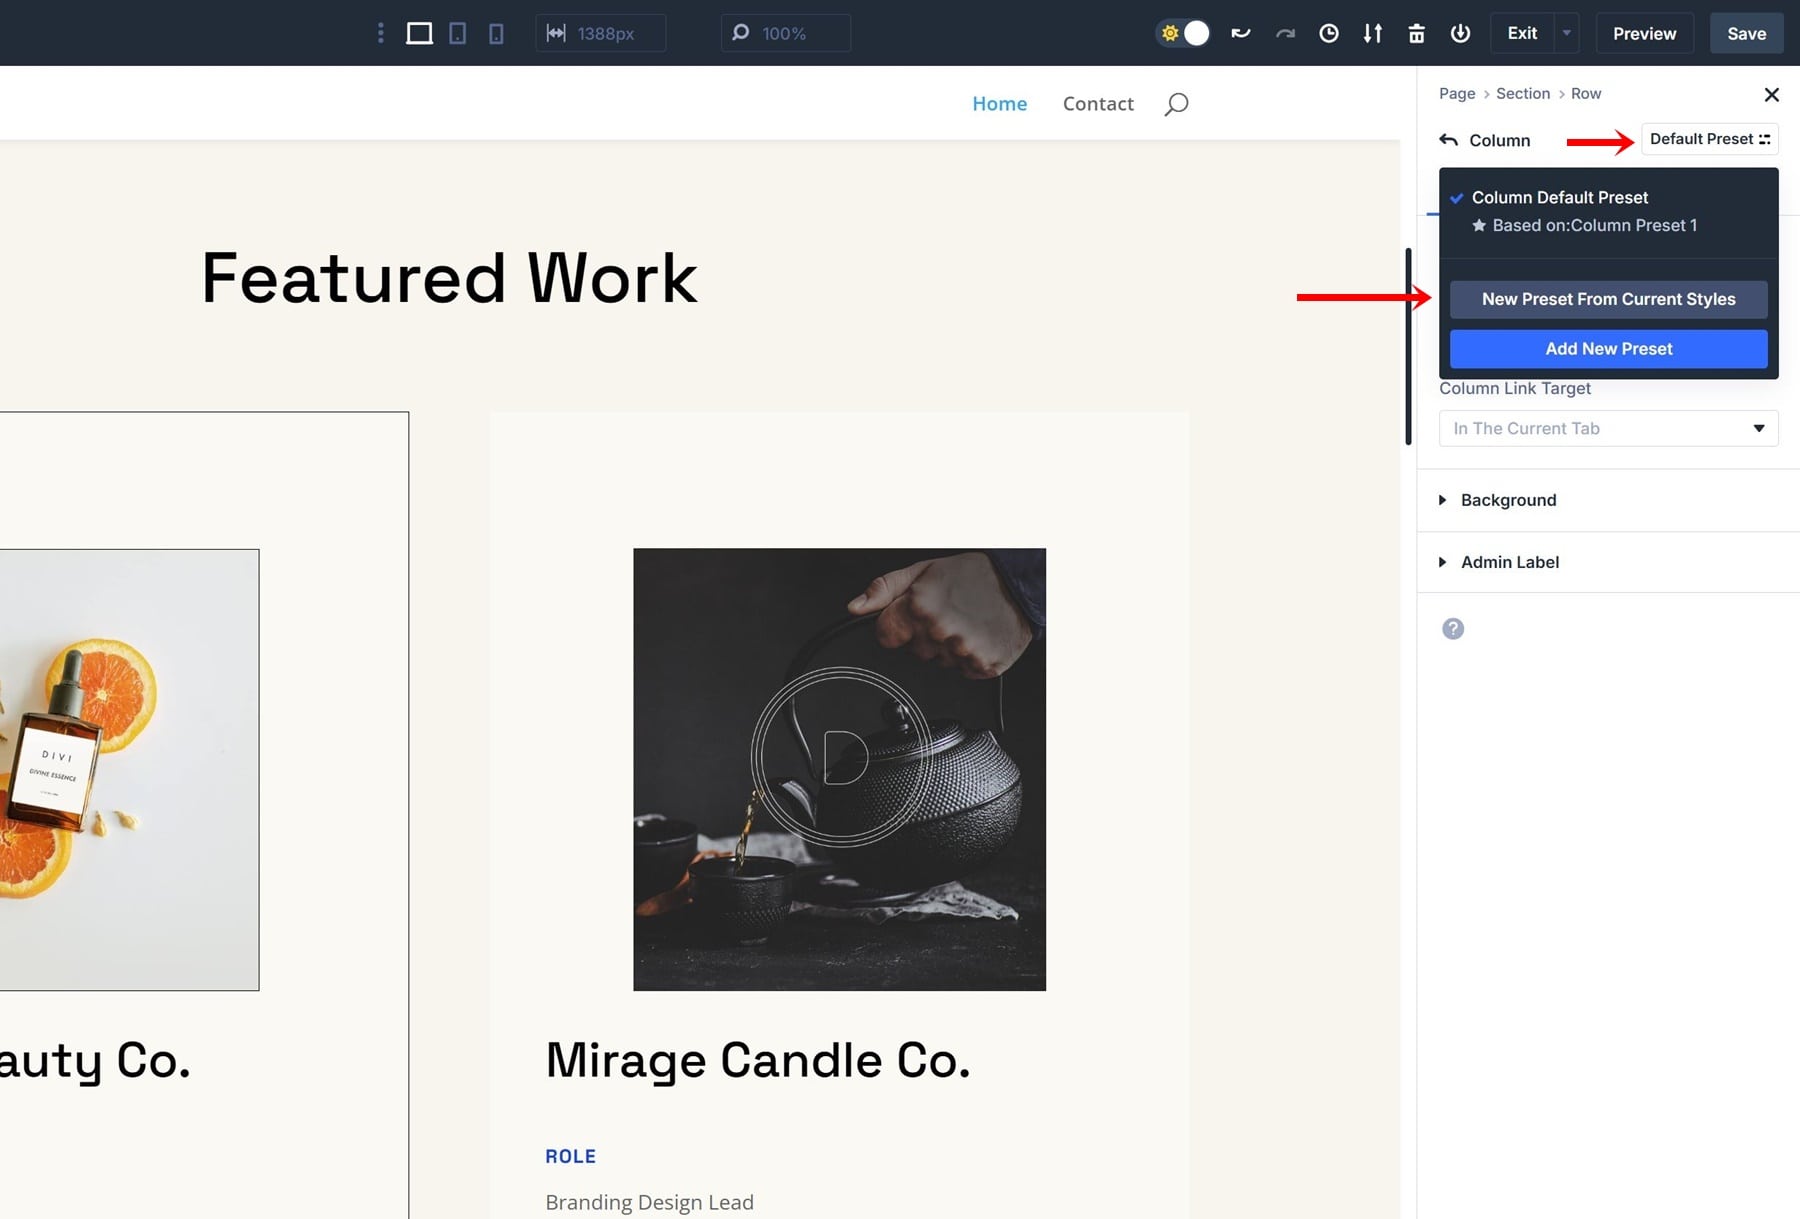
Step 1: Create New Column Preset
Open your first column and create a new preset from current styles in the top right corner. Give it a descriptive name, and save the settings.
Step 2: Enable Border Preset Alongside Column Preset
Now, navigate to the second column of your row. I’ve made sure that column 2 doesn’t have any overriding element-level settings. Once you’re there, enable the preset you made in the previous step.
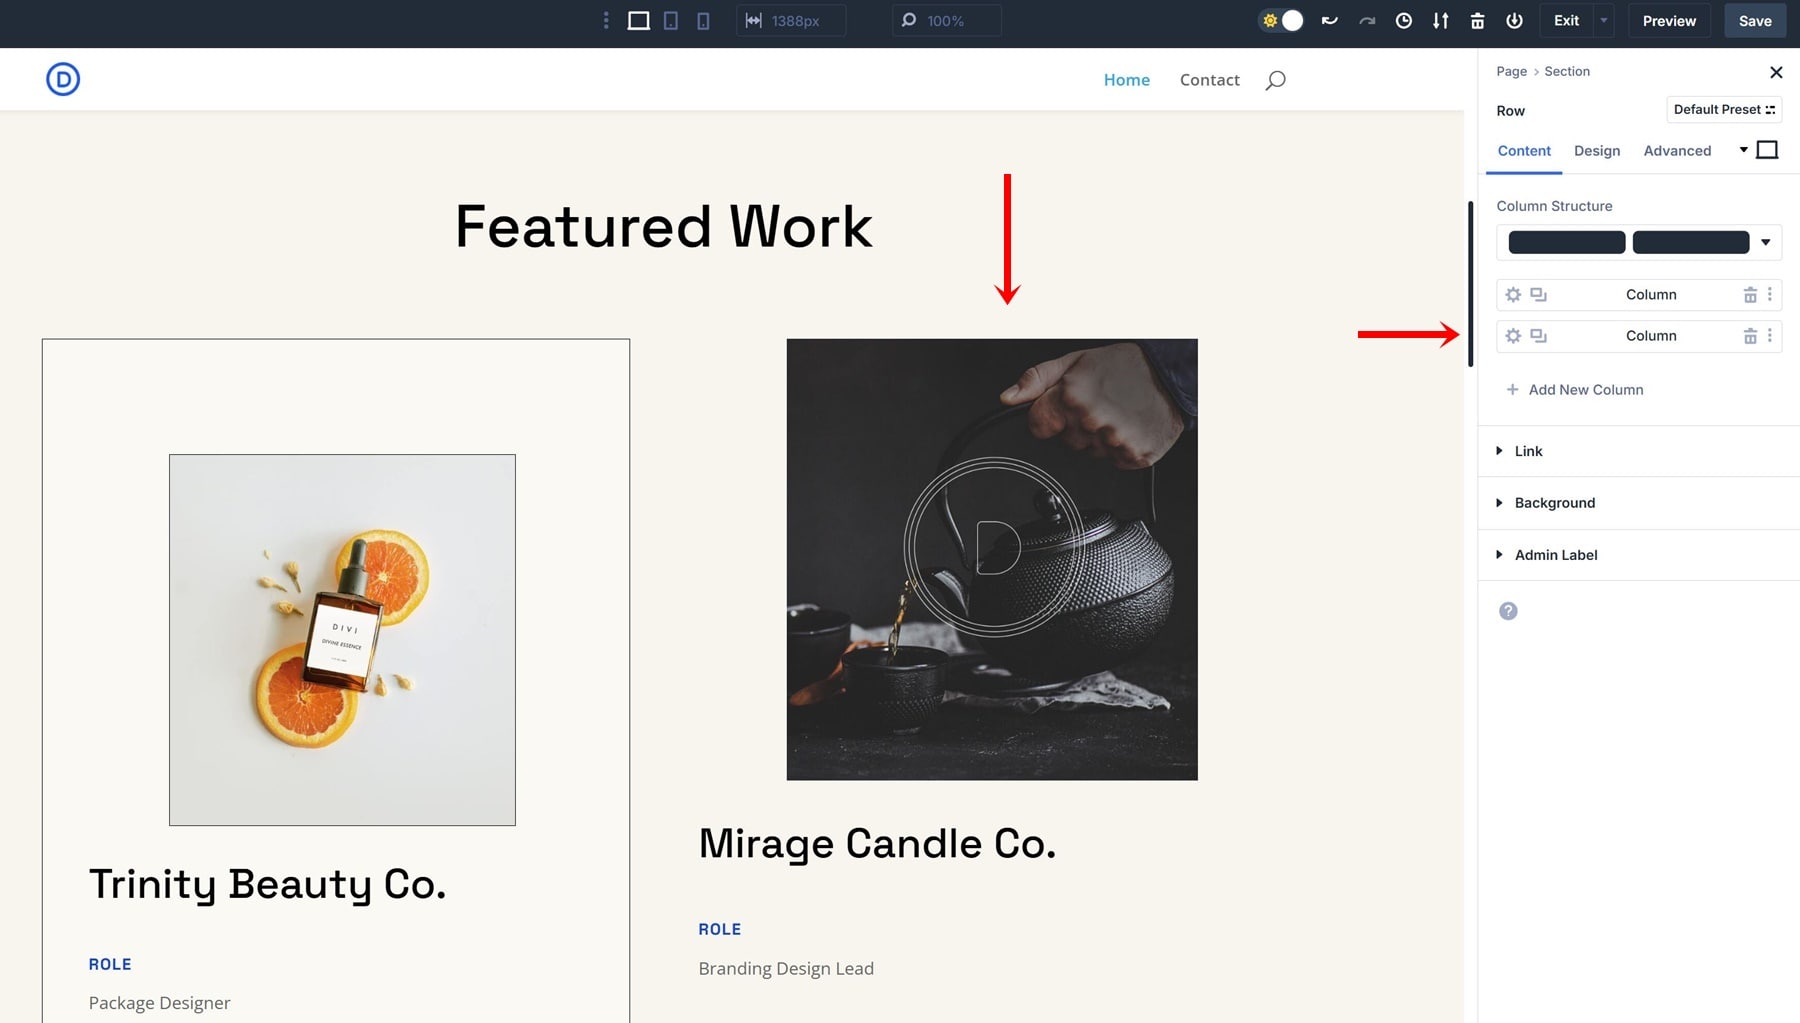
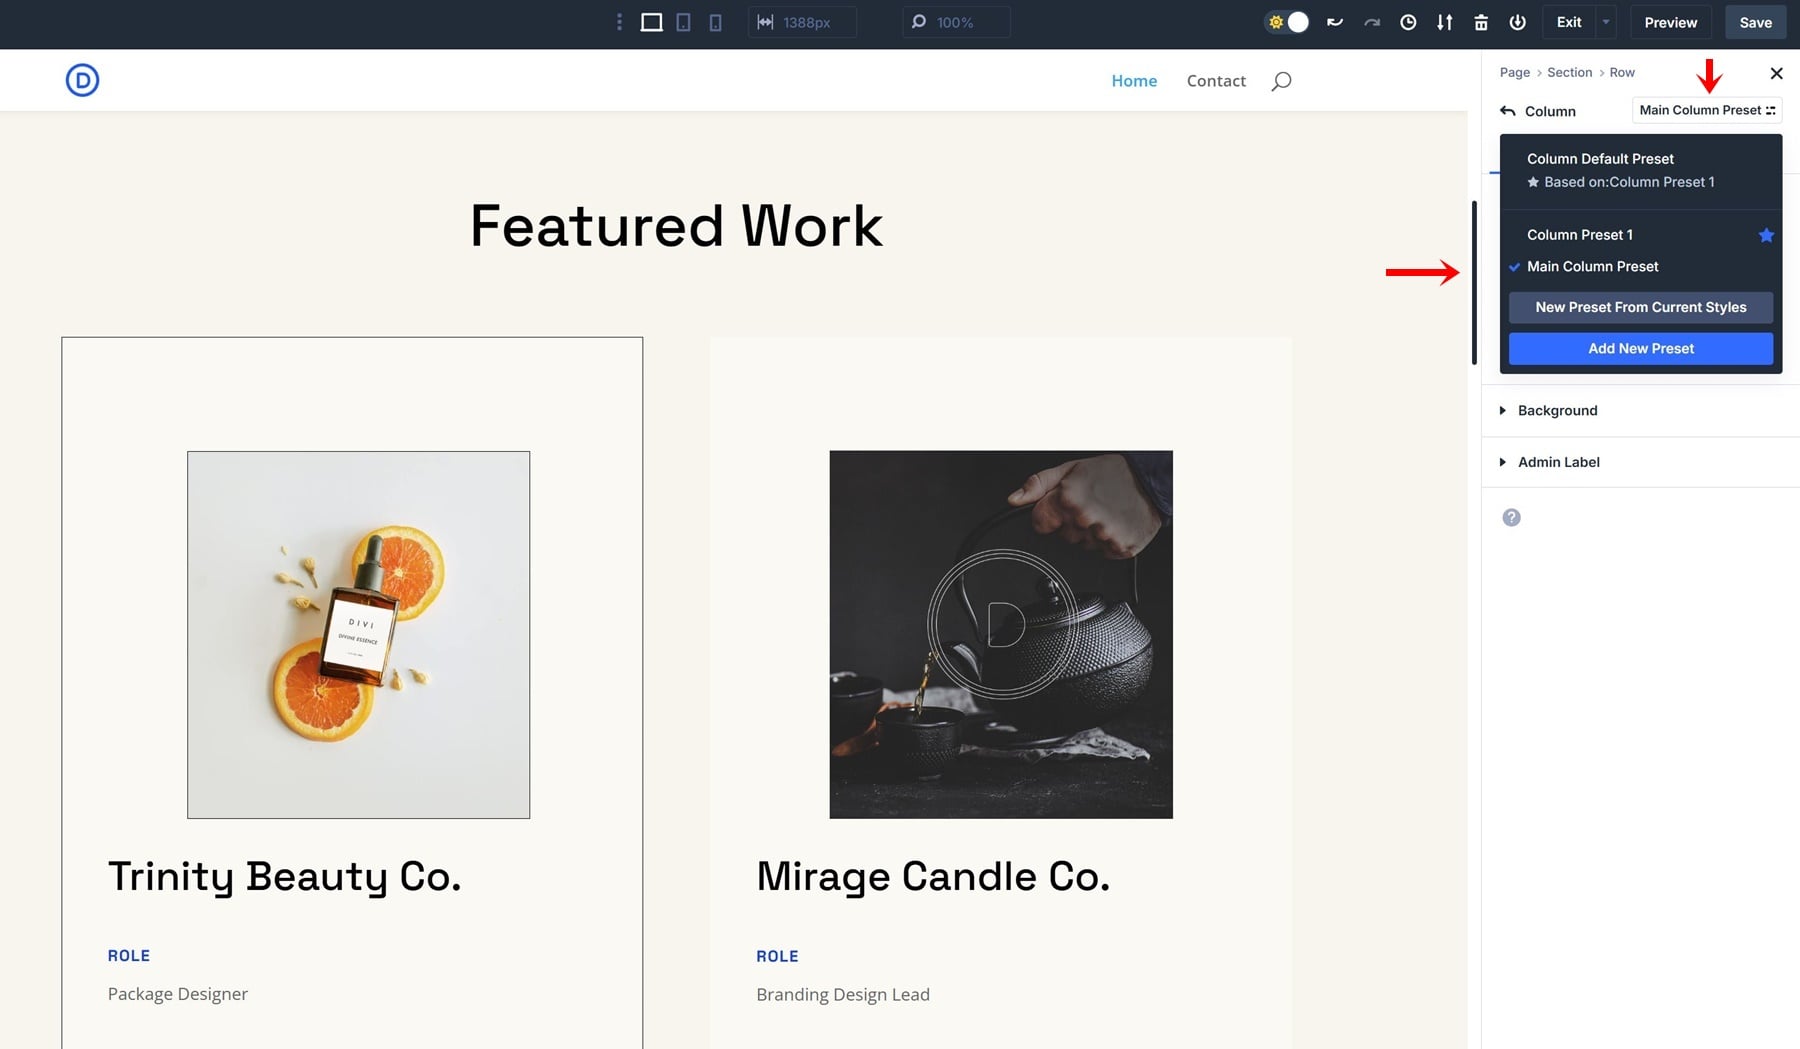
At this point, both columns share the same Element Preset, but only the first column contains an additional Border Preset (which you plan on using on other elements in the future as well).
Assigning An Option Group Default As Default
Another great option with Option Group Presets is the ability to make it the default. That means as soon as you add an element that includes that particular styling capability, the default styling you’ve chosen will apply. This is particularly helpful for typography, colors, and buttons.
Let’s take buttons, for example. Button styles are part of several modules, including the Contact Form Module, CTA Module, Email Optin Module, and more. If you want one particular style to apply to all these buttons automatically, that is possible with the Option Group Presets. Let’s see how.
Step 1: Open The Contact Form Module Inside Your Contact Page
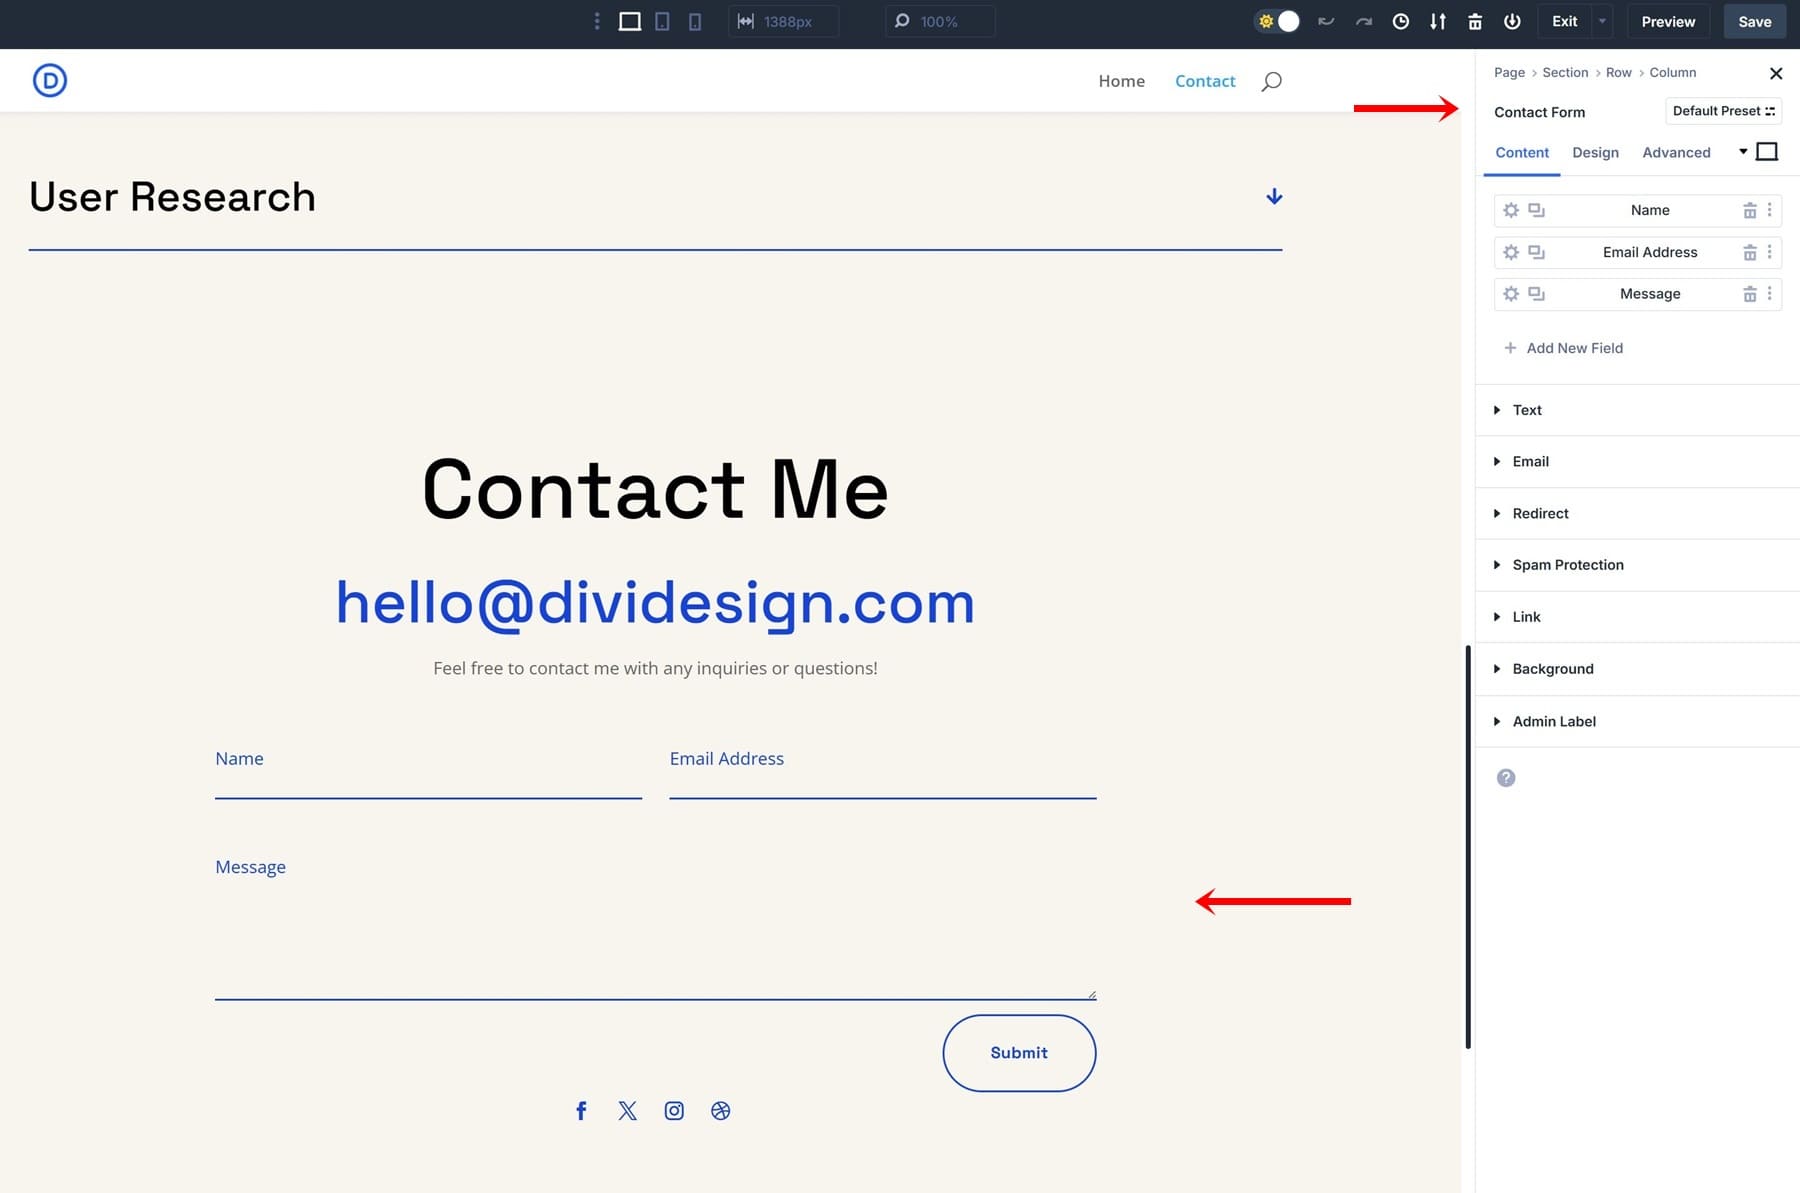
For this particular example, we’re going to use the contact page that is included in the Design Portfolio Layout Pack. Once you create a new page, upload this layout (or any other contact layout). Then, open the settings of the Contact Form Module that you’ll find inside that layout.
Step 2: Create Option Group Preset From Static Style
Creating an Option Group Preset is easy. You have two options; you can either create one from scratch or turn an existing static style into an Option Group Preset. Since we have a designed button inside our Contact Form Module, we don’t have to style it again, and we can instead reuse these settings for our Option Group Preset. Navigate to the Design tab and open the button settings.
Once you hover the top right corner of this settings group, you’ll see an icon appear. Click this icon.
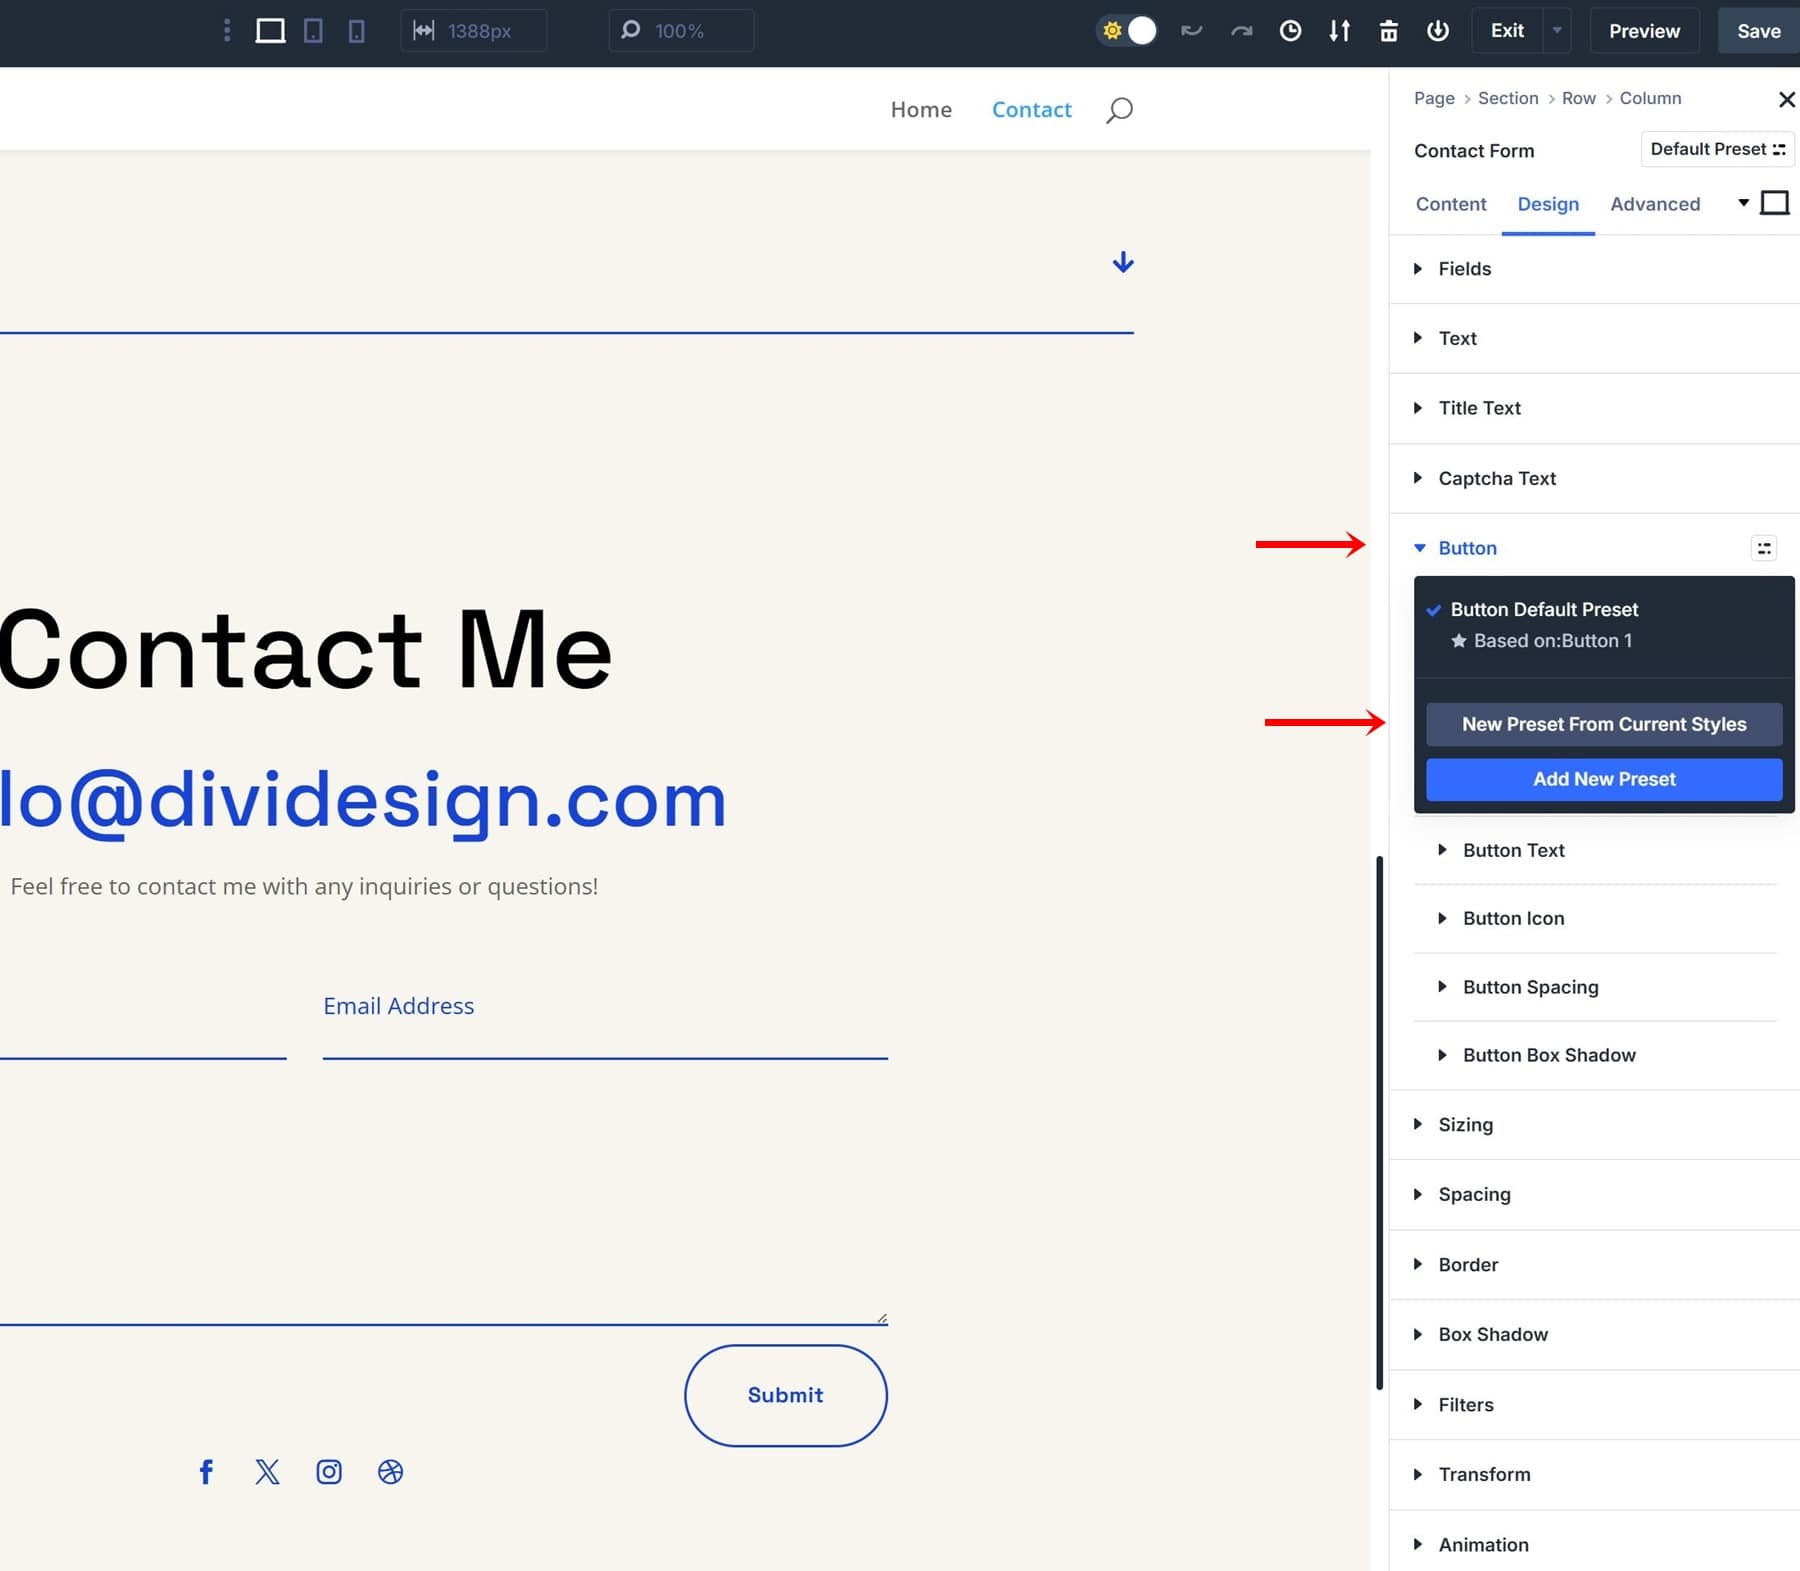
Continue by selecting “New Preset From Current Styles” and giving your button a descriptive name such as “Primary Button”.
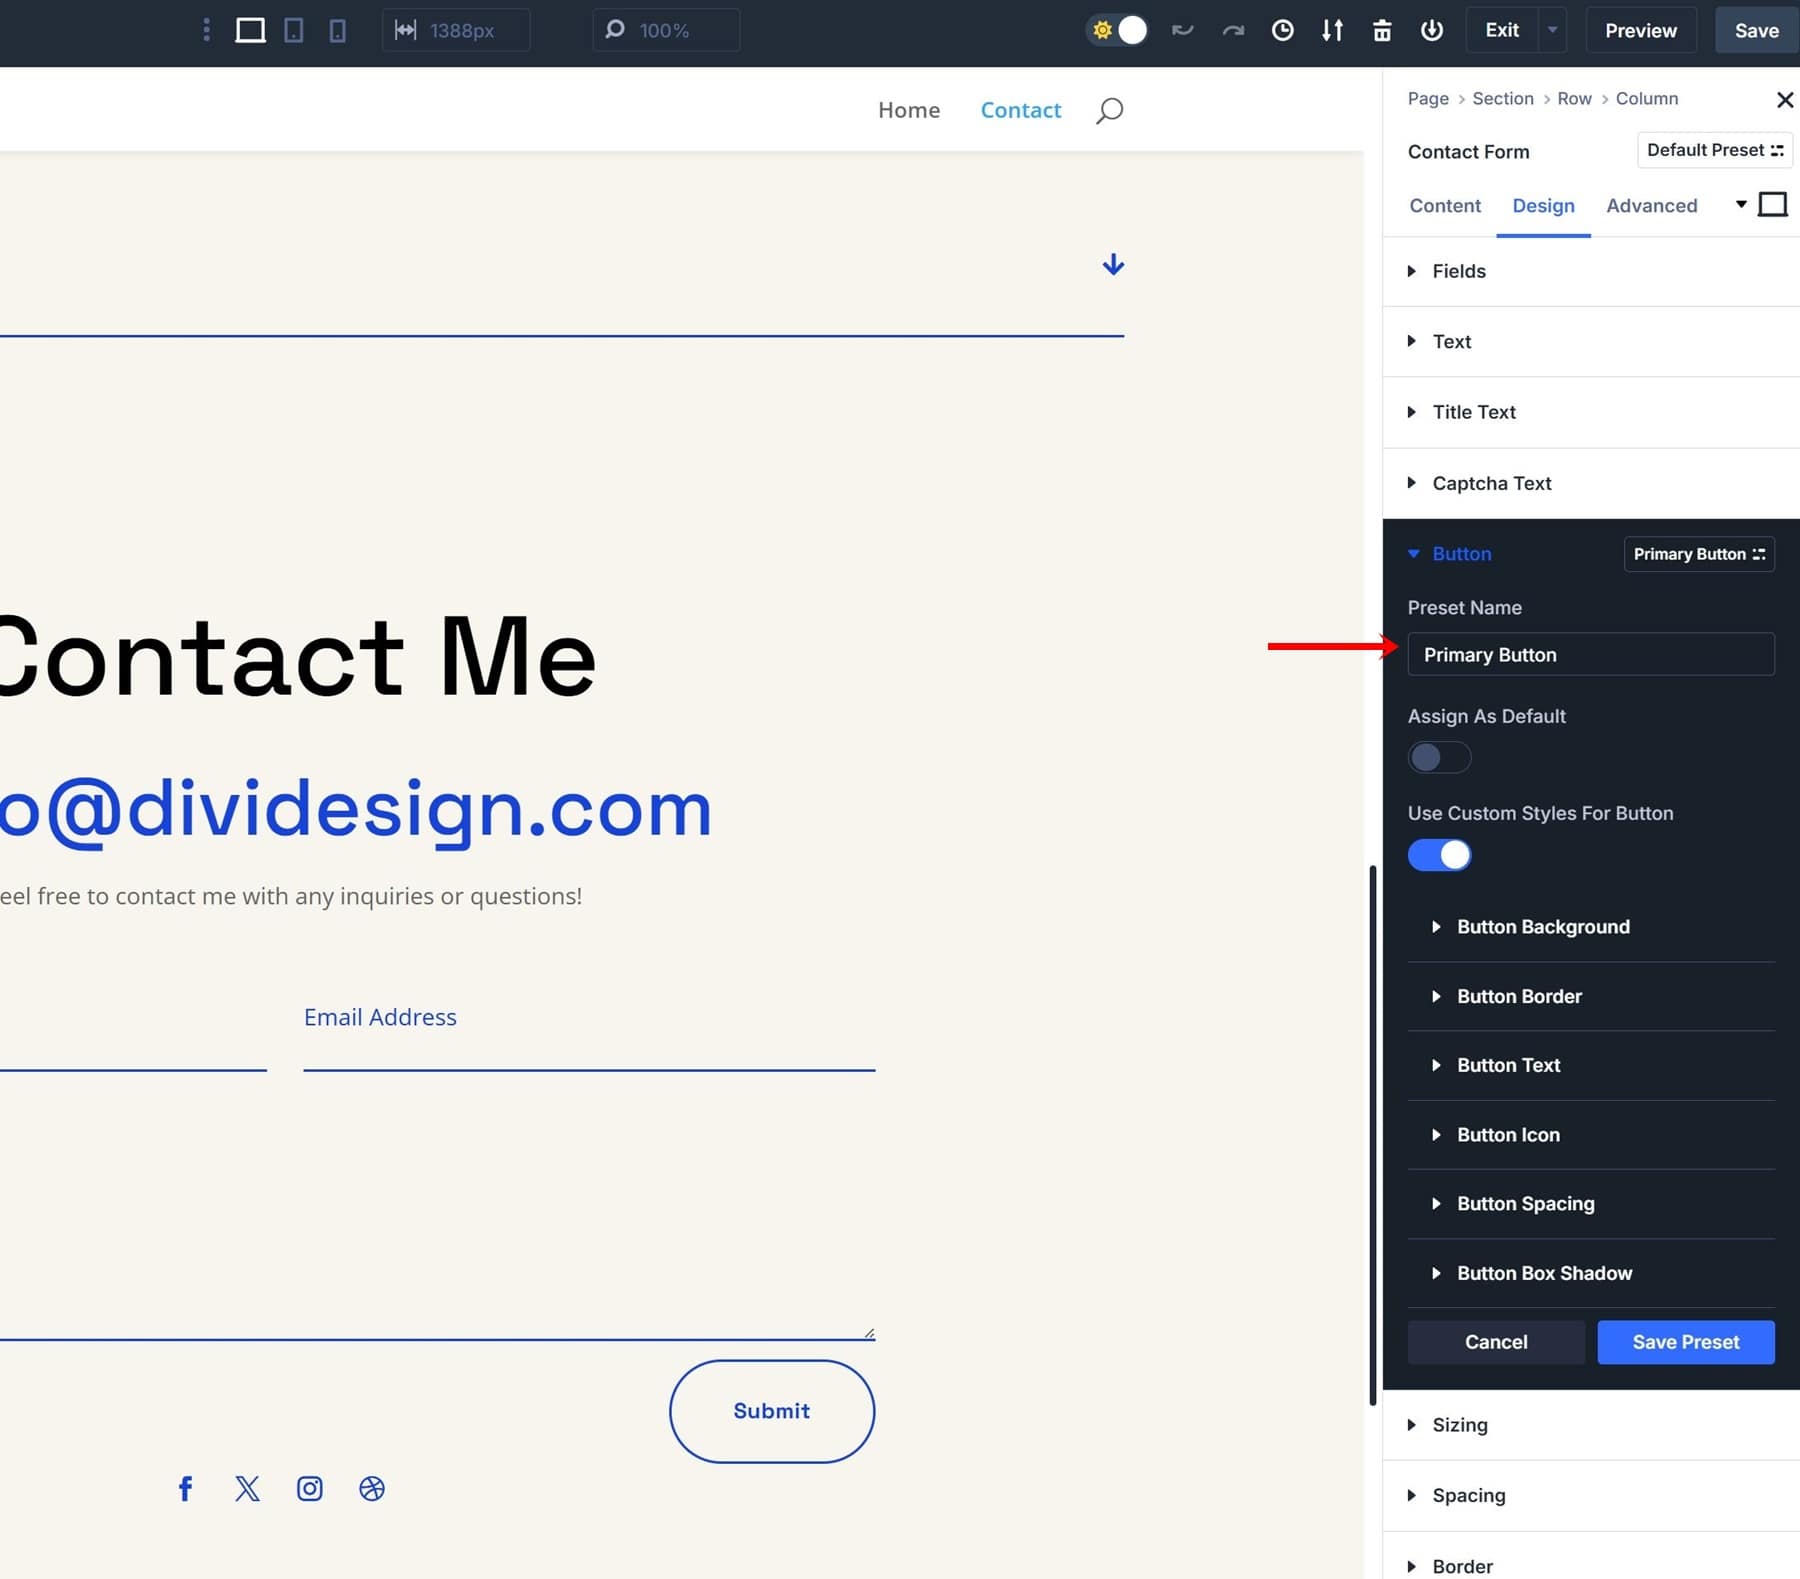
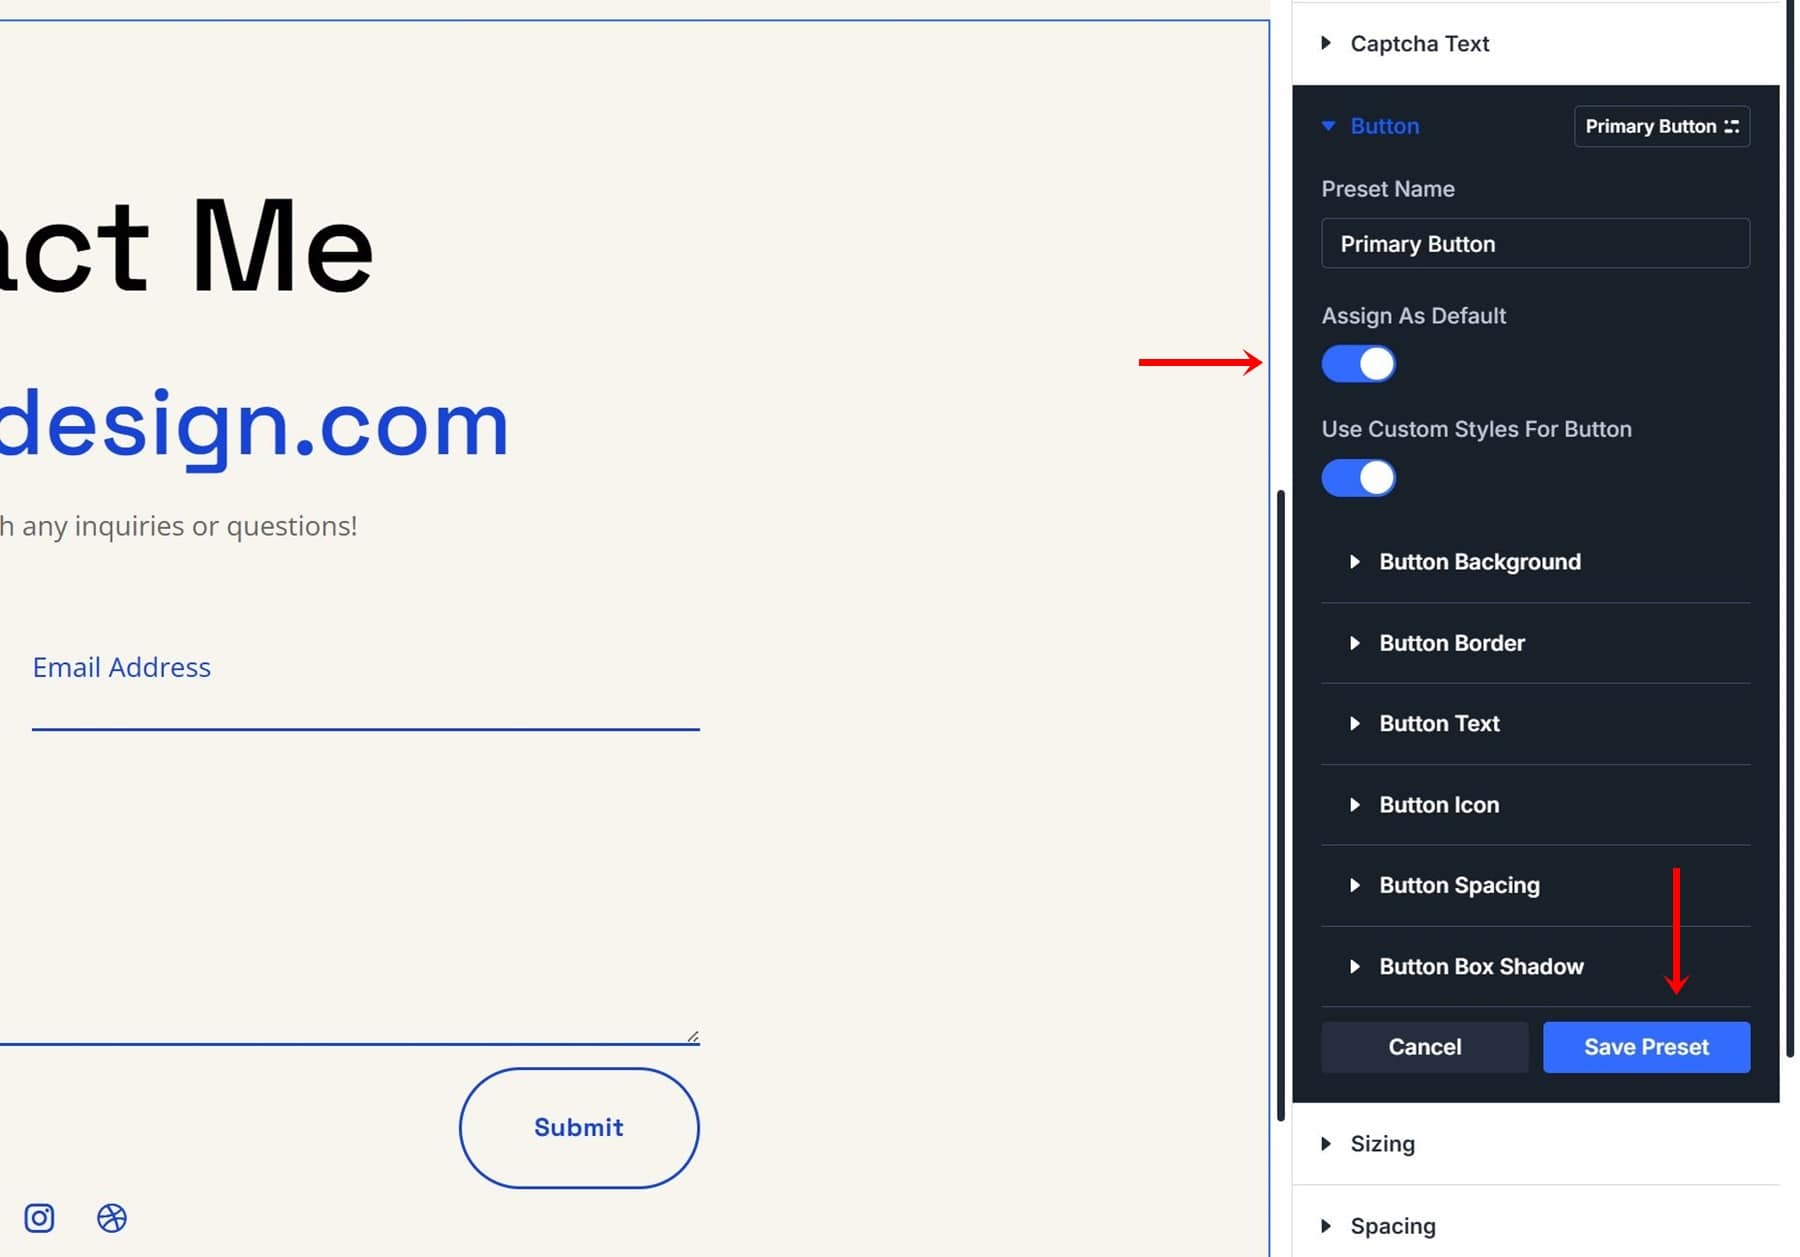
Step 3: Assign Button Style As Default
To make this button style the default for all buttons across your website, toggle the “Assign As Default” option and save your preset settings.
Step 4: Add New Unstyled Email Optin Module To See Results
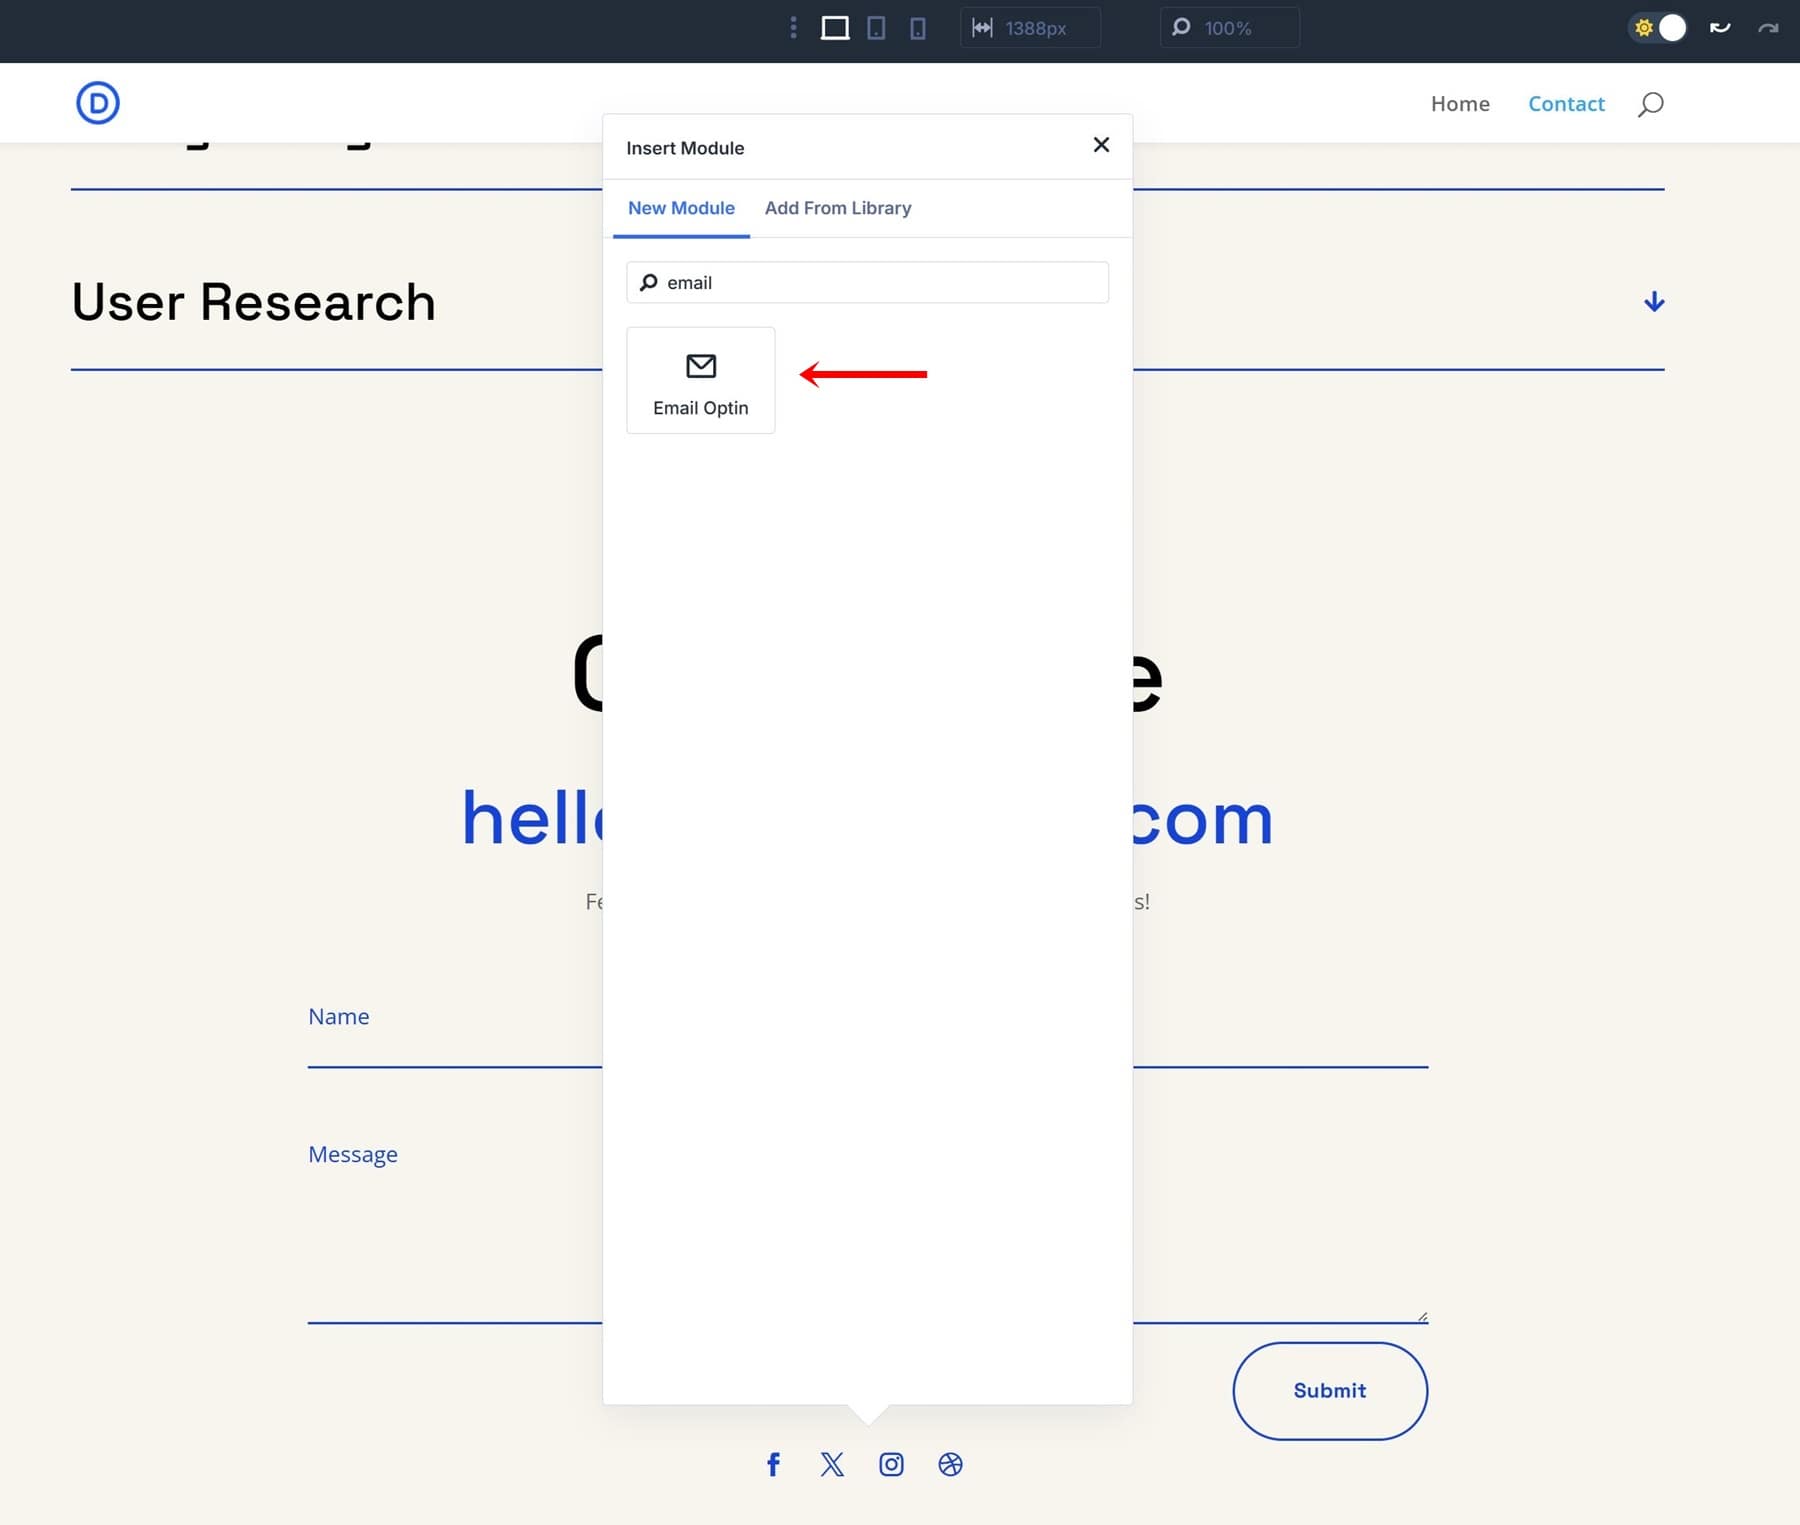
As soon as you add any module with Button settings, the new default will apply. This isn’t limited to only Contact Form Modules, where we created the initial Option Group Preset, but extends to all elements with button settings. One of the modules that includes Button settings is the Call To Action Module.
To see your new preset in action, add an unstyled brand-new Email Optin Module right below your Contact Form Module.
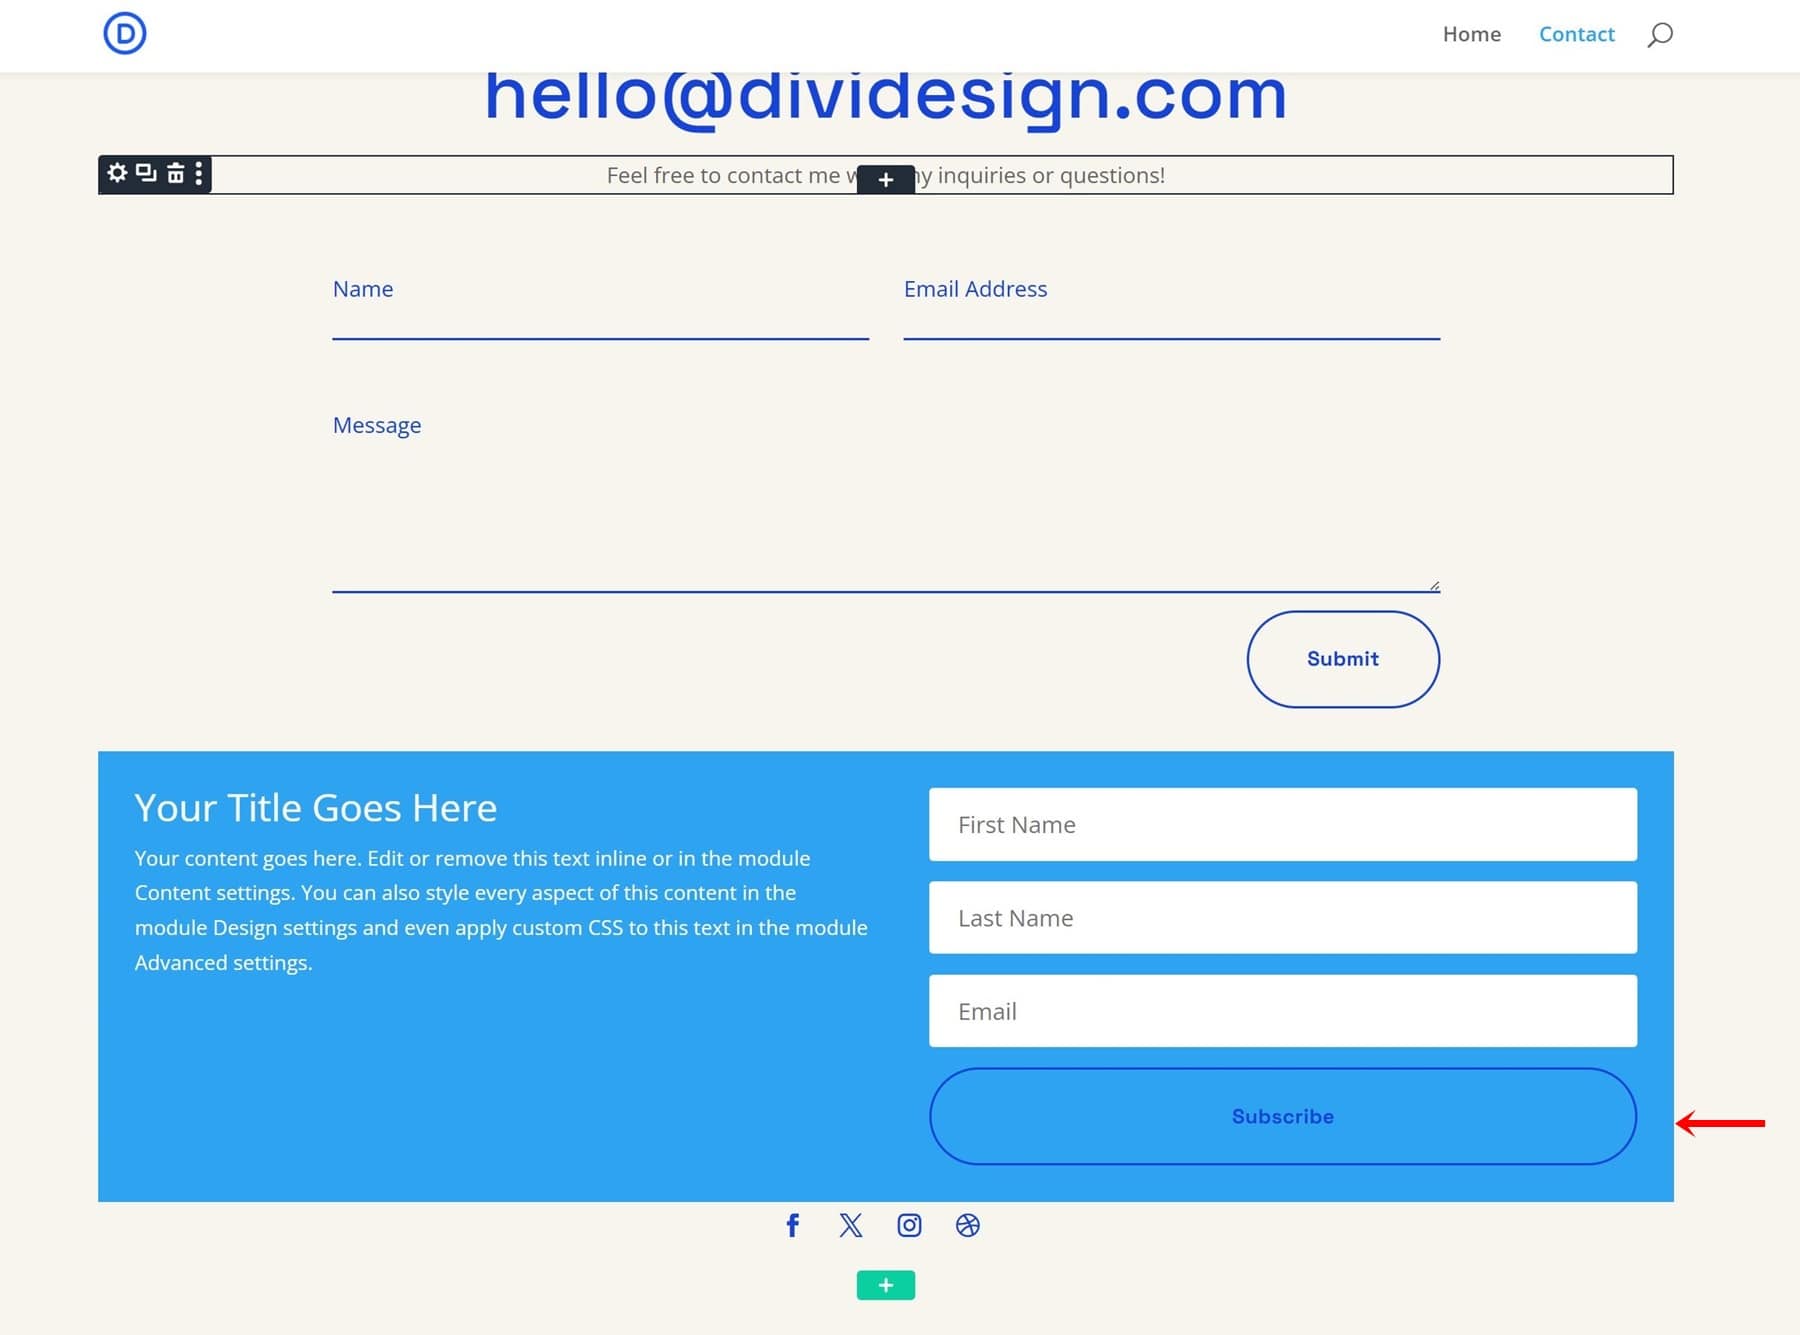
You’ll see that the button inside this newly added module contains the new default styling we applied in the previous part of this tutorial.
Globally Editing A Preset
Let’s continue with our example of the Button Preset. Since this is the default for all buttons across our entire website, updating the style on this button can help us save an enormous amount of time. We only have to edit it once, and the changes will apply throughout our entire website.
To edit an existing preset, locate it inside one of your modules.
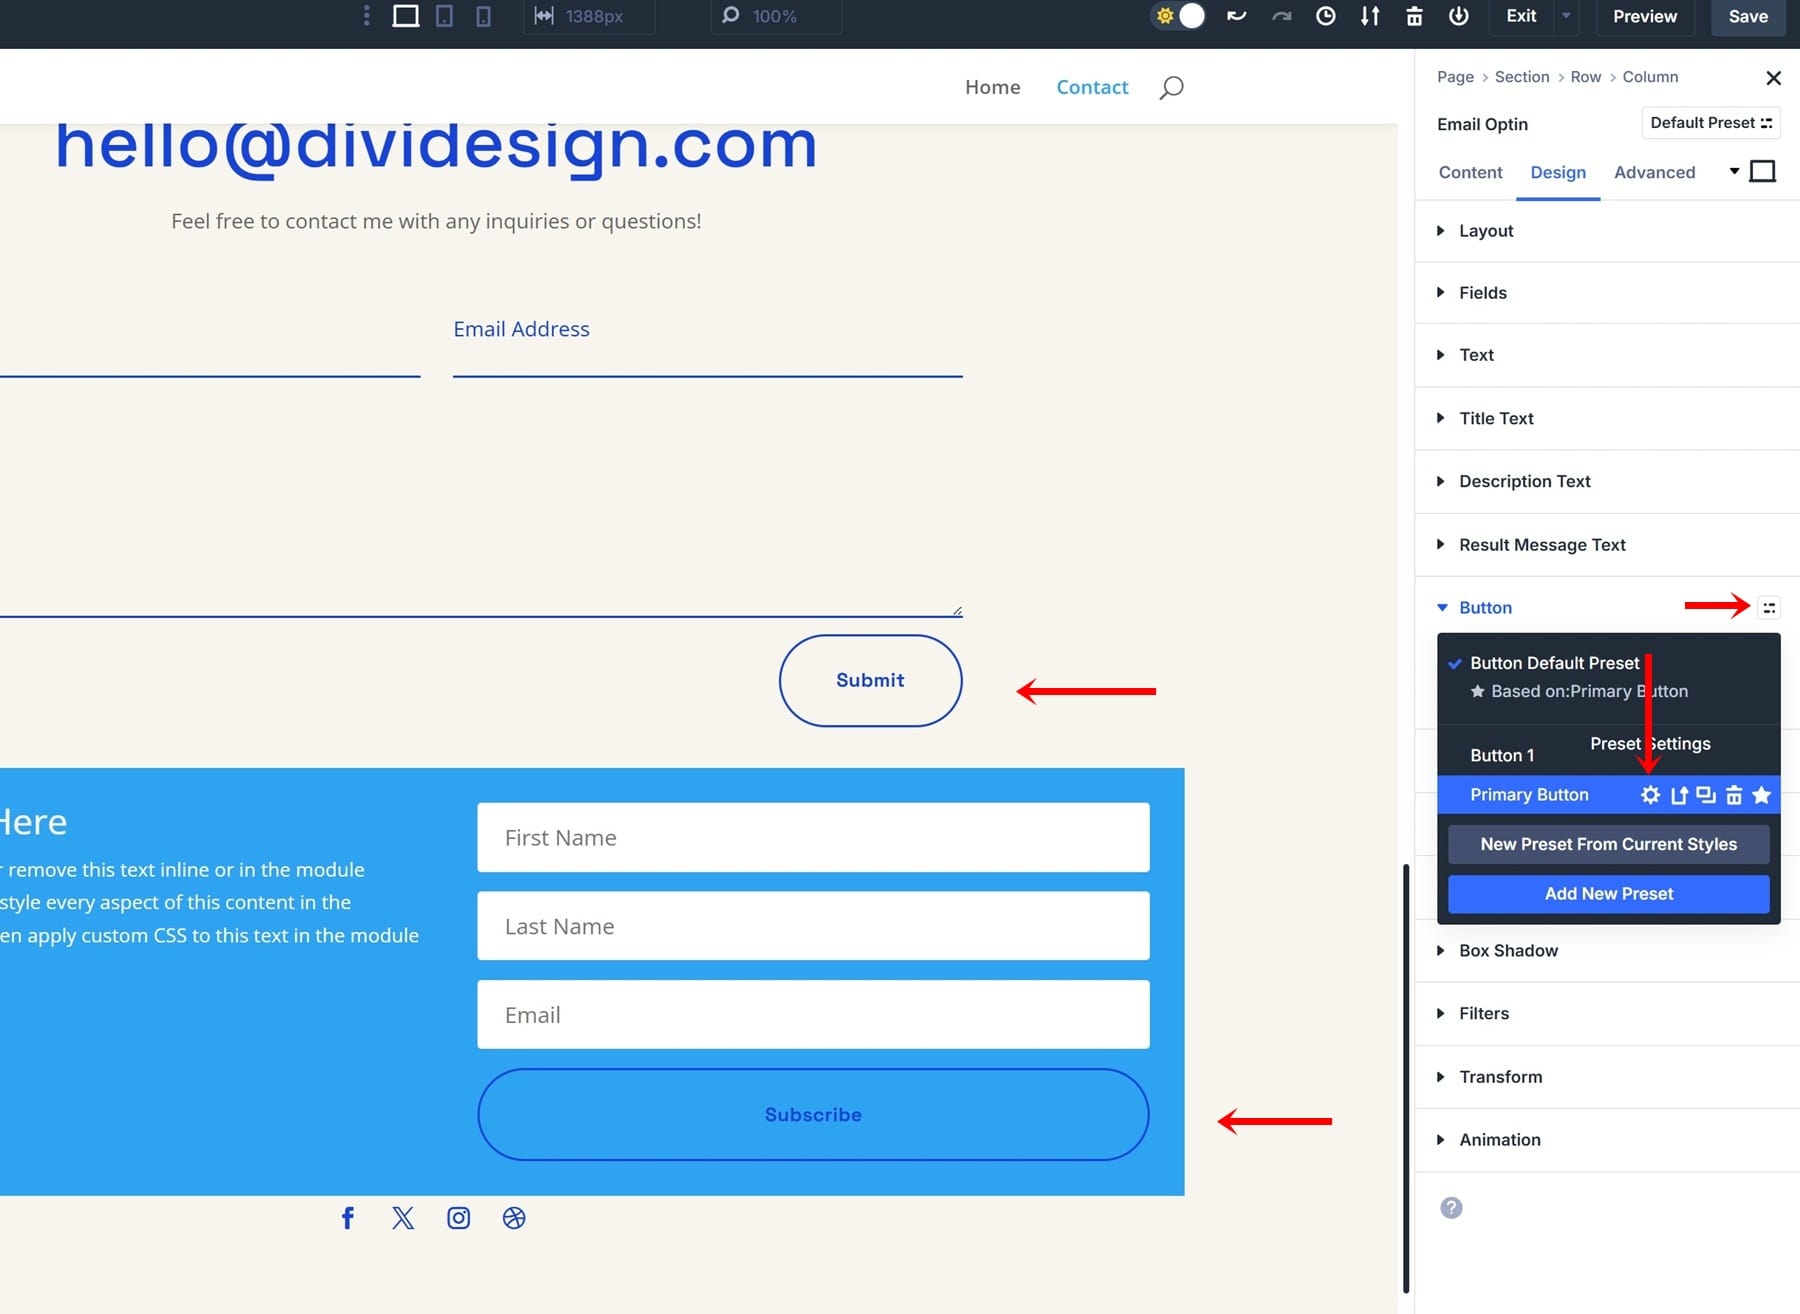
Hover the Button Preset and click the gear icon. This will open a screen where all the modifications can take place. Let’s change the border radius to 5px, for example. You can notice how it immediately takes effect in all the instances where this Button Preset was used.
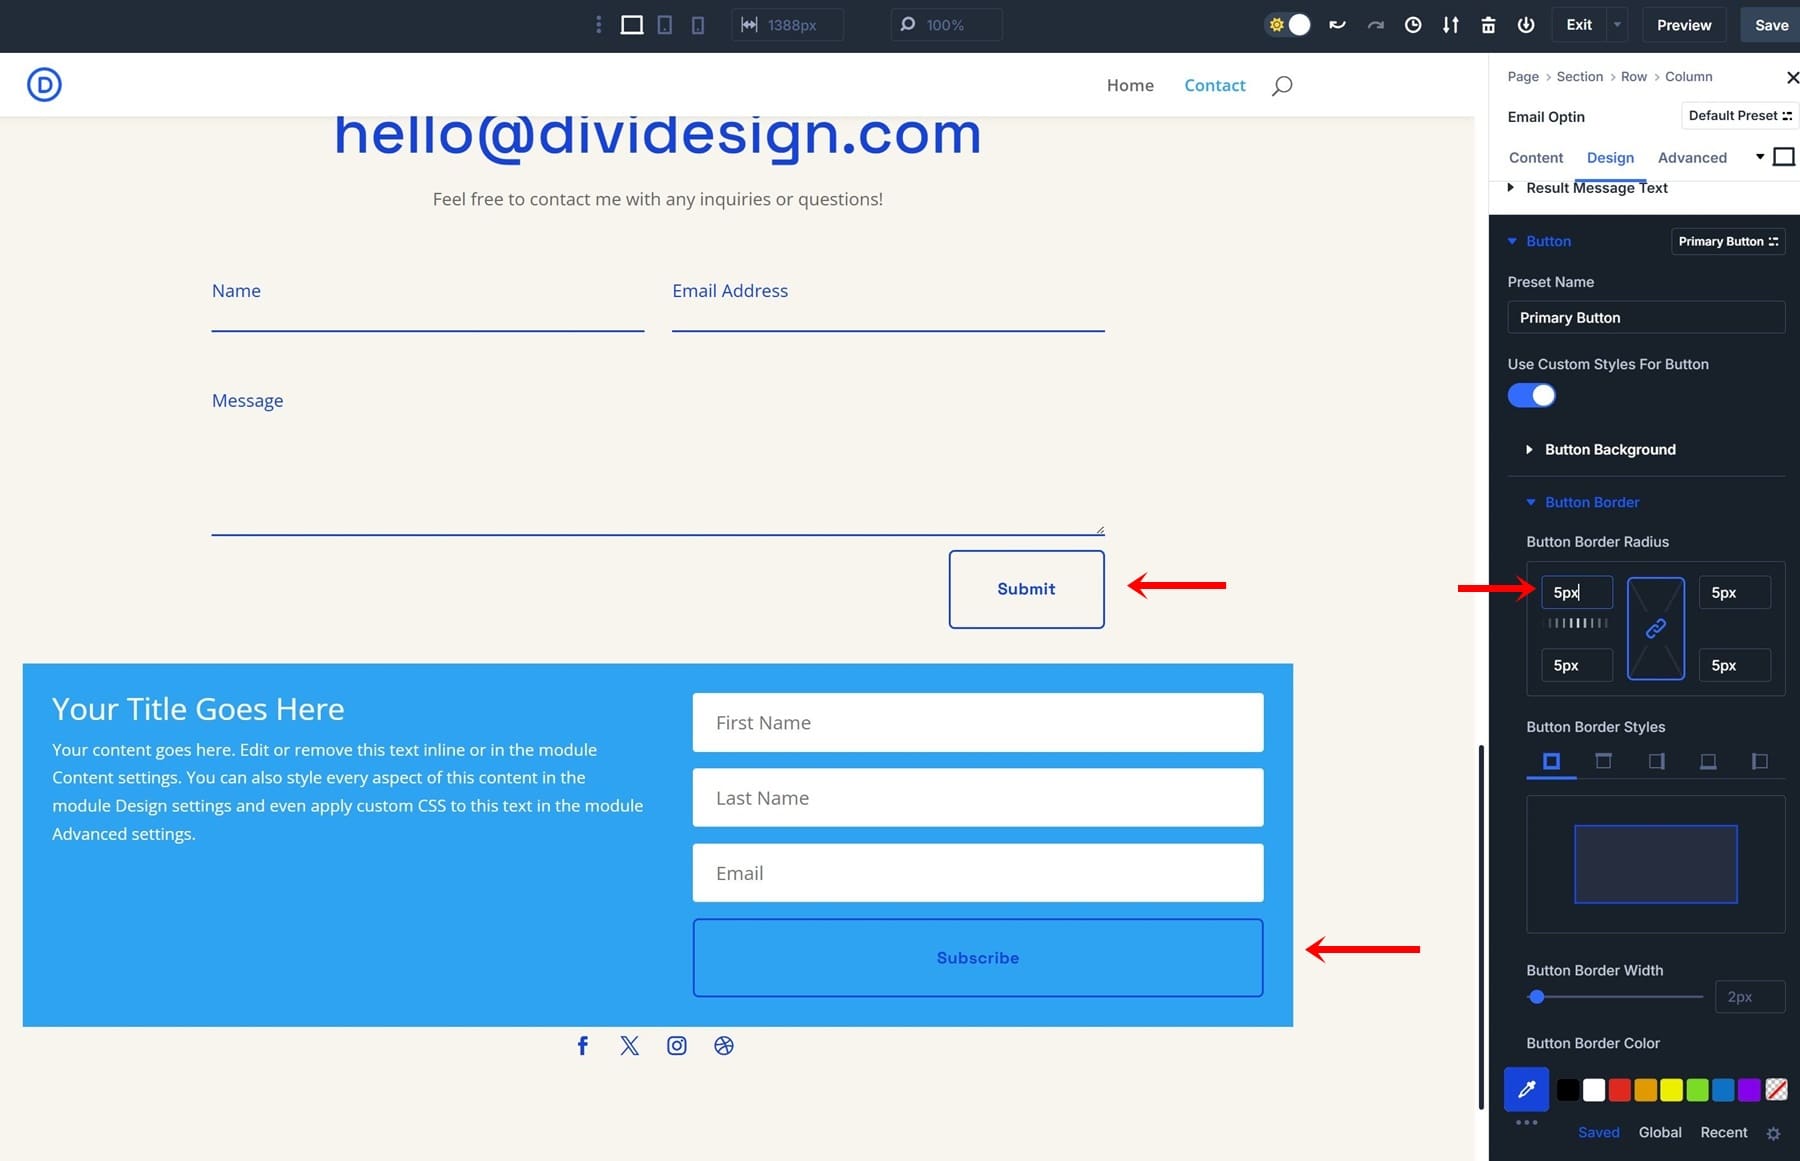
Always make sure to click “Save Preset”, and it’ll give you a warning mentioning that it’ll effect all instances where you’ve used this preset.
Key Benefits Of Using Option Group Presets
Once you start using Option Group Presets, it’s hard to imagine how you’ve never used them in the past. Let’s discuss why you should explore Divi 5 with the new Option Group Presets today.
1. Faster & More Efficient Design Workflow
With Option Group Presets, you no longer need to repeat design changes manually across different elements. Once you create a preset, it can be applied universally. If a design update is needed, modifying the preset automatically updates all elements that use it, saving time and effort.
2. Scalability
As websites grow, maintaining consistent design can become a challenge. Option Group Presets allow you to scale your designs efficiently by ensuring that all elements follow a unified style. Whether you’re managing a small business website or a large enterprise project, presets help maintain a clean and structured design system.
3. Easier Collaboration
Option Group Presets make collaboration smoother between designers working on the same project. Instead of manually updating multiple elements, team members can use presets to apply standardized styles quickly. Additionally, clients requesting changes will benefit from a more streamlined process since edits can be made at the preset level without having to modify individual elements individually.
4. Consistency Across Site Elements
Design consistency is crucial for a professional website. By using Option Group Presets, you can ensure that every button, heading, and background follows the same design rules. This eliminates inconsistency and helps maintain brand identity across all pages.
5. Easy Global Updates With Minimal Effort
Instead of manually updating styles for each element, Option Group Presets allow you to make global changes effortlessly. A single adjustment to a preset instantly updates all elements that use it, reducing the time spent on revisions and ensuring uniformity across your entire website.
Get Started With Divi 5 Today
Option Group Presets are a powerful addition to Divi 5, providing a flexible and efficient way to manage your website’s design. By leveraging these presets, you can streamline your workflow, maintain design consistency, and effortlessly make global updates. Start using Option Group Presets today and experience a new level of control and efficiency in your web design projects.
The post Everything You Need To Know About Divi 5’s Option Group Presets appeared first on Elegant Themes Blog.
# A Comprehensive Guide to Divi 5’s Option Group Presets: Features and Benefits
Divi, developed by Elegant Themes, has long been a favorite among web designers and developers for its versatility and user-friendly interface. With the release of Divi 5, a significant update has introduced a powerful feature known as Option Group Presets. This feature enhances the customization capabilities of the Divi Builder, allowing users to create more dynamic and visually appealing websites with ease. In this article, we will explore the features and benefits of Option Group Presets in Divi 5, helping you understand how to leverage this tool for your web design projects.
## What Are Option Group Presets?
Option Group Presets in Divi 5 are essentially predefined settings that allow users to save and apply a collection of design options across various elements of their website. These presets can include settings for colors, fonts, spacing, and other design attributes, enabling users to maintain consistency and streamline their design process.
### Key Features of Option Group Presets
1. **Customizable Presets**: Users can create their own presets tailored to their specific design needs. This flexibility allows for a personalized approach to web design, ensuring that each project can have a unique look and feel.
2. **Global Application**: Once a preset is created, it can be applied globally across multiple elements or sections of a website. This feature is particularly useful for maintaining a consistent design language throughout a site, making it easier to manage large projects.
3. **Easy Access and Management**: Divi 5 provides an intuitive interface for managing Option Group Presets. Users can easily access, edit, and delete presets as needed, ensuring that their design workflow remains efficient.
4. **Real-Time Preview**: As users apply presets, they can see real-time changes in the visual editor. This immediate feedback allows for quick adjustments and refinements, enhancing the overall design experience.
5. **Compatibility with Existing Designs**: Option Group Presets can be integrated with existing designs, allowing users to update and improve their websites without starting from scratch. This backward compatibility ensures that users can take full advantage of the new features without losing their previous work.
### Benefits of Using Option Group Presets
1. **Time Efficiency**: By saving time on repetitive design tasks, Option Group Presets allow designers to focus on more creative aspects of their projects. This efficiency can lead to faster project completion and increased productivity.
2. **Consistency Across Designs**: Maintaining a consistent design across multiple pages or sections is crucial for branding and user experience. Option Group Presets help ensure that colors, fonts, and other design elements remain uniform, reinforcing brand identity.
3. **Simplified Collaboration**: For teams working on web design projects, Option Group Presets facilitate better collaboration. Team members can share presets, ensuring that everyone is on the same page regarding design choices and styles.
4. **Enhanced Creativity**: With the ability to experiment with different presets, designers can explore various design options without the fear of losing their original settings. This encourages creativity and innovation in web design.
5. **User-Friendly Experience**: Divi 5’s intuitive interface makes it easy for users of all skill levels to take advantage of Option Group Presets. Whether you are a seasoned developer or a beginner, the learning curve is minimal, allowing for quick adoption of this powerful feature.
### How to Create and Use Option Group Presets
Creating and using Option Group Presets in Divi 5 is a straightforward process:
1. **Access the Divi Builder**: Start by opening the Divi Builder on the page or post where you want to apply the presets.
2. **Select an Element**: Click on the element you want to customize (e.g., a text module, button, or section).
3. **Customize Settings**: Adjust the design settings as desired, including colors, fonts, spacing, and more.
4. **Save as Preset**: Once you are satisfied with your customizations, look for the option to save your settings as a preset. Give your preset a descriptive name for easy identification.
5. **Apply Presets**: To apply a preset to other elements, simply select the element, navigate to the presets menu, and choose the desired preset from the list.
6. **Edit or Delete Presets**: If you need to make changes to a preset, you can easily edit it from the presets management interface. Similarly, if a preset is no longer needed, it can be deleted with just a few clicks.
## Conclusion
Divi 5’s Option Group Presets are a game-changer for web designers and developers looking to enhance their workflow and improve the consistency of their designs. By leveraging the features and benefits of this powerful tool, users can create stunning, cohesive websites more efficiently than ever before. Whether you’re working on a personal blog, a business site, or an e-commerce platform, Option Group Pres

Recent Comments