

Divi AI has an AI toolset that is usable at any point in your website design process. Today, we wanted to show you how to get the most out of Divi AI using its new AI Section Generator. This is a great feature addition for those who have established websites but want to speed up adding new content sections.
If you missed our AI Section Generator feature release post, watch our video below. With the rest of this article, we’ll show you how to use this new feature for faster website builds.
What is Divi AI’s Section Generator?
Divi AI’s Section Generator is a new feature that allows users to create individual web page sections using artificial intelligence within Divi Builder.
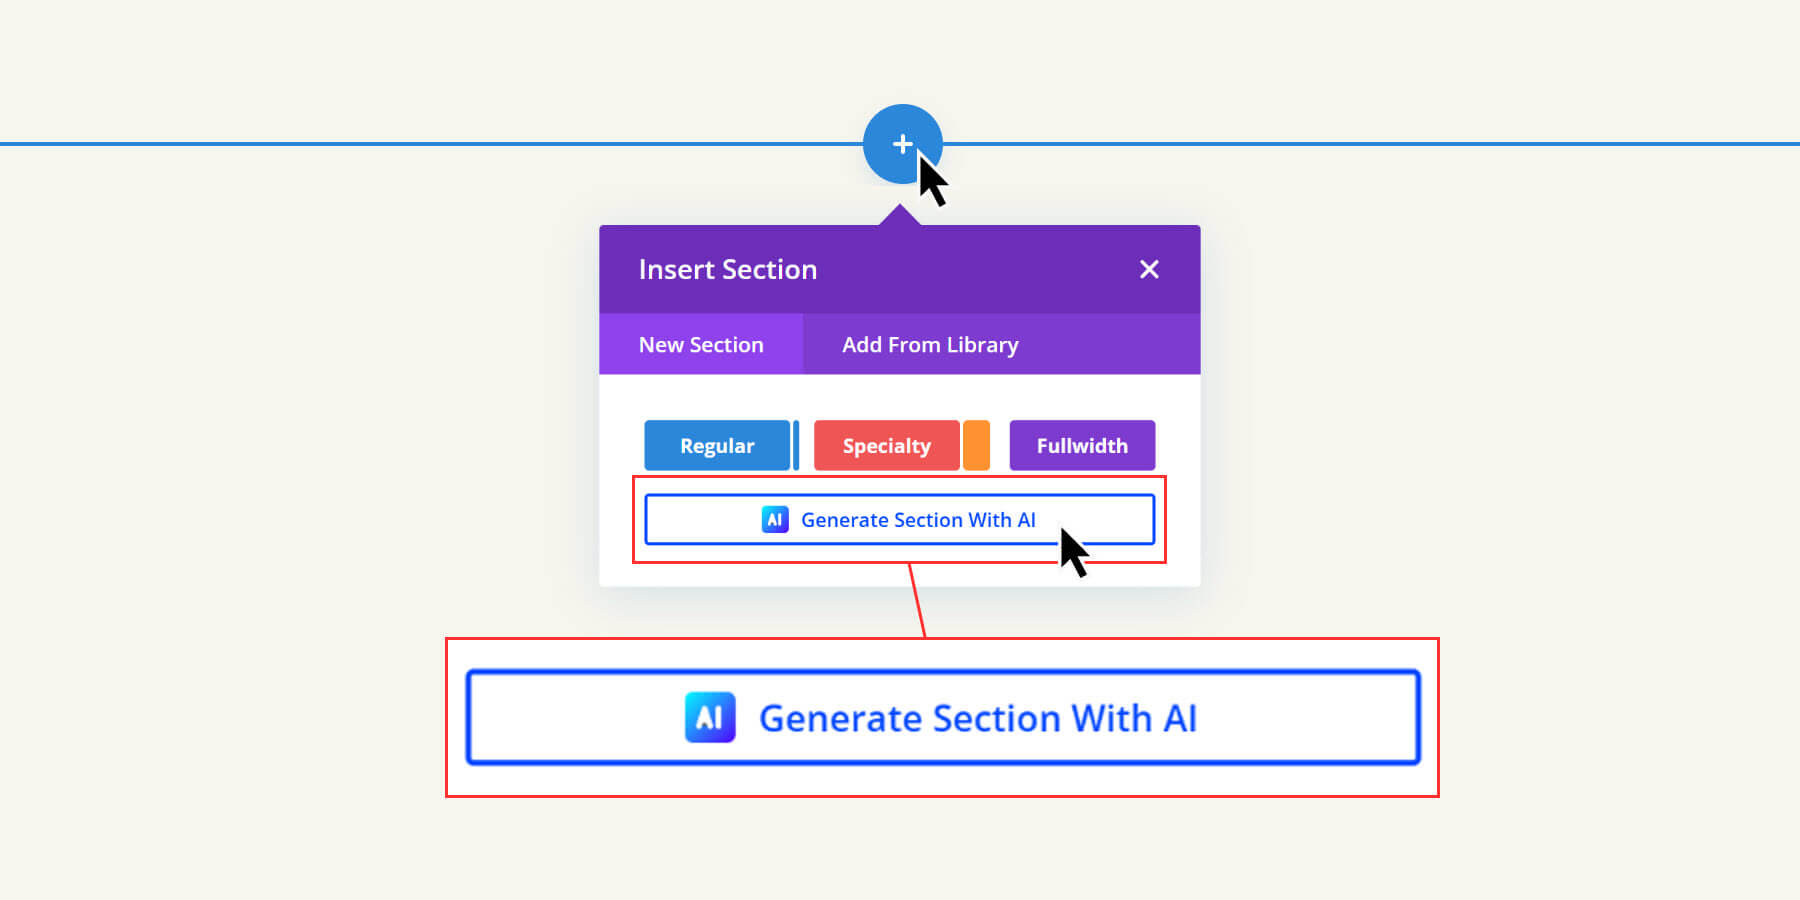
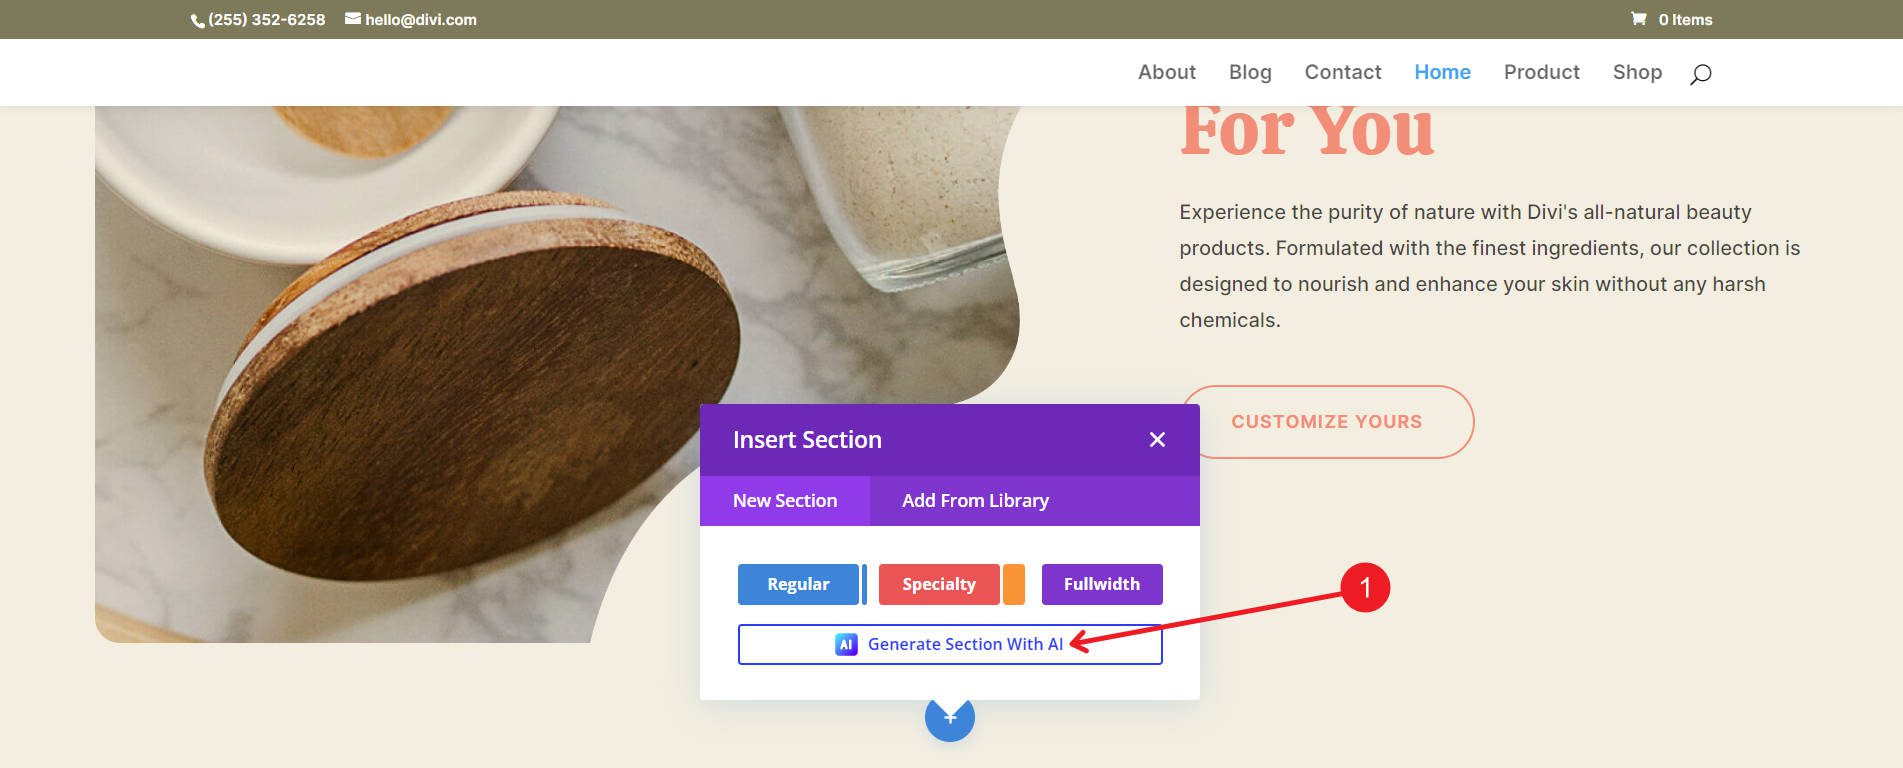
You’ll notice when adding a new section in Divi, there is an option to “Generate Section With AI”.
Divi Sections are containers for organizing webpage content (containing Rows and Divi Modules). On the back end, they help keep pages organized; on the front end, they help create a visual separation between different parts of your web pages. This is what Divi’s AI Section generator can create for you automatically.
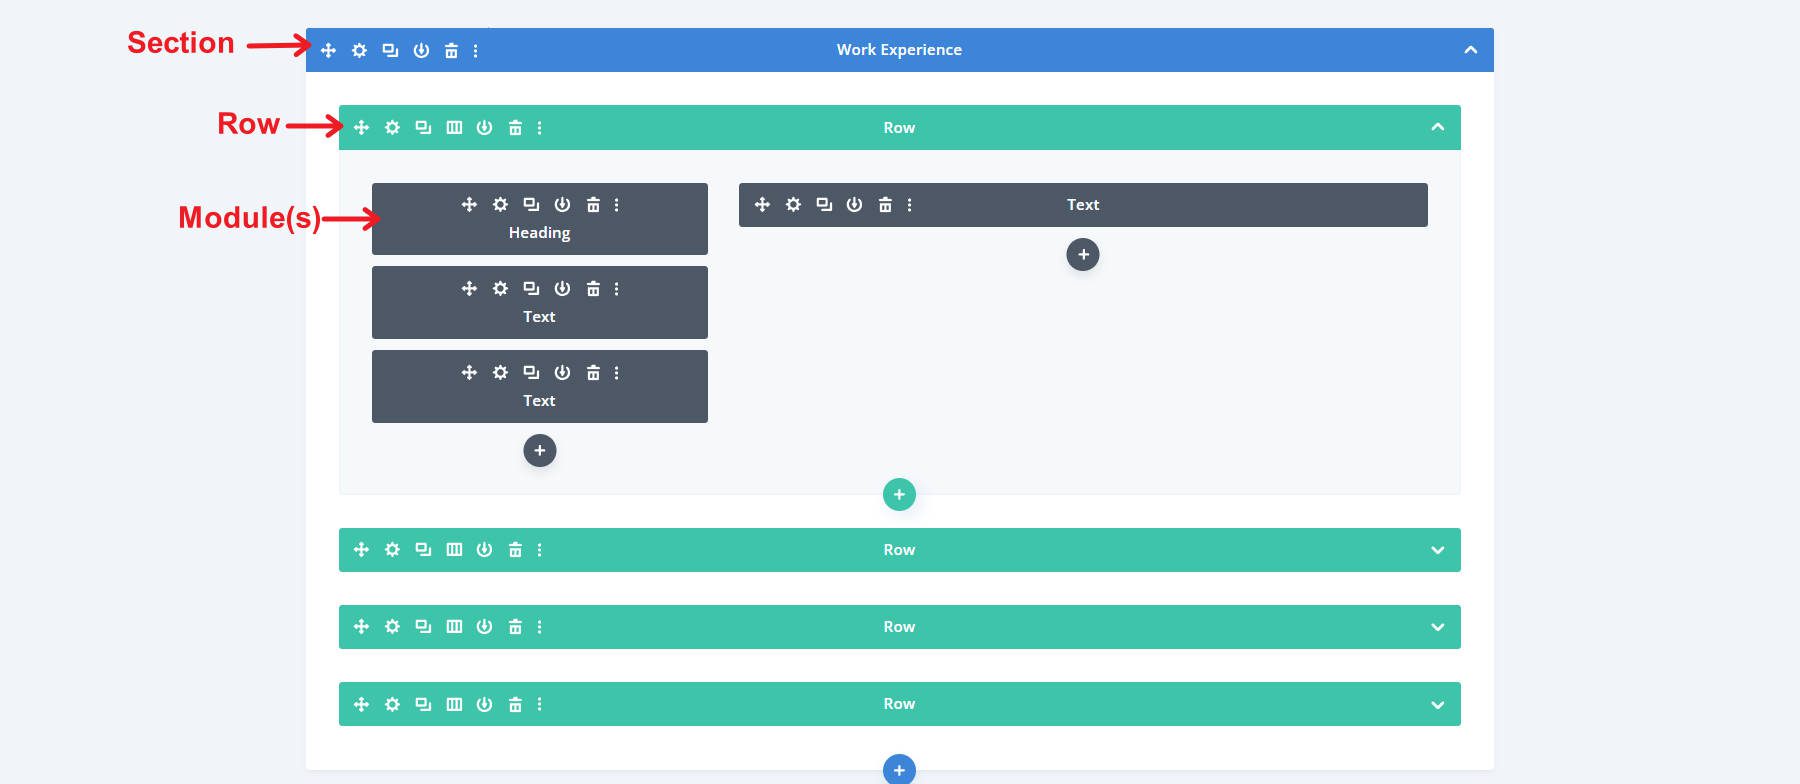
Wireframe View of a Section housing multiple Rows, each including Columns and Modules
Divi AI’s Section Generator will take your prompts and design specifications to construct a new section (including the modules and content within them). This lets anyone ask AI for what they need without building from scratch.
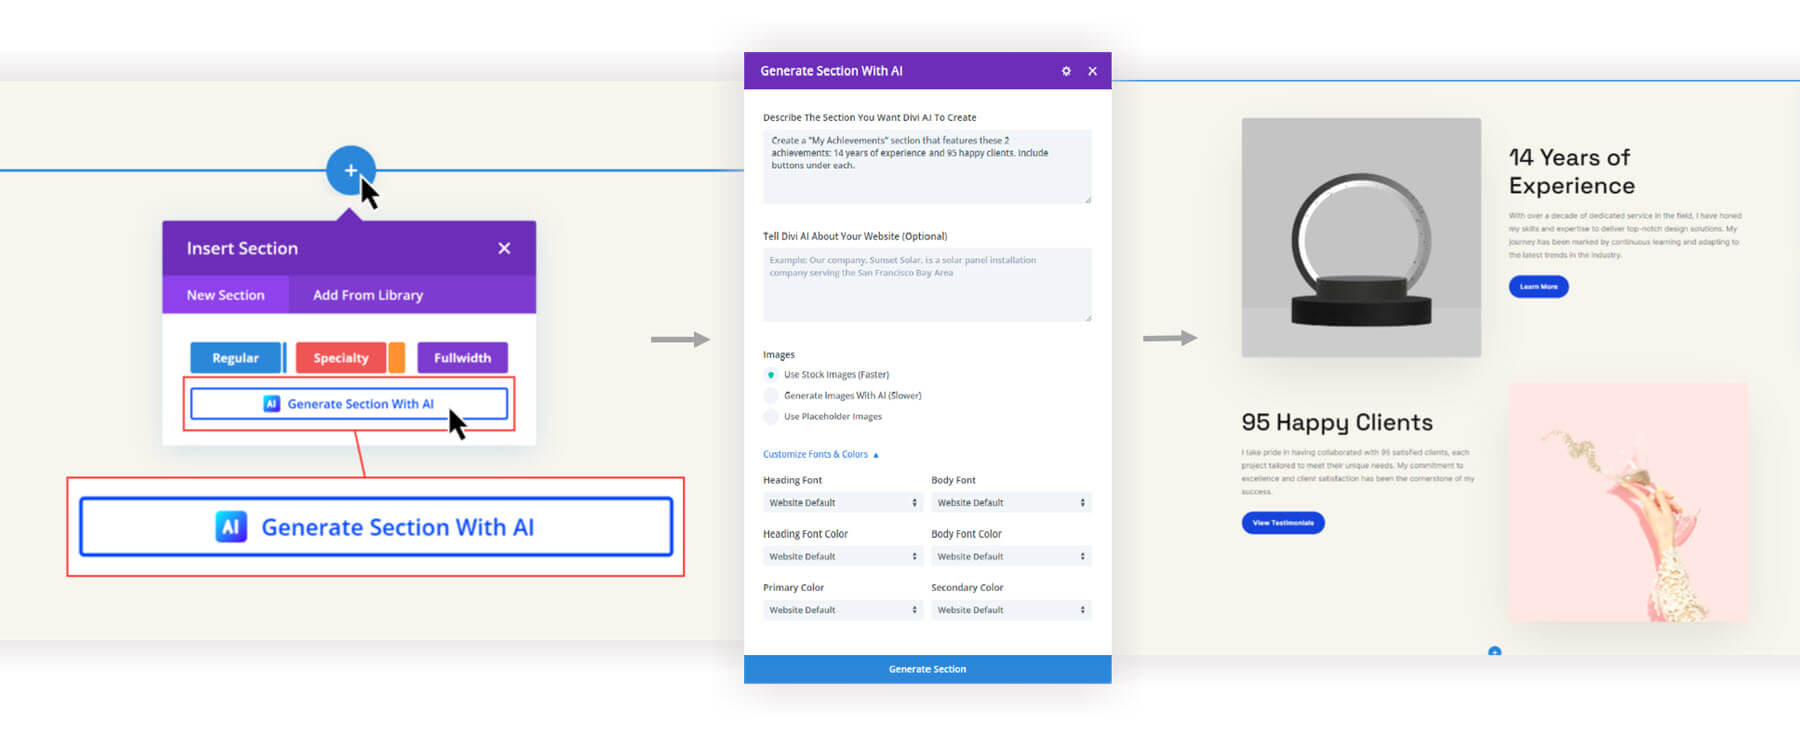
One of the best parts is that all AI-generated sections are fully editable using Divi’s Visual Builder. It’s a faster way to build custom websites.
How Divi’s AI Section Generator Fits In With Other Divi AI Tools
AI Sections are one piece of building a website with Divi AI. To help you see where it fits in, here is a list of Divi AI tools and capabilities:
- AI Website Builder is the most comprehensive AI tool within Divi AI. Using Divi Quick Sites, you can use Divi AI to generate an entire website with multiple pages (unique content and layouts) and theme templates, putting together dozens of tasks in a single prompt.
- Divi Layouts AI allows users to build a single page or theme template using Divi AI. It’s useful when building new pages, but you don’t need to create a bunch of basic pages.
- ✨Divi AI Section Generator lets you quickly add new sections to a page with usable content and design that matches your brand. This is great for adding something missing on an otherwise great page.
- Divi Text AI is your personal AI writing companion within Divi that can generate website text in context on demand.
- Divi Image AI is a complex AI tool for generating and modifying images. It lets you create new images on the fly with simple prompts. And you can bring existing images to an AI editing process. To use, select an area of an image or set reference image percentage and enter a prompt to make changes.
- Divi Code AI is usable on any Divi Modules through the Advanced Tab. Generate custom CSS to add advanced styles to individual modules or use a code module to generate HTML and Javascript.
The list shows that the first three tools have a broader application (website, pages, sections) while the last three have a more granular application (text, images, code).
Divi’s AI Section generator fills in a missing piece of the Divi AI website building process, allowing you more control and flexibility to build and customize your pages with entirely new sections in a single click.
How to Use Divi’s AI Section Generator
You’ll use AI Sections in three major use cases: Starter Sites, AI-generated websites/Layouts, and using them from scratch in the visual builder.
Here’s how you can expect each of these to work.
Add a New Section to a Starter Site
If you use Divi Quick Sites you can choose to build your website using one of our Divi Starter Sites. Starter Sites set up your website with predesigned pages, templates, and established Default Settings (fonts and colors). When you look at your new pages using a Starter Site, you’ll notice that the content and sections are generic but well-styled. You can then use Divi to create new Sections that match the Default Styles from the Starter Site. This way, the new content you create matches the overall style that you already choose.
Your first step is to have already used a Starter Site. Then, navigate to the page you want to add a section to. Find the place where you want to add your Section and click the Blue Plus icon.
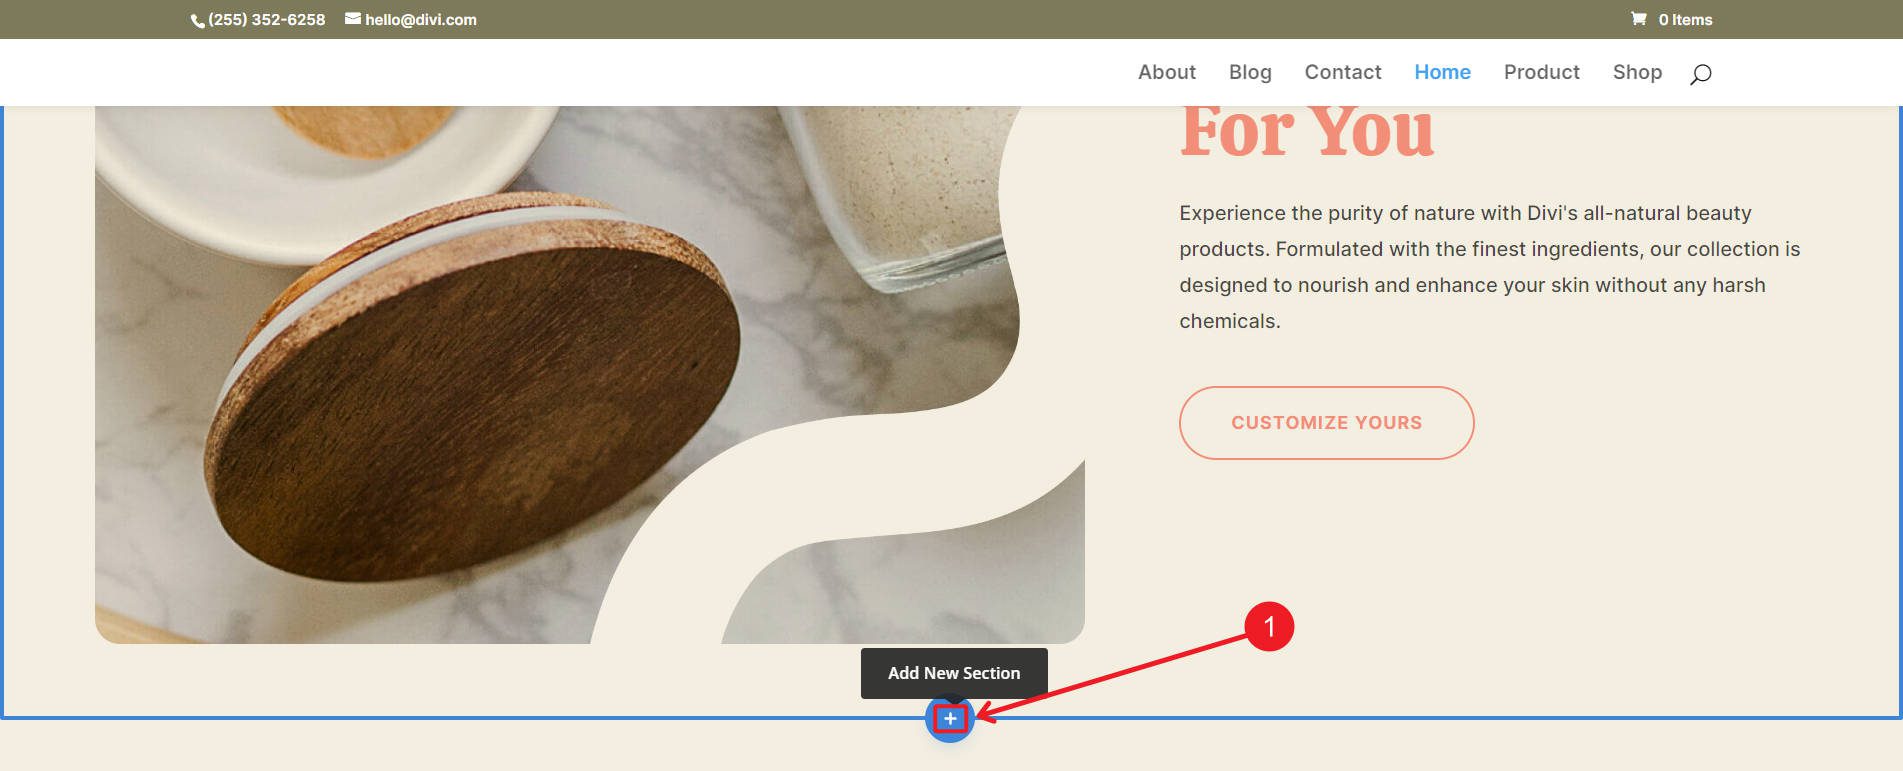
Open the AI Section popup modal to configure your prompt by clicking Generate Section With AI.
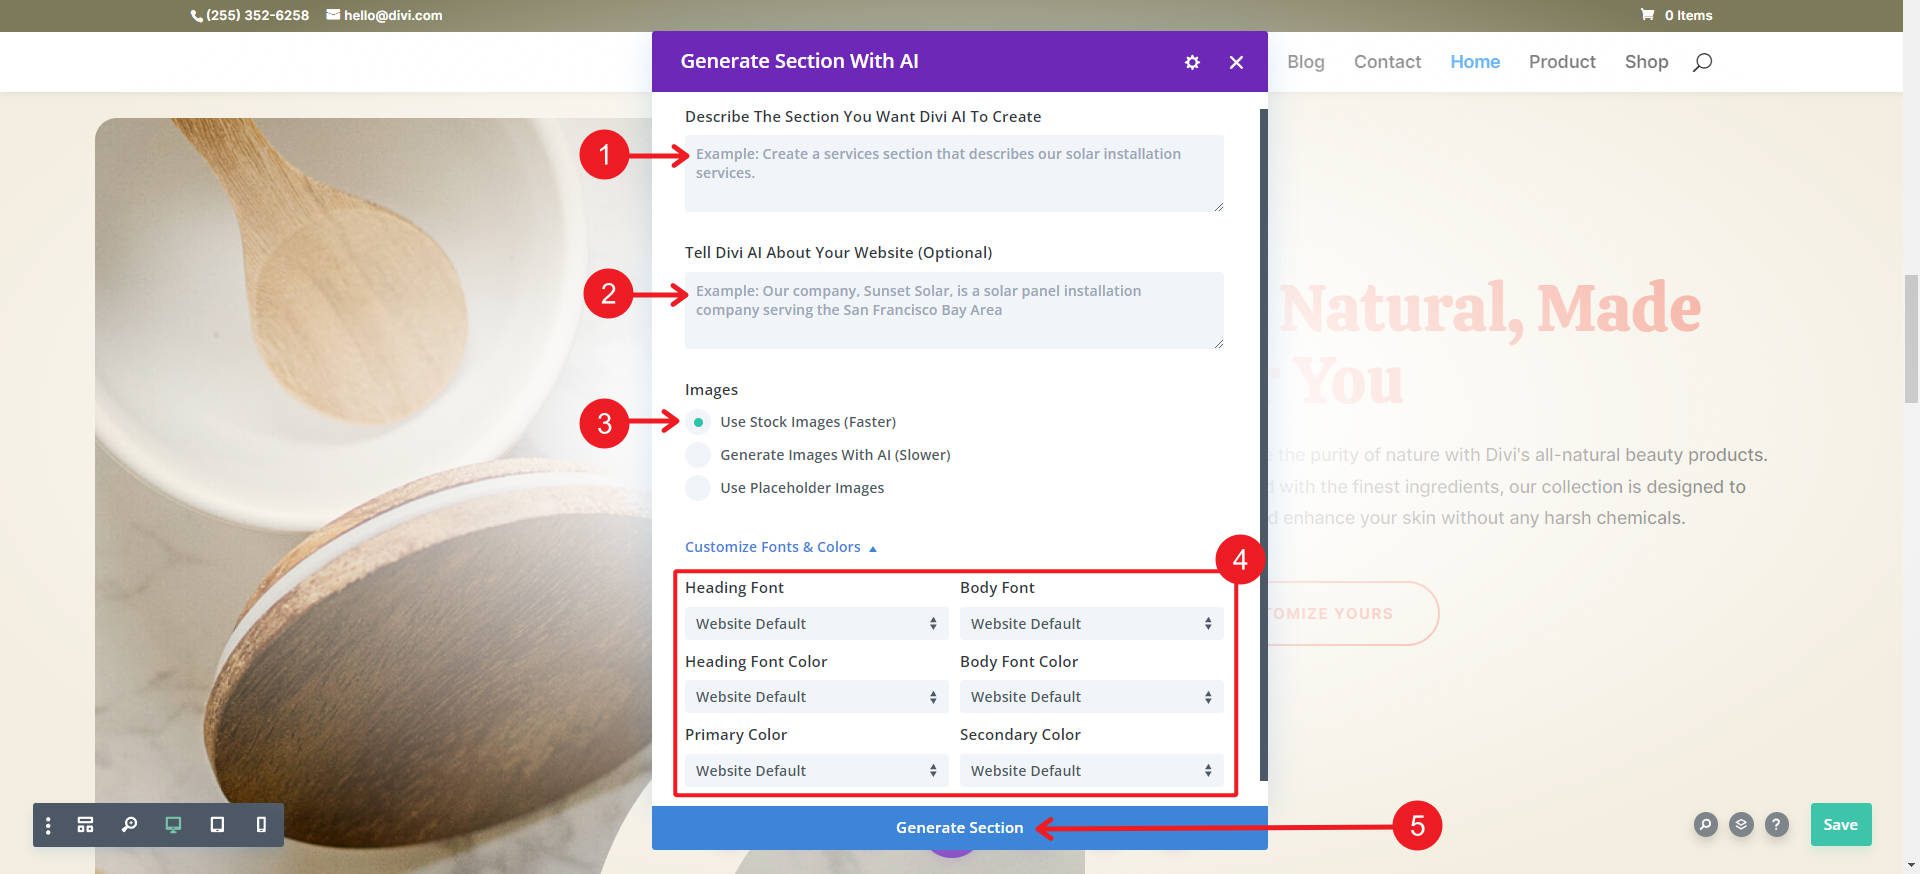
You’ll build your prompt with specific instructions (1), an optional prompt (2), and a declaration of how Divi AI uses images (3). For the purposes of this tutorial, the important settings are found at number 4, where you should set fonts and colors to Website Default to keep the default styles set by the Starter Site.
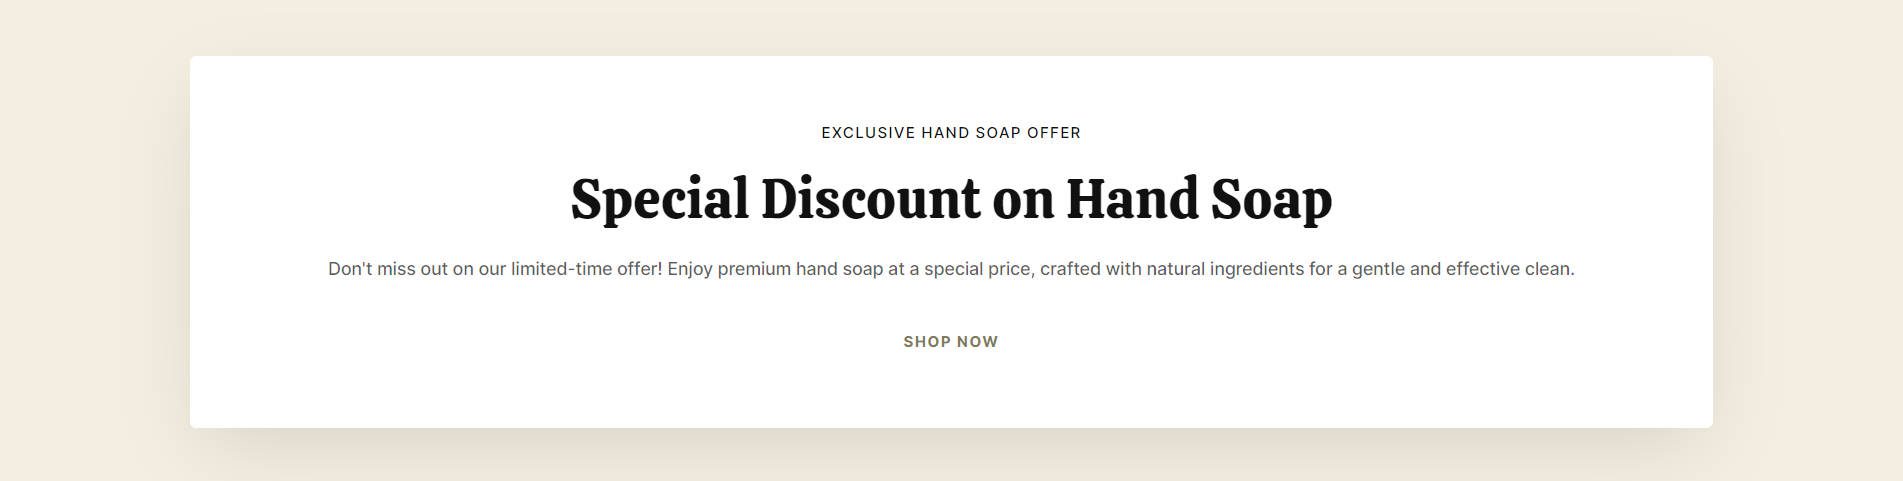
We requested Divi AI to create a call-out section to advertise a discount on our website’s hand soap. It adopted the Starter Site default styles to fit in with the rest of the page without manually setting styles.
Add a New Section to an AI-Generated Layout
If you’re building pages one by one with Divi Layouts AI, you can give AI the ability to come up with its own styles—and with any luck—save those AI Styles to use later. First, we need to create a page and generate an AI Layout. On a new page, Insert Layout and select Build with AI.
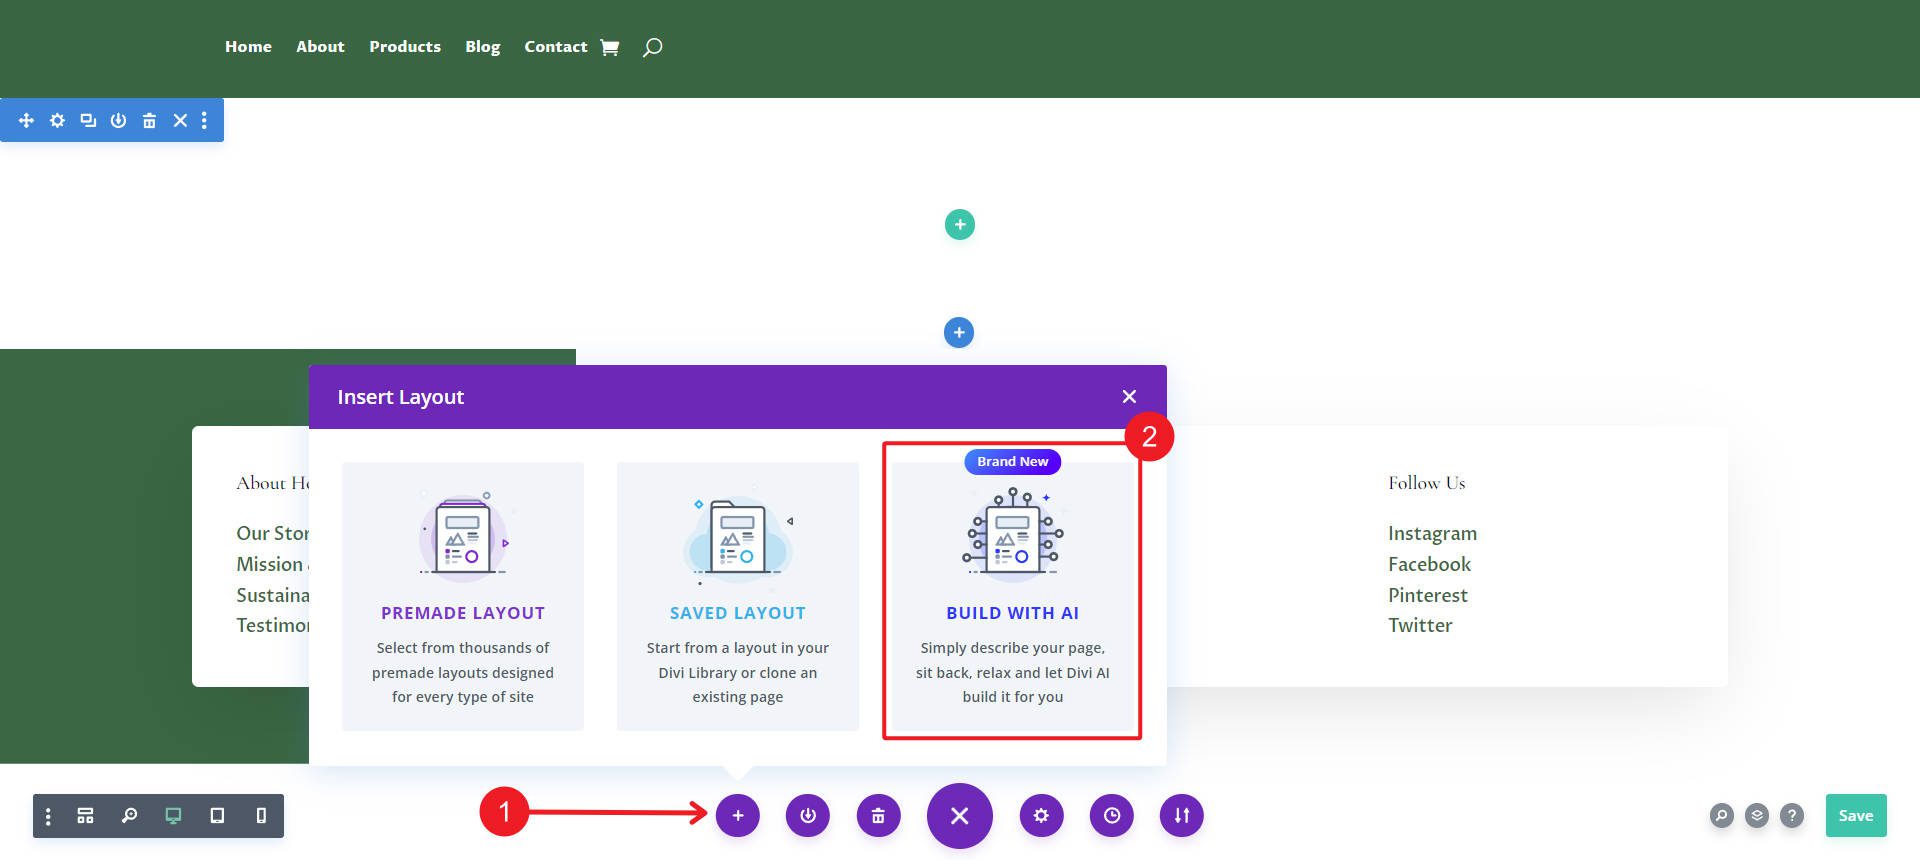
You’ll be asked to set provide the details for the webpage build for Divi AI to follow. When ready, Generate Layout.
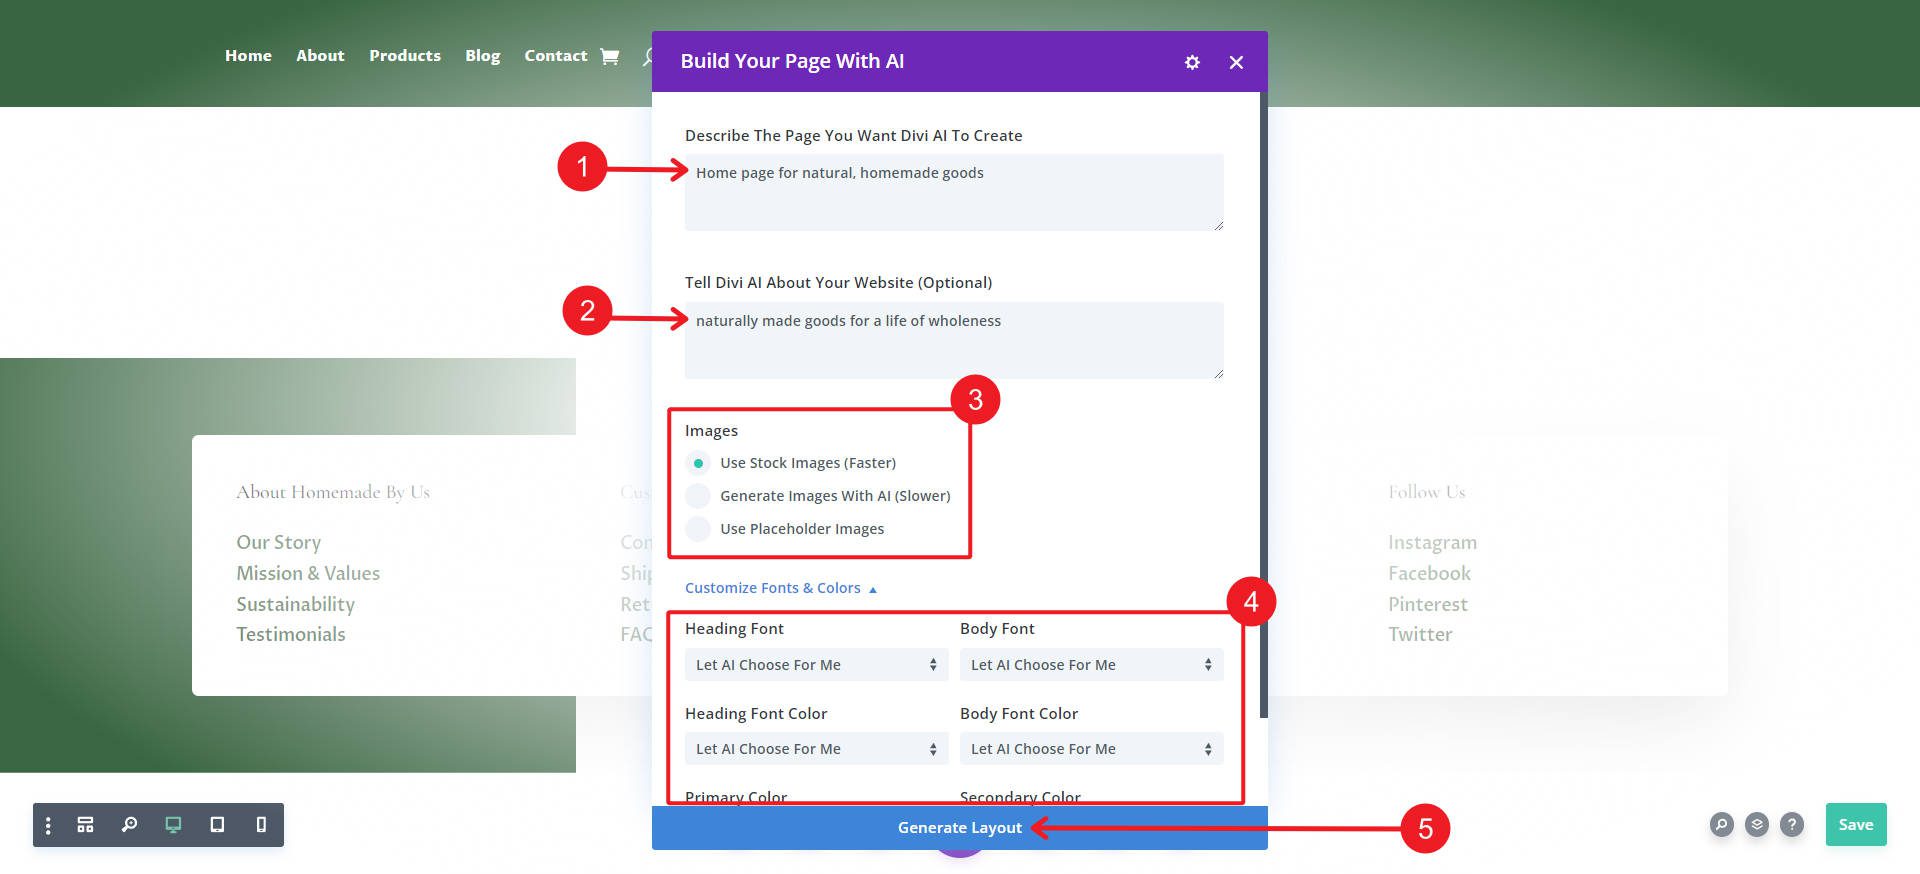
Now, wait for the AI to build your page. When it’s done, review to make sure you like the styles it used. If not, you can use the AI Layout builder again to see what it can do differently. If you do like it, then notice up in the top right. There should be a How Does It Look? modal where you can save the fonts and colors that Divi AI used.
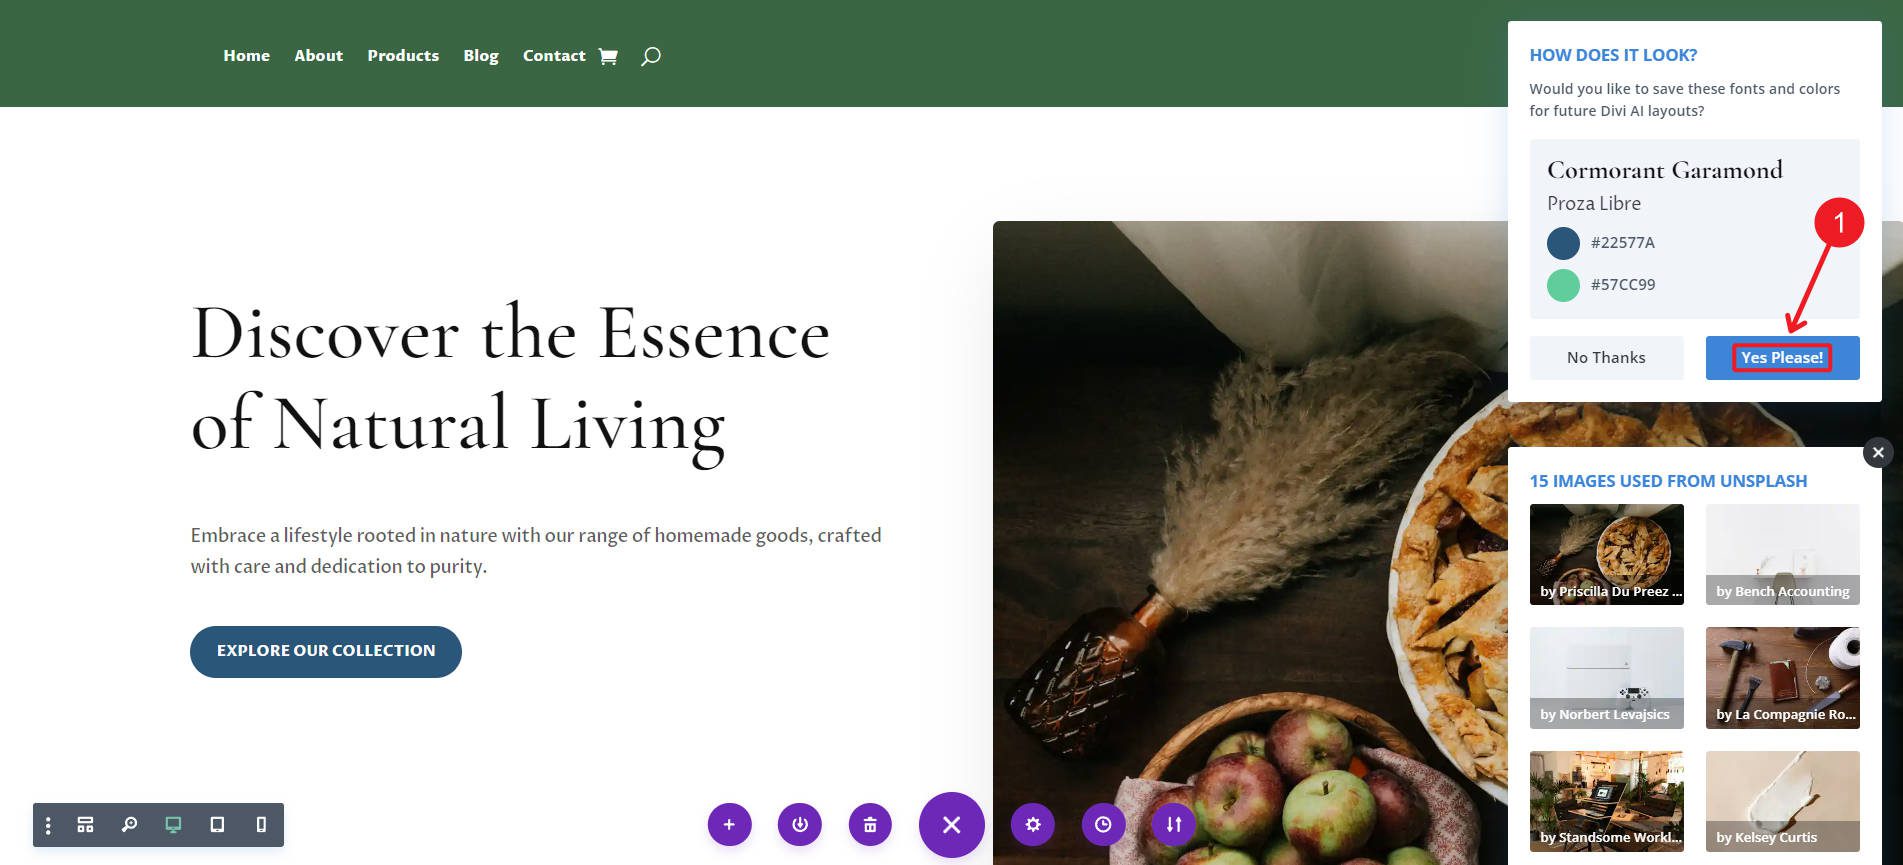
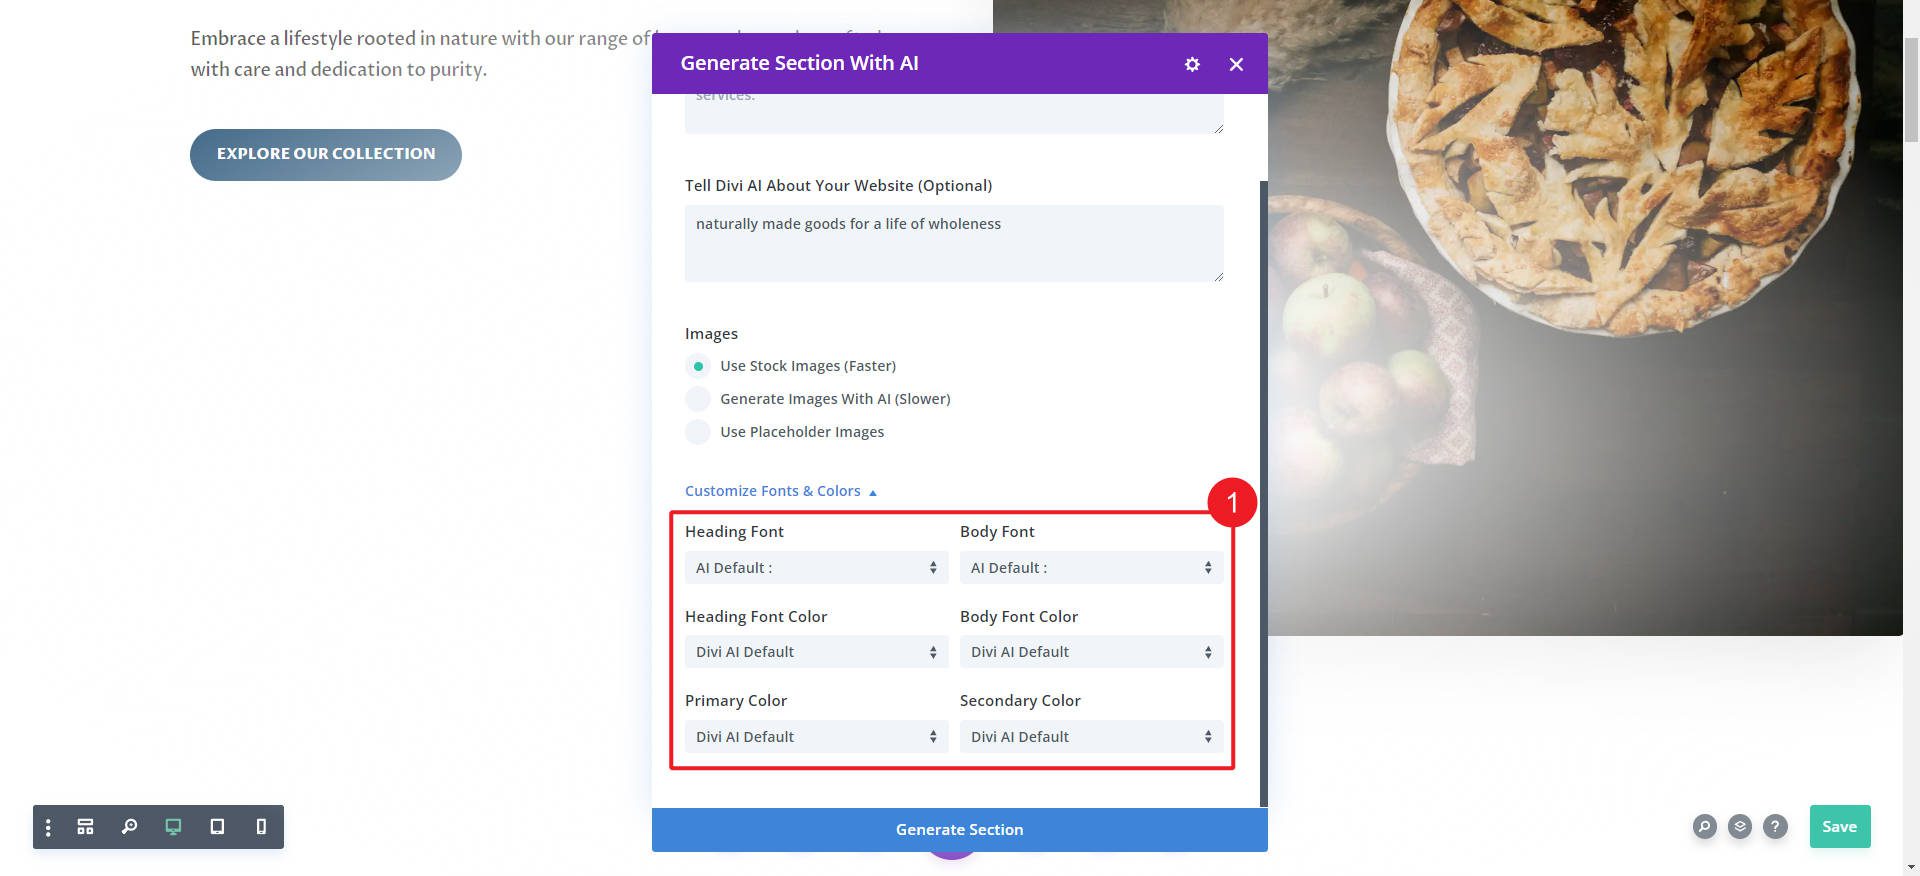
After saving those AI styles, try creating a new section with AI (similar steps as before). Under the Customize Fonts & Colors portion of the prompt pop up, make sure to set the fonts and colors to the Divi AI default setting. This will will carry over those settings we just saved to your new AI generations with the AI section builder.
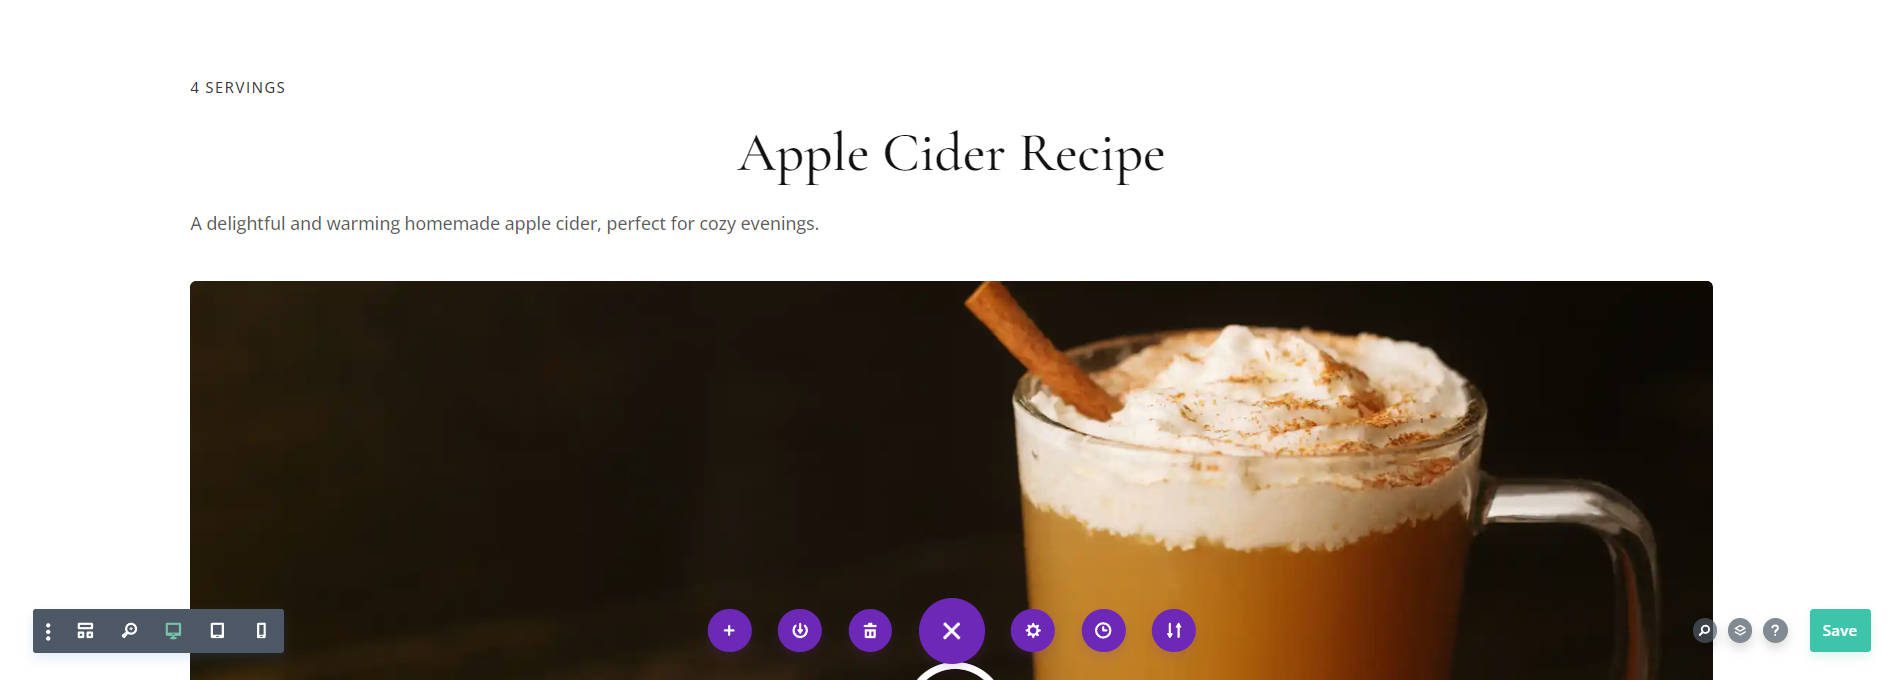
Your new section will have the same styles as the rest of the page.
Build a Page From Scratch Using AI Sections
Here’s how you can use the Divi AI section generator from scratch. Add sections to a page by clicking the Blue + button in the Visual Builder. They will appear underneath any existing sections on the page.

You have your standard options for creating sections, but you should notice and click the Build Section with an AI button.
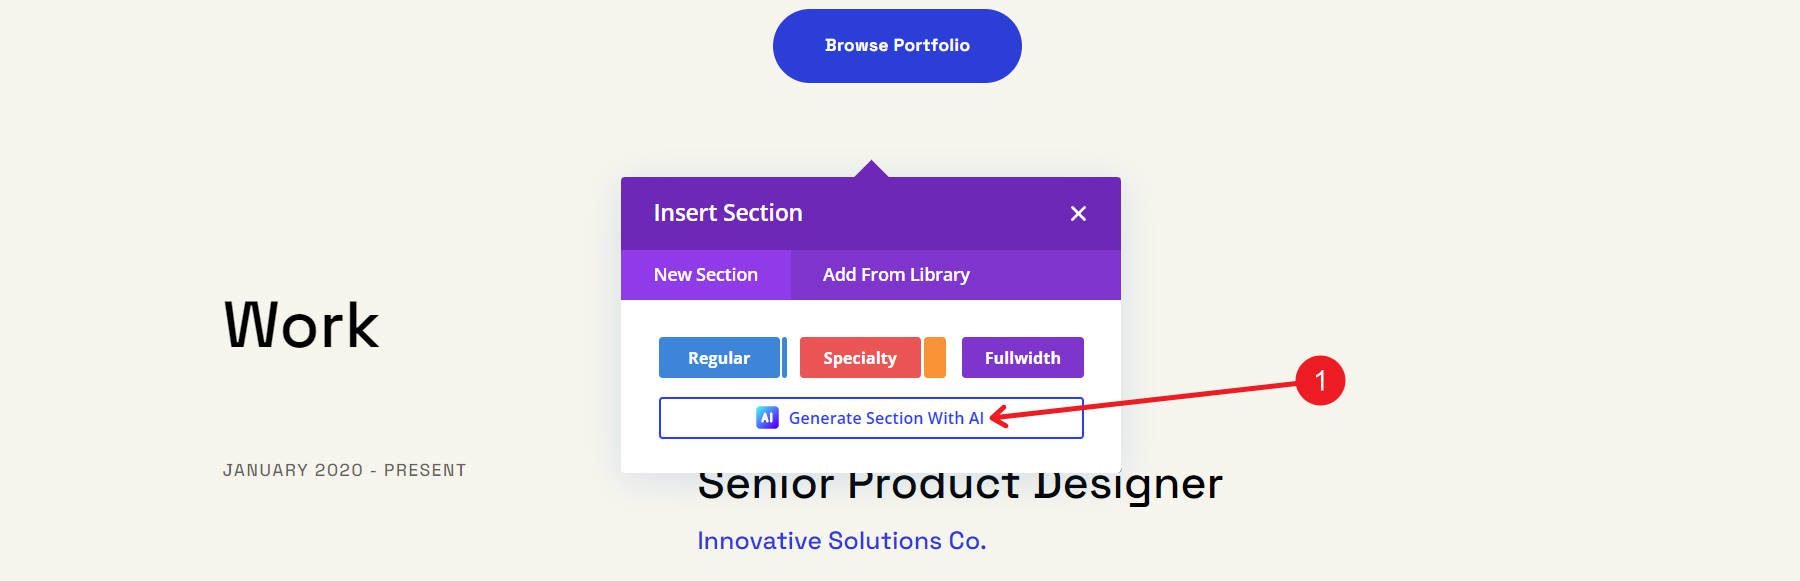
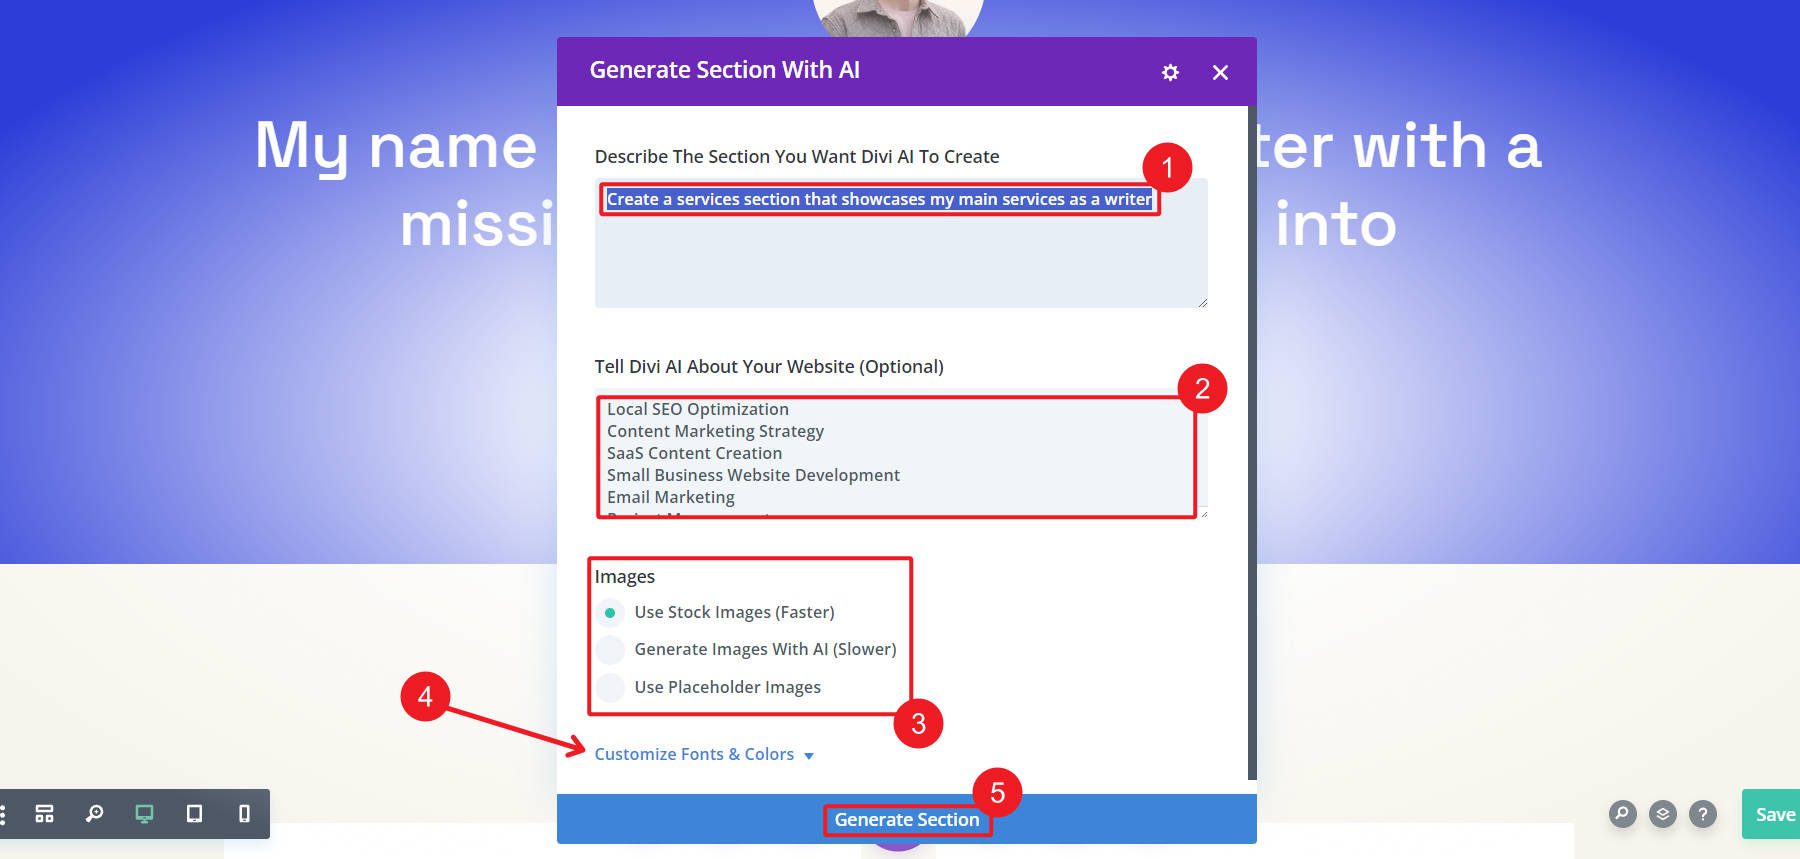
Divi AI’s modal will pop up. This is where you can create your request (prompt) that Divi AI will use to create your new section. You’ll notice a field box for as long of a prompt as you need. You will also set color and font preferences (use Global Styles, Let AI Choose, or hand-select them for this generation). When ready, Generate Section.
Divi AI will take a few seconds to analyze your prompt, transform it into a section, add Divi Modules, and populate image/text content. Creating sections is fastest (and often better) when using the Unsplash integration which fetches professional photos.
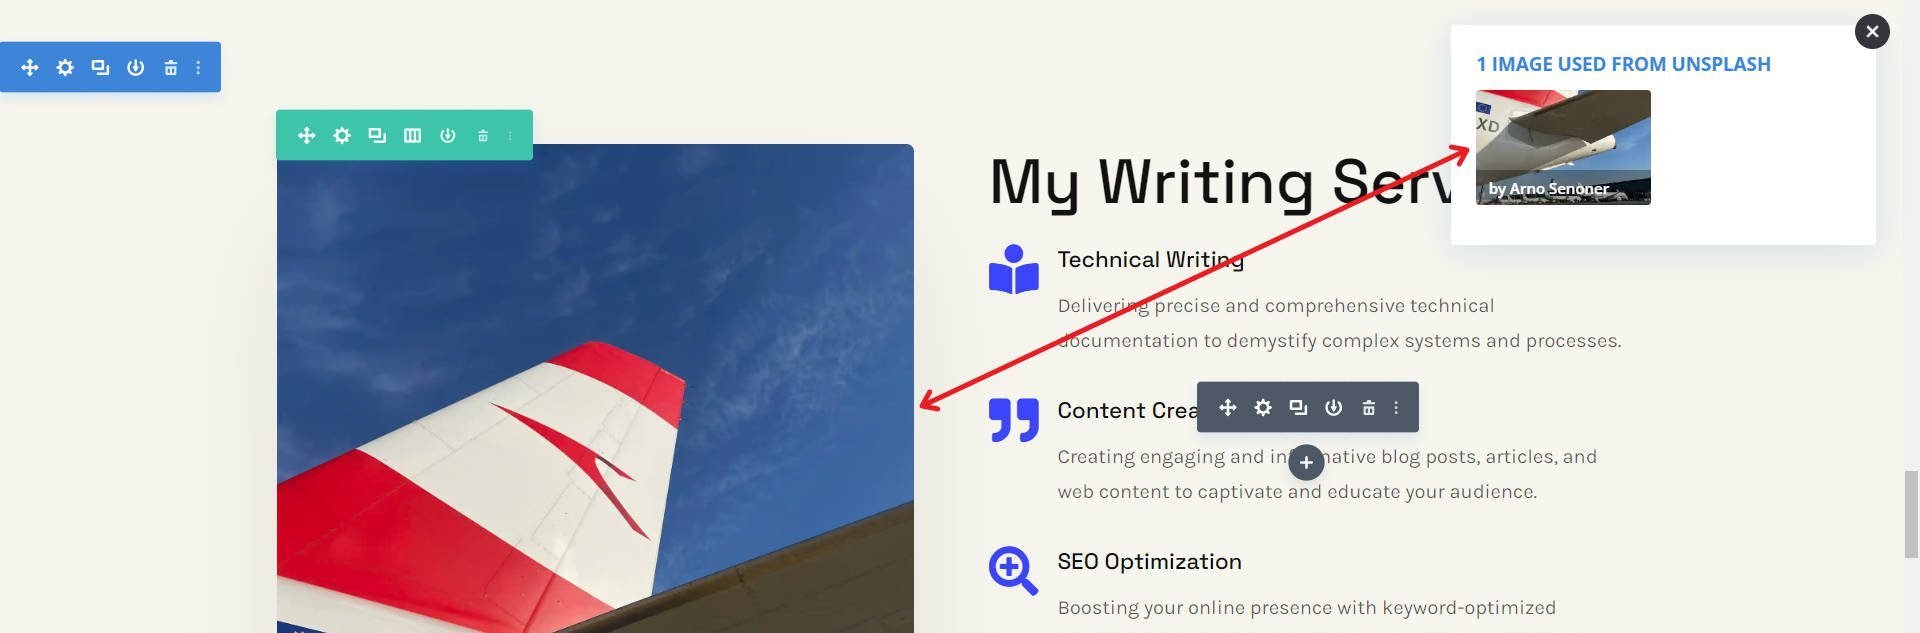
Once you’ve done this, Divi AI will place your new section on your page. Every section, row, and module setting is ready for your modifications. Notice how even the written content is based on what you give the AI.
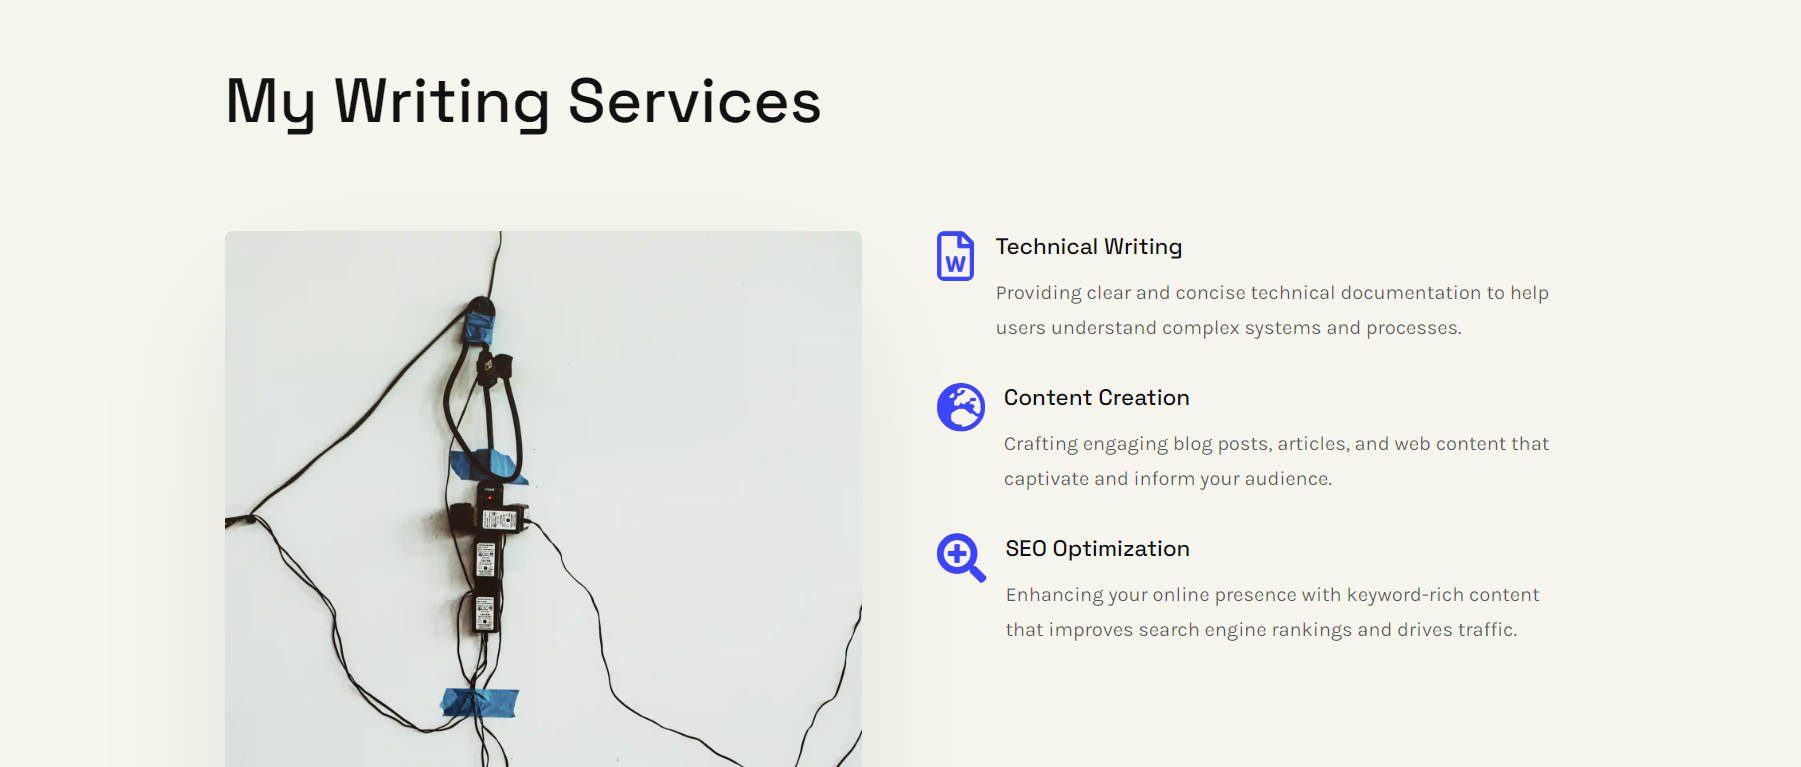
Layout, Style, Icons, and Text all pieced together with Divi AI
If the AI misunderstood you or created something that doesn’t work, you can delete the section and try again. I like to keep a Word Doc or Notepad open to save my prompts; that way, I don’t have to retype my prompt if I need to regenerate a section. I always recommend mastering prompt engineering. If you keep getting poor results, you need to experiment more to learn how to make better requests.
AI Section Generation Tips
Here’s some hard-won advice about using Divi AI to get the most out of your experience.
Use a Strong Optional Prompt
You’ll notice that when you build a new section with AI, two prompt fields ask for information. The first is the main prompt, which is your explicit request to Divi AI. But there’s an Optional field where you can tell Divi AI about your entire website.
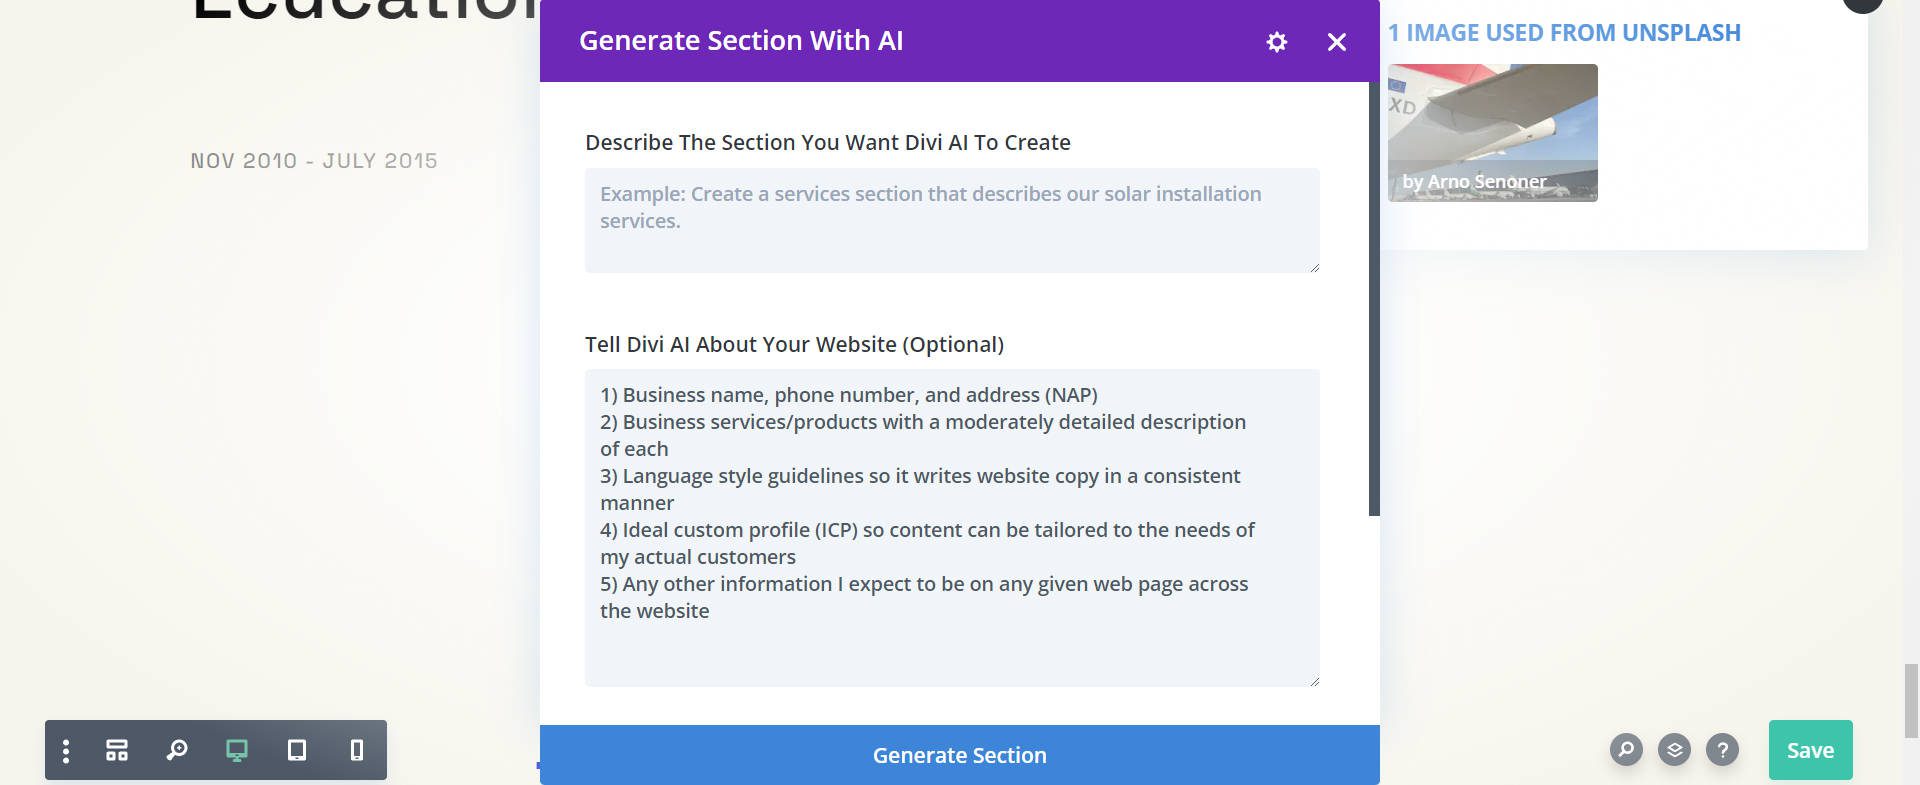
The main reason you should use the optional prompt is that it will save time when asking Divi AI to create specific elements. Each time you use Divi AI, you’ll ask for very specific things, but the optional prompt lets you keep a single thread consistent across your website. It will reduce the time you write out prompts while providing better and more consistent responses.
Here’s what I tend to include in the optional Tell Divi AI About Your Website prompt field:
- Business name, phone number, and address (NAP)
- Business services/products with a moderately detailed description of each
- Language style guidelines so it writes website copy in a consistent manner
- Ideal custom profile (ICP) so content can be tailored to the needs of my actual customers
- Any other information I expect to be on any given web page across the website
What’s nice about this prompt is that it can be used in multiple types of Divi AI requests, not only AI section generation.
Set Fonts and Colors
Setting default fonts and colors in Divi AI will help you get more consistent results. Clicking the Gear icon at the top right of Divi AI will reveal a Settings modal. Here, you can set preferences that Divi AI will automatically use on all requests.
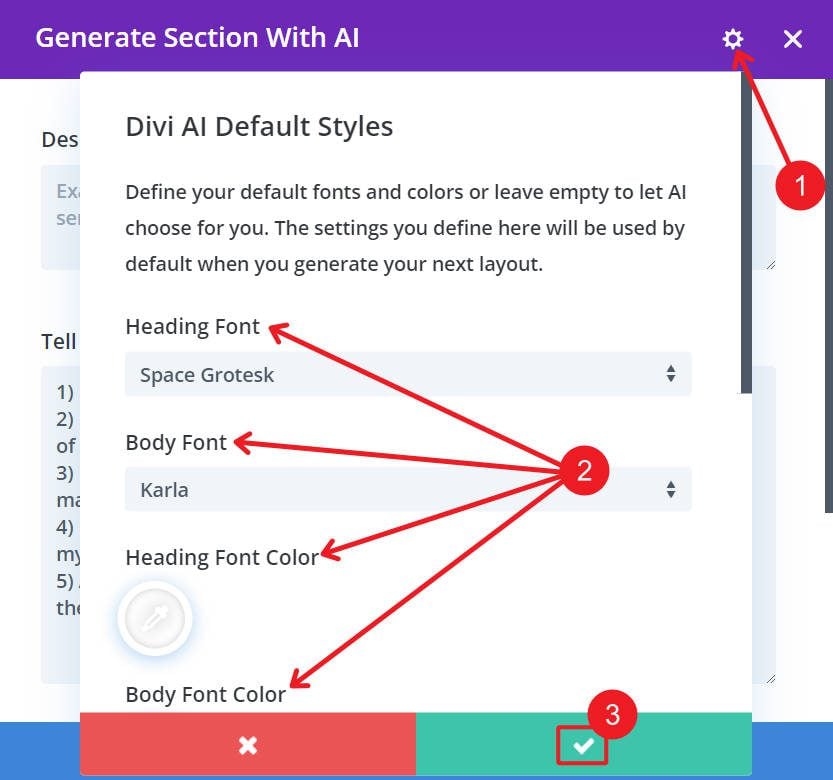
If you don’t want to set one set of styles for your website, you can manually adjust the Fonts and Colors for every request. This is good if you use more than 2 fonts or 2 primary colors on your website.
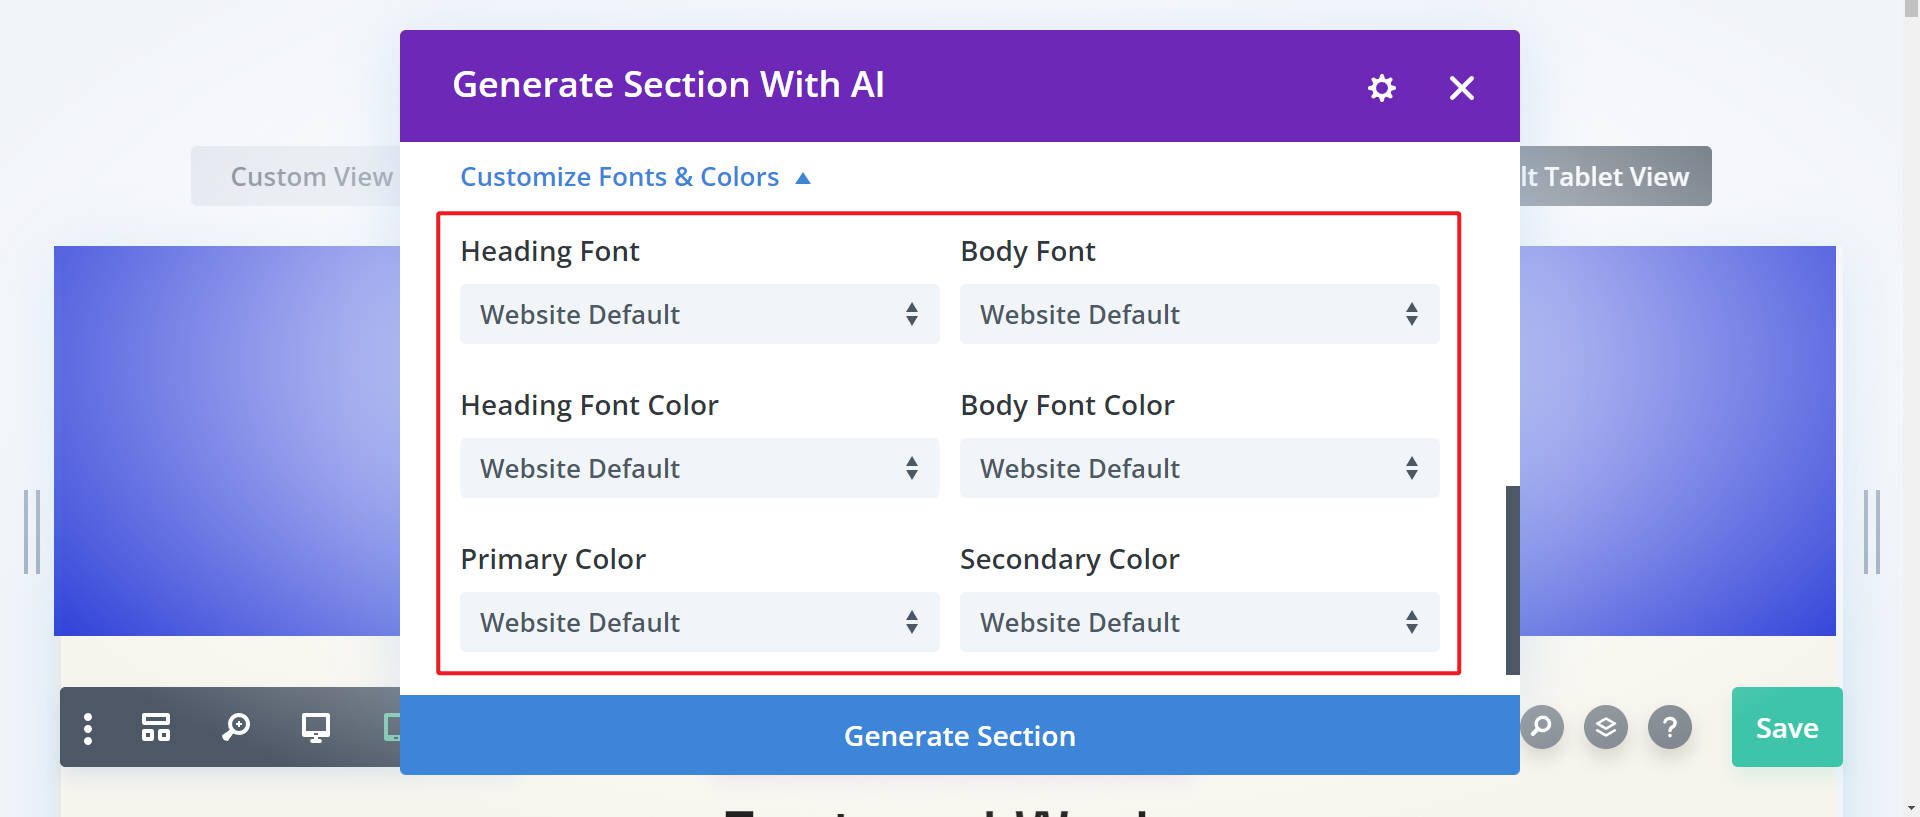
It’s recommended that you also set your default fonts and colors in Divi’s theme customizer before you start designing. If you use a Starter Site or an AI-generated quick Site, these fonts and colors will be automatically created for you.
Use and Apply Presets to Generated Content
You can create global presets for sections, rows, and individual modules. These help a website keep a consistent design from page to page.
Best of all, presets can be applied to multiple elements across your website. All elements set to the same preset will be updated when one is updated. This makes it much easier to manage a website because your design changes are applied throughout it. Though Divi AI does a good job with design, you should apply those designs to presets for an easier-to-maintain website.
How to Get this AI Website Section Generator
Everyone can try Divi AI for free to generate up to 20 sections. Purchase a Divi AI membership for unlimited section generation as well as unlimited text, image, code, layout, and website generation for you and your team.
If you are new to Divi, you can get a significant discount on Divi AI when you buy the Divi Pro bundle. If you are already a Divi customer, you can get the same great discount by logging in to your account and visiting the Offers page.
Frequently Asked Questions
Does Divi AI offer unlimited usage?
What can I create with Divi AI?
How does Divi AI generate sections?
Can Divi AI match the style of my existing website when generating new sections?
The post How to Use Divi’s New AI Section Generator appeared first on Elegant Themes Blog.
# A Comprehensive Guide to Utilizing Divi’s New AI Section Generator
In the ever-evolving landscape of web design, tools that enhance creativity and streamline workflows are invaluable. One such tool is Divi’s new AI Section Generator, a feature that leverages artificial intelligence to assist users in creating stunning and functional website sections with ease. This guide will walk you through the capabilities of the AI Section Generator, how to use it effectively, and tips for maximizing its potential.
## What is Divi’s AI Section Generator?
Divi, a popular WordPress theme and page builder developed by Elegant Themes, has integrated an AI-powered tool that allows users to generate custom sections for their websites. This feature is designed to simplify the design process, enabling users—regardless of their technical expertise—to create visually appealing and responsive sections in a matter of minutes.
### Key Features of the AI Section Generator
1. **Intuitive Design Suggestions**: The AI Section Generator analyzes your content and suggests design layouts that best fit your needs, ensuring that your sections are not only aesthetically pleasing but also functional.
2. **Customizable Templates**: Users can choose from a variety of pre-designed templates generated by the AI, which can be further customized to align with your brand’s identity.
3. **Responsive Design**: The generated sections are optimized for all devices, ensuring that your website looks great on desktops, tablets, and smartphones.
4. **Content Integration**: The AI can help you generate and integrate content, including headings, text, and images, making it easier to populate your sections quickly.
5. **SEO-Friendly**: The AI Section Generator takes into account best practices for SEO, helping you create sections that are not only visually appealing but also optimized for search engines.
## How to Use the AI Section Generator
Using Divi’s AI Section Generator is straightforward. Follow these steps to get started:
### Step 1: Access the Divi Builder
1. Log in to your WordPress dashboard.
2. Navigate to the page or post where you want to add a new section.
3. Click on the “Enable Divi Builder” button to launch the Divi Builder interface.
### Step 2: Open the AI Section Generator
1. Once in the Divi Builder, click on the “+” icon to add a new section.
2. Select the “AI Section Generator” option from the menu.
### Step 3: Input Your Requirements
1. Provide the AI with a brief description of the type of section you want to create. This could include the purpose of the section (e.g., a call-to-action, testimonial, portfolio showcase), preferred layout style, and any specific content or images you want to include.
2. Click the “Generate” button to let the AI work its magic.
### Step 4: Review and Customize
1. The AI will present you with several design options based on your input. Browse through the suggestions and select the one that resonates most with your vision.
2. Once you’ve chosen a design, you can further customize it using Divi’s intuitive drag-and-drop interface. Adjust colors, fonts, spacing, and content as needed.
### Step 5: Save and Publish
1. After finalizing your section, click the “Save” button to store your changes.
2. Preview your page to ensure everything looks as intended.
3. Once satisfied, hit the “Publish” button to make your changes live.
## Tips for Maximizing the AI Section Generator
1. **Be Specific with Your Inputs**: The more detailed your description, the better the AI can tailor its suggestions to meet your needs. Include keywords and phrases that capture the essence of what you want.
2. **Experiment with Different Styles**: Don’t hesitate to try out various layouts and designs. The AI can generate multiple options, so explore different aesthetics to find the perfect fit.
3. **Combine AI-Generated Sections with Custom Designs**: Use the AI-generated sections as a foundation and then layer on your own custom elements to create a unique look that reflects your brand.
4. **Utilize the Preview Feature**: Always preview your sections before publishing. This allows you to see how they will appear on different devices and make adjustments as necessary.
5. **Stay Updated**: Divi is continually evolving, and new features are regularly added. Keep an eye on updates from Elegant Themes to take full advantage of any enhancements to the AI Section Generator.
## Conclusion
Divi’s new AI Section Generator is a powerful tool that democratizes web design, making it accessible to users of all skill levels. By harnessing the capabilities of artificial intelligence, you can create beautiful, functional website sections quickly and efficiently. Whether you’re a seasoned designer or a novice, this feature can significantly enhance your workflow and elevate your website’s design. Embrace the future of web design with Divi’s AI Section Generator and watch your creative possibilities expand.

Recent Comments