
Keeping your WordPress website up to date can feel like a never-ending chore. However, it is necessary, especially if you want to protect your site from hackers, keep it running smoothly, and make the most of the latest features.
In this post, we’ll dive into WordPress updates and show you two ways to enable auto updates on your WordPress website: the built-in automatic update feature and a powerful new site management tool called Divi Dash.
Let’s get started.
Why Should You Enable Auto Updates On Your WordPress Website?
There are a few reasons why you should keep your WordPress website updated. One of the biggest reasons is so you won’t forget. Let’s face it, we’re all human. Remembering every update that each of your sites needs can be overwhelming. Auto updates are one of the best ways to avoid this. There are other reasons, too, including security concerns, performance, gaining access to added features, and avoiding conflicts among the software installed on your site.
Security Comes First
When your WordPress core files, themes, and plugins are updated, they usually fix issues that hackers can exploit to gain access to your sites. These vulnerabilities can lead to everything from the white screen of death to data breaches. In fact, malicious actors can sometimes introduce backdoors into outdated software. These backdoors can provide bad actors with unauthorized access, allowing them to steal users’ information, inject malware, or take control of your site. By keeping your site up-to-date, you’re metaphorically locking the door at night to deter potential intruders.
Speed Matters
Updates aren’t just about security, they can also give your site a performance boost. Newer plugins, themes, and WordPress versions often include optimizations that make your site load faster. A fast website is one of the most important factors for search engine optimization (SEO) and keeping your bounce rate in check. The fact is that if your site doesn’t load fast enough, you’re fighting an uphill battle when it comes to gaining ground in search engine ranking pages (SERPs).
You’ll Get New Features
Updated software often brings new features and improvements to your website. This could mean anything from enhanced design options to added SEO tools. For example, the popular SEO plugin Rank Math often provides new features through regular updates. Some recent updates include in-depth Google Search Console analytics and AI-powered content generation. By failing to update plugins, you’re robbing yourself of new features that could make your life easier.
Updated Plugins and Themes Play Nicely Together
WordPress is one of the most customizable platforms to build incredible websites. Because it is open source, there are a lot of moving parts. The creators of WordPress made it easy for third-party themes and plugins to work together like a well-oiled machine. Outdated software can be a compatibility nightmare. Reputable third-party developers, like Elegant Themes, constantly update their themes and plugins to keep pace with WordPress, ensuring everything runs smoothly. However, you must update your site to avoid security concerns and compatibility issues, or you risk losing important content you worked hard to create.
How WordPress Automatic Updates Work
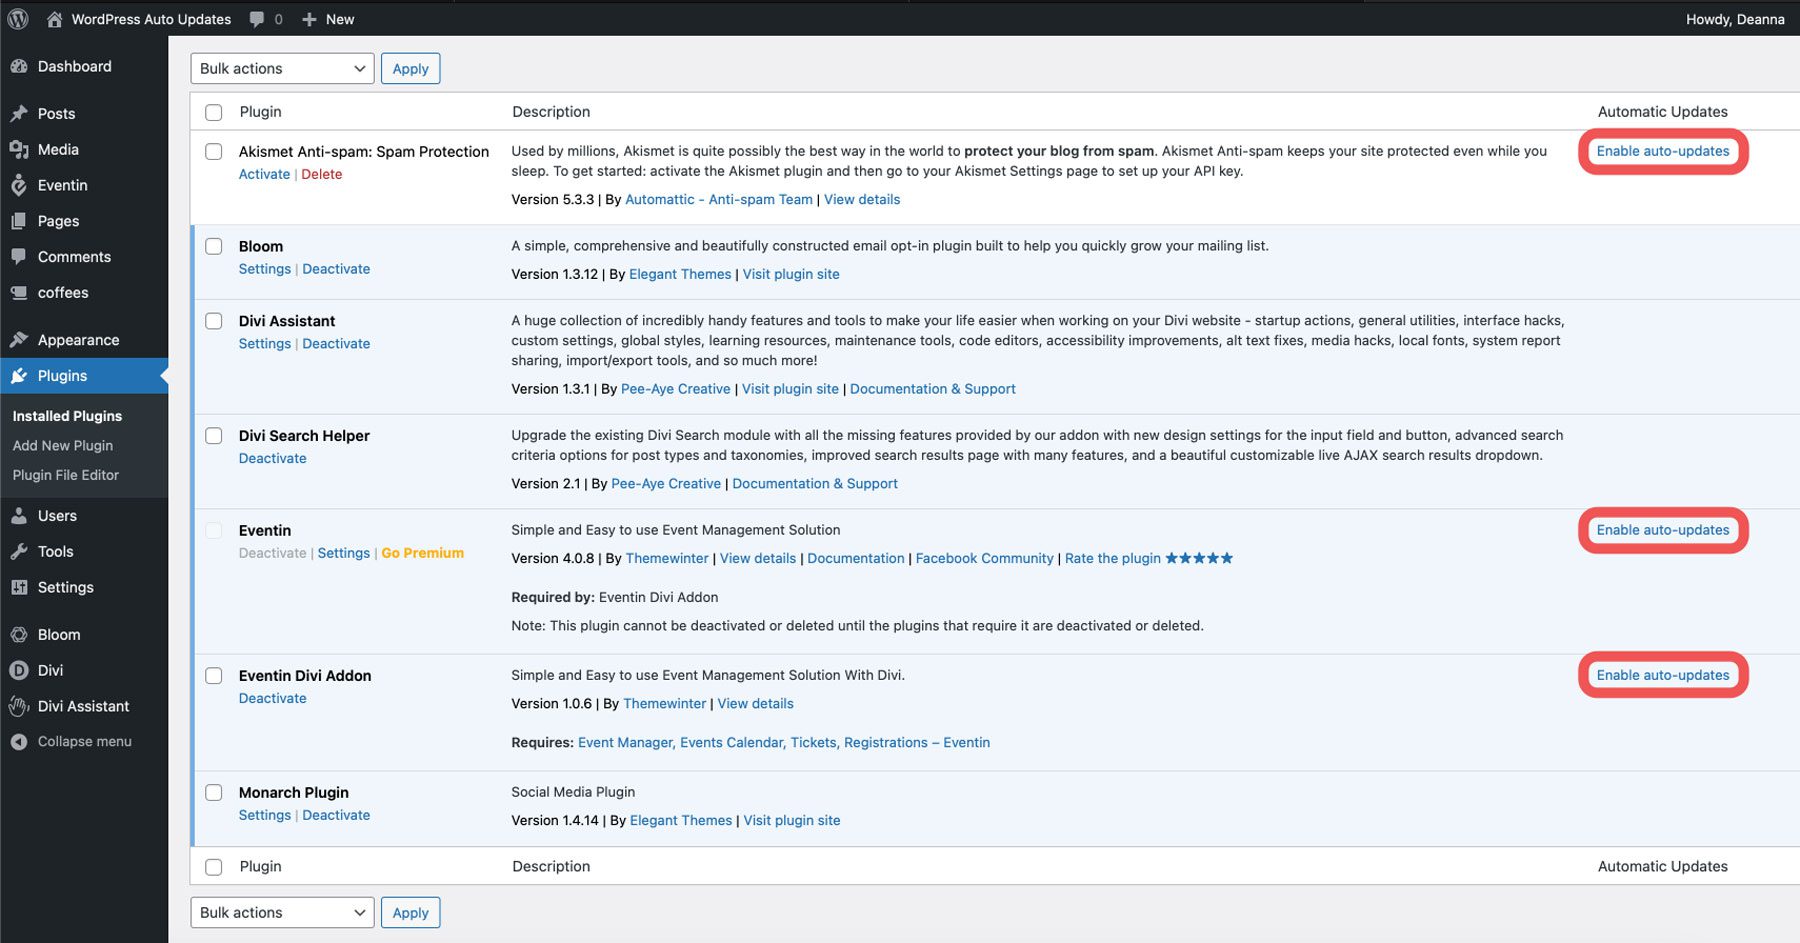
WordPress can automatically update its themes and plugins. However, each of these is handled differently. WordPress core is updated regularly with two options: You can choose to automatically update it with maintenance and security releases or enable automatic updates for all new versions of WordPress.
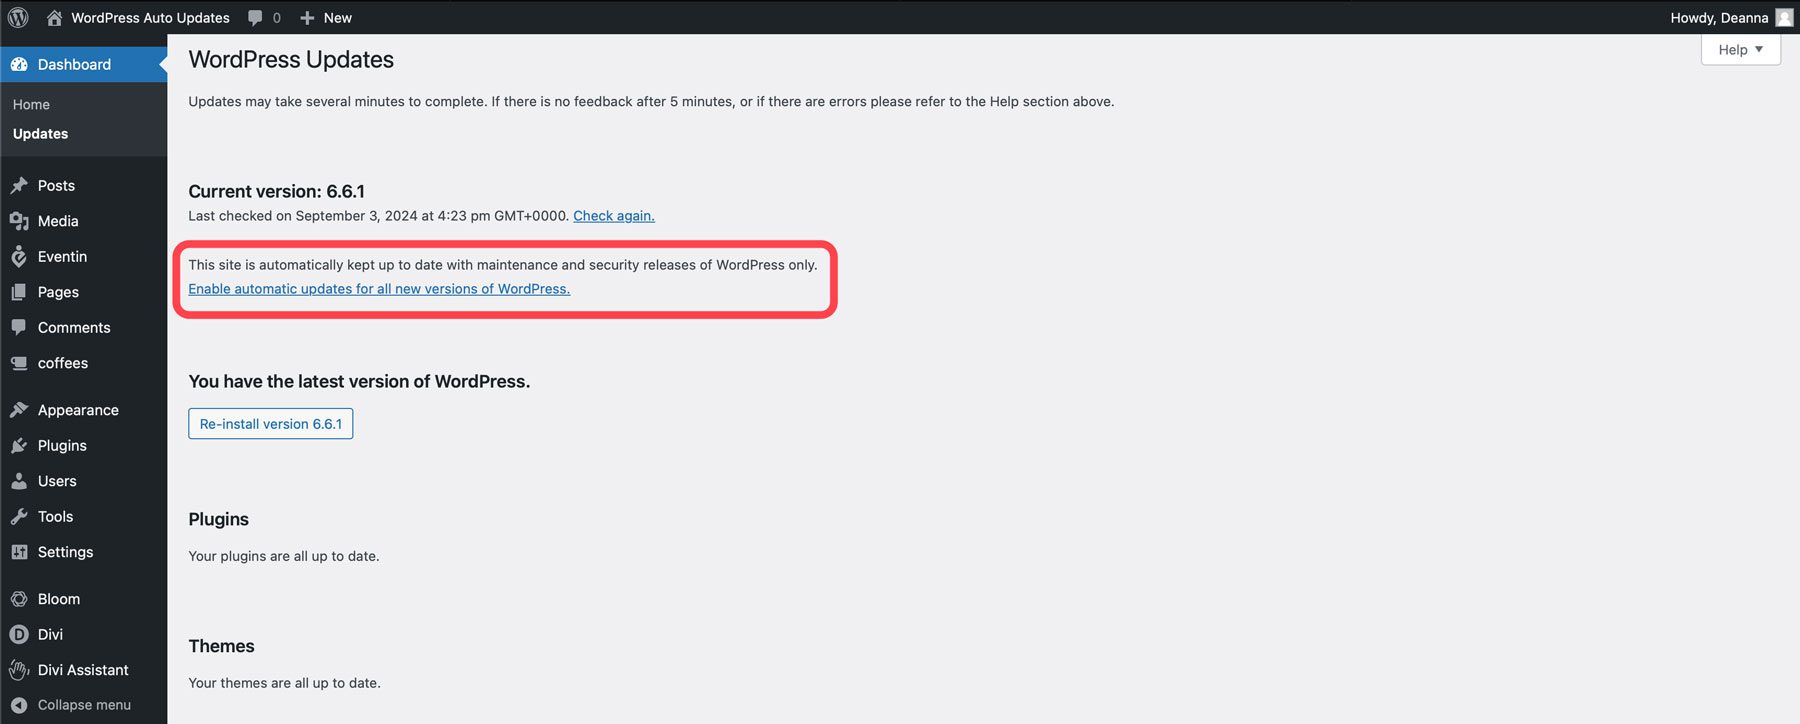
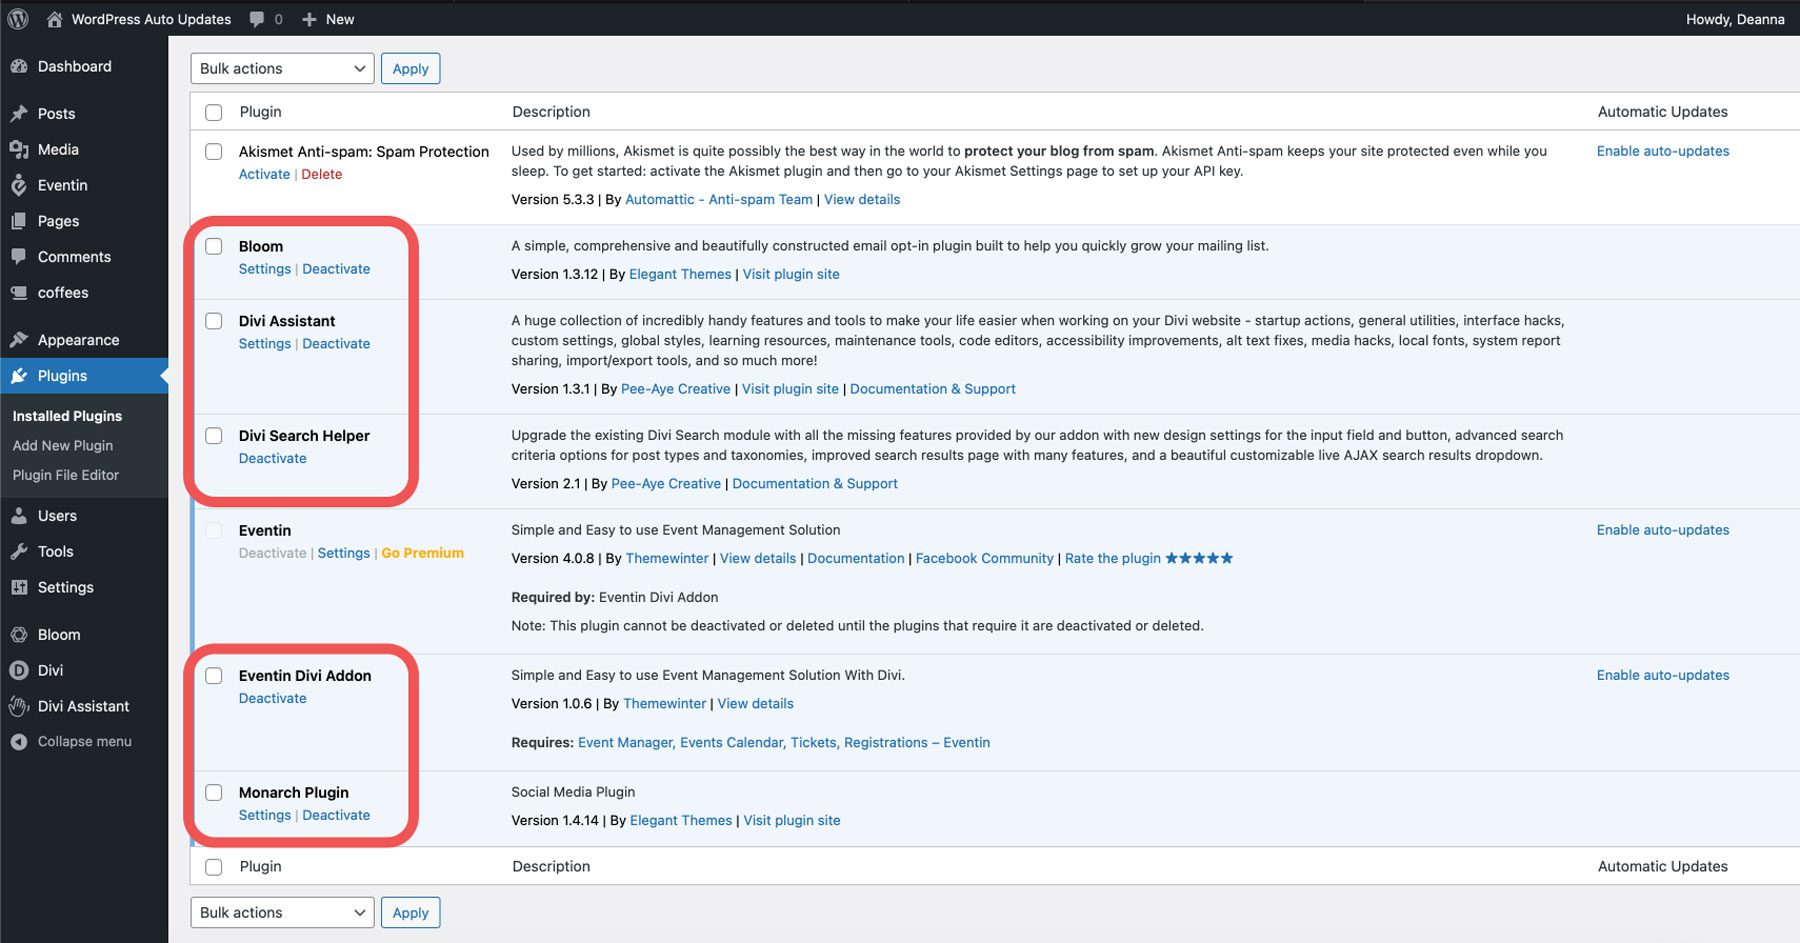
Plugin updates are handled differently than core updates. By default, WordPress automatically checks for plugin updates and notifies you when they are available. You can configure WordPress to automatically update plugins for you, either on a single plugin or all at once. However, premium plugins, such as Bloom, Monarch, or other third-party solutions can’t be updated automatically through WordPress. That’s because many premium plugins require yearly licenses tied to subscriptions requiring payment. Auto-updating these plugins could inadvertently trigger payment or licensing issues, especially if the license has expired or there are changes to the payment terms.
Finally, theme updates work similarly to plugin updates. You can manually install theme updates through the WordPress updates dashboard or configure WordPress to take care of them.
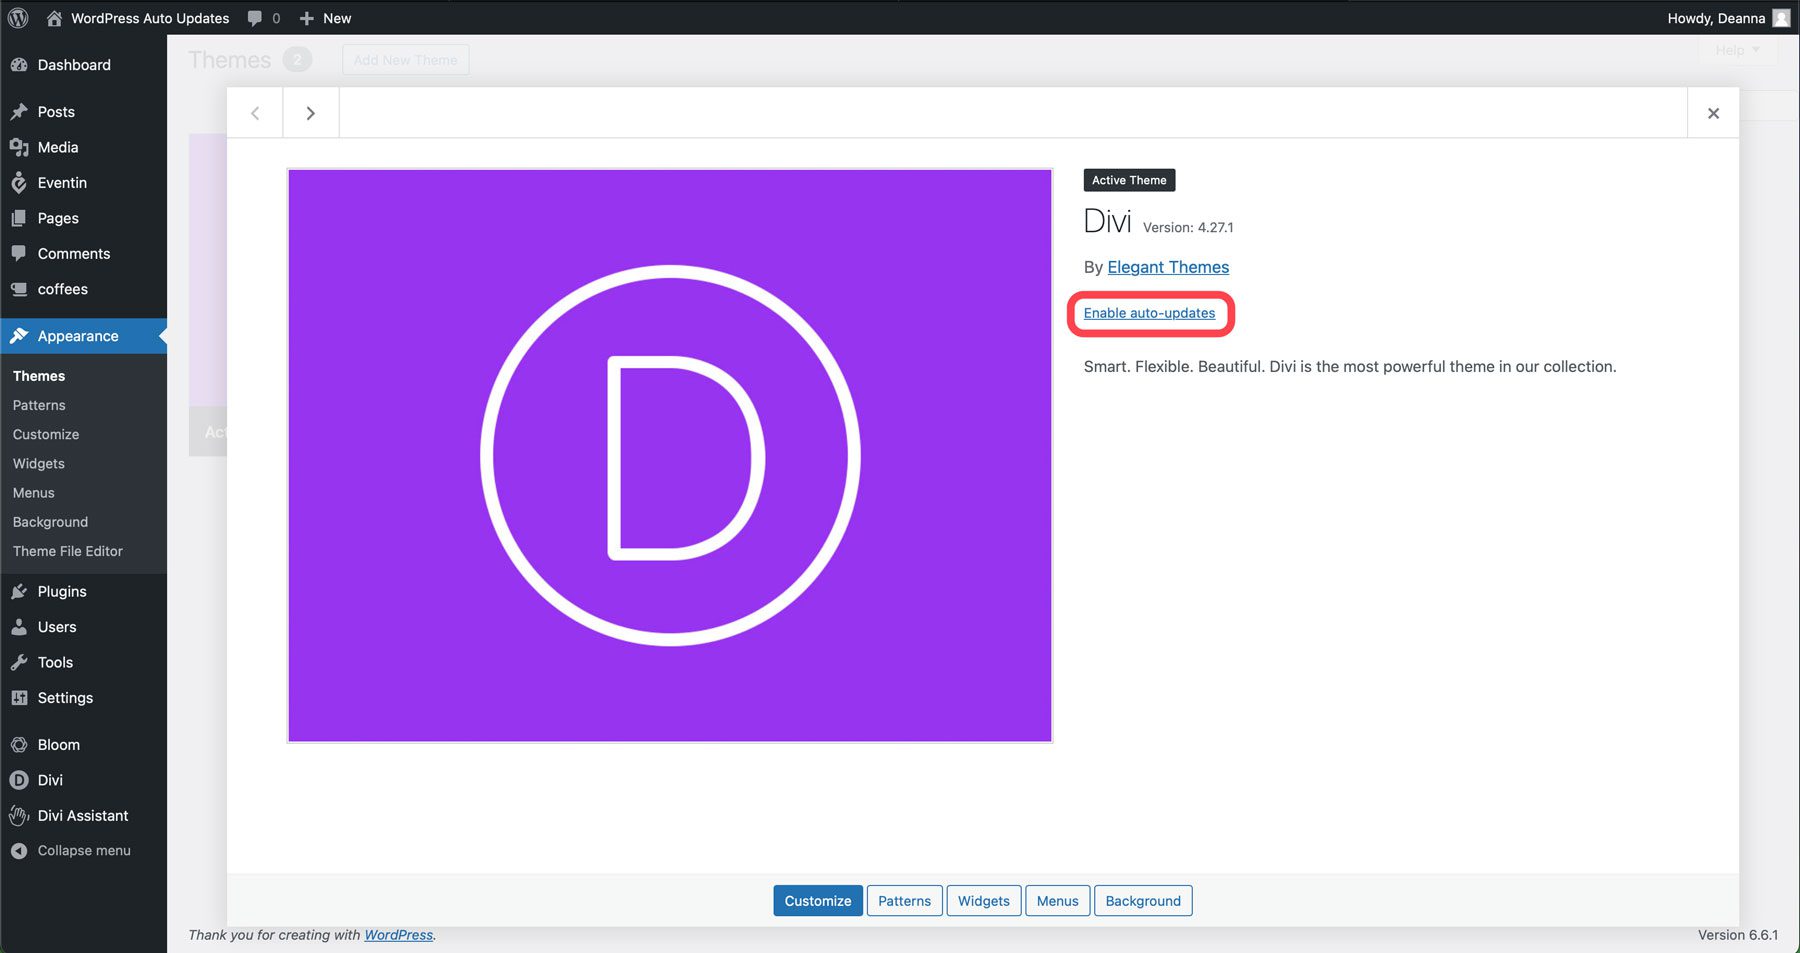
Regardless of your chosen method, enabling auto-updates requires logging into your WordPress website to configure them. While that may be fine for folks who only manage a few websites, what about those who manage dozens or hundreds? In that case, we suggest an alternative: a site management tool.
What Is A Site Management Tool?
Site management tools provide a convenient way to enable auto-updates because they offer centralized control. Managing multiple websites in one location makes it easier to stay on top of crucial updates across all your sites. Many site management tools allow you to schedule updates at specific times, ensuring they don’t interfere with your website’s peak traffic hours. They can also provide system status reports to spot any potential errors. Also, most site management tools are user-friendly, making using them easy for people of any skill level.
Divi Dash: Your One-Click Solution for WordPress Auto Updates
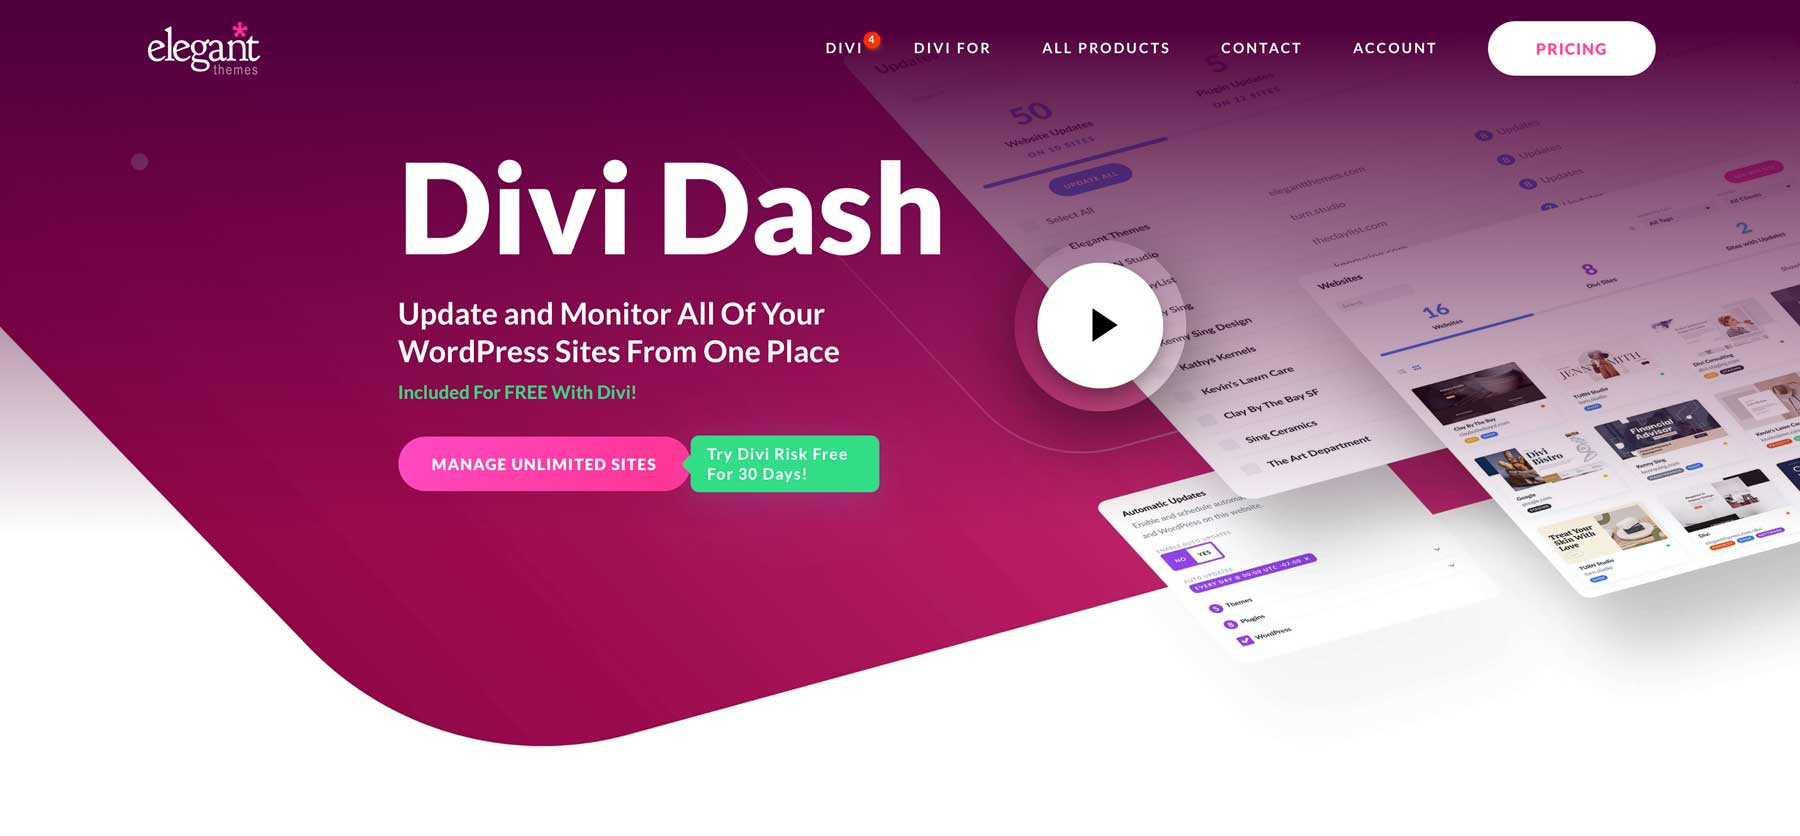
Managing updates for multiple WordPress websites can be a real pain. Juggling individual plugin and theme updates, monitoring compatibility, and remembering to check for core updates is time-consuming. This is where Divi Dash can be a real lifesaver. Divi Dash is a powerful site management tool that makes managing multiple WordPress websites a breeze. Among its key features is its robust auto-update functionality. It’s a great way to stay on top of every website you own, including your clients, team members, and site monitoring.
The best part is that it’s available for free with a Divi license. You might be wondering, What if I don’t use Divi on every site I own? No worries. Divi Dash works with any WordPress website, regardless of whether it uses Divi or not.
What are the Features of Divi Dash?
Automated WordPress, Theme, and Plugin Updates
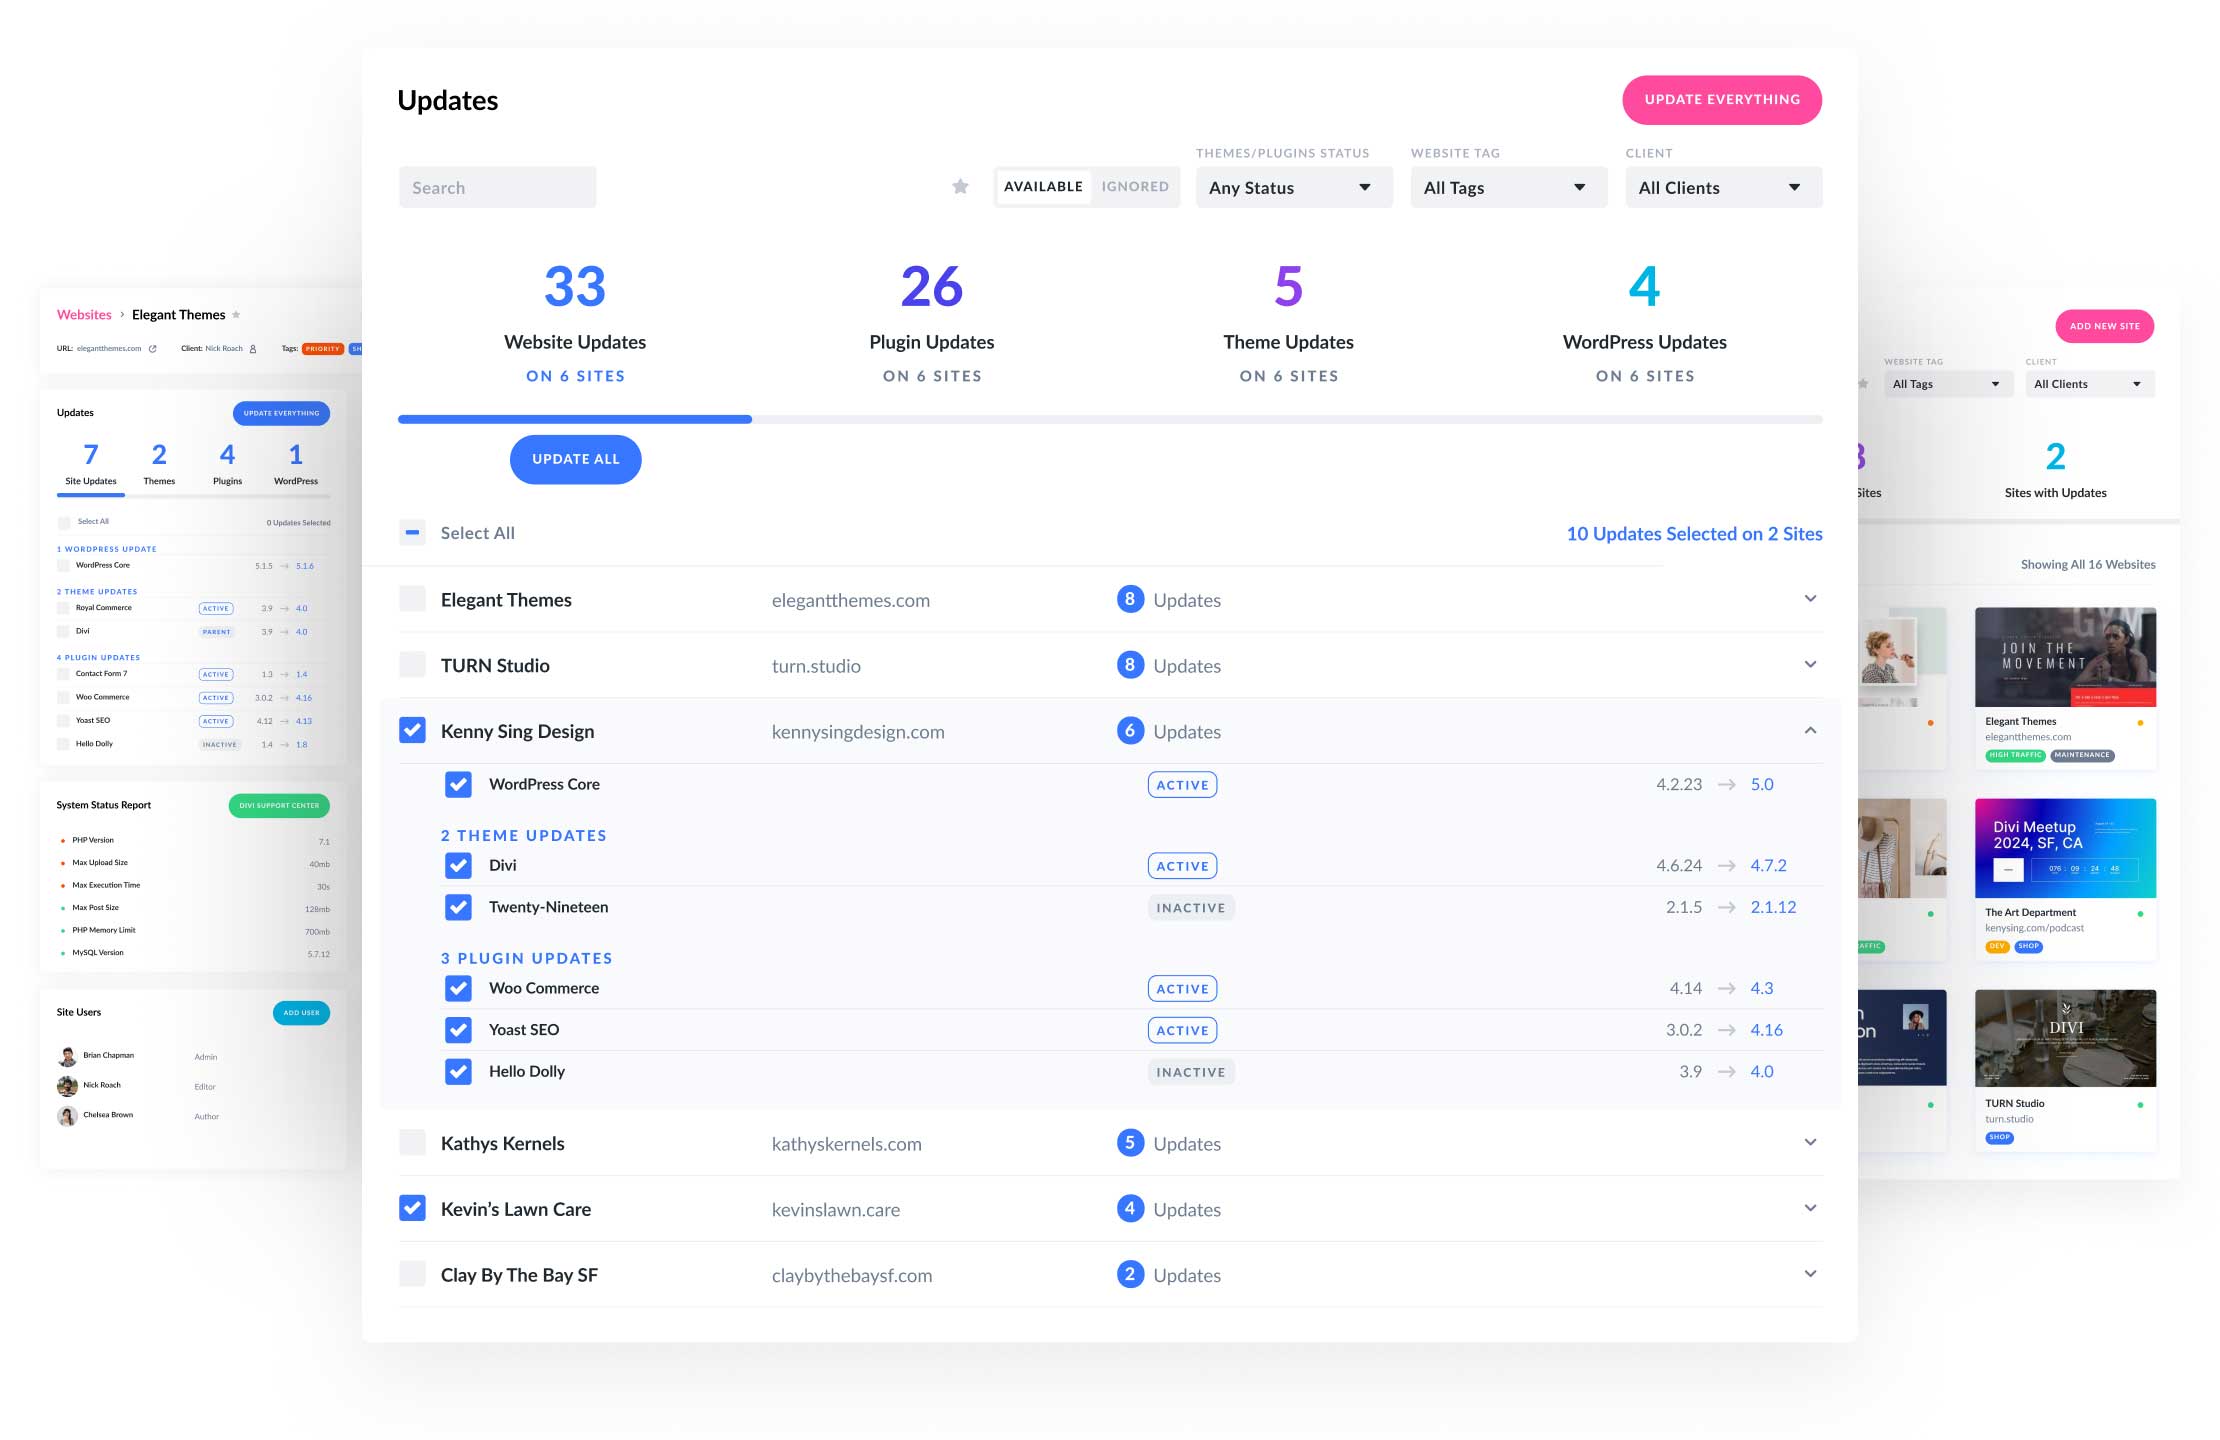
The best feature of Divi Dash is the ability to control when your WordPress core, plugin, and theme updates take place. With Divi Dash, you can set a custom schedule to update your software from the date and time to your current time zone. You can customize it by selecting the themes and plugins you’d like to update automatically.
Manage Every Plugin and Theme On Every Site In One Place
Do you have inactive themes and plugins you’re no longer using? With Divi Dash, you can easily delete inactive plugins and themes with the click of a button. When you add a site to Divi Dash, you can control which themes and plugins are installed in one convenient location. For busy web developers and freelancers, this can save incredible time since you won’t have to log in to each website individually.
In-Depth Website Dashboards
Once a website is added to Divi Dash, you’ll get a robust overview. You can view what updates are needed, the installed themes and plugins, and set up automatic updates. A system status report also provides information on critical components like the version of PHP and MySQL installed on the server, parameters such as max execution time, max post size, and PHP memory limit, and the users on the site. There are also database customization options for deleting spam comments, post and page revisions, and the ability to remove posts and pages in the trash.
Add and Manage Clients
In addition to enabling auto updates on WordPress, you can add and manage all of your clients in one place. This gives freelancers and web agencies who manage multiple clients and their websites a huge advantage. You can view sites associated with each client, manage their updates, and keep crucial contact information in one place. Divi Dash helps you to be more organized, regardless of how many websites you own.
Enabling Auto Updates In Divi Dash
Now that you have a solid understanding of Divi Dash and how it enables auto updates on WordPress, let’s walk through the process of adding a site and setting up automatic updates.
Step 1: Purchase Divi
For those not already using the most powerful WordPress theme on the market, now is the time to invest. With Divi, you can build any type of website you can imagine. With Divi’s powerful drag-and-drop page builder, building websites is a breeze. You can easily drag one of over 200 design modules onto the page and watch your vision come to life in real time. That said, there are other ways to build a website using Divi. You can start with a premade layout, design your site with Divi AI, or easily launch your site in minutes using Divi Quick Sites.
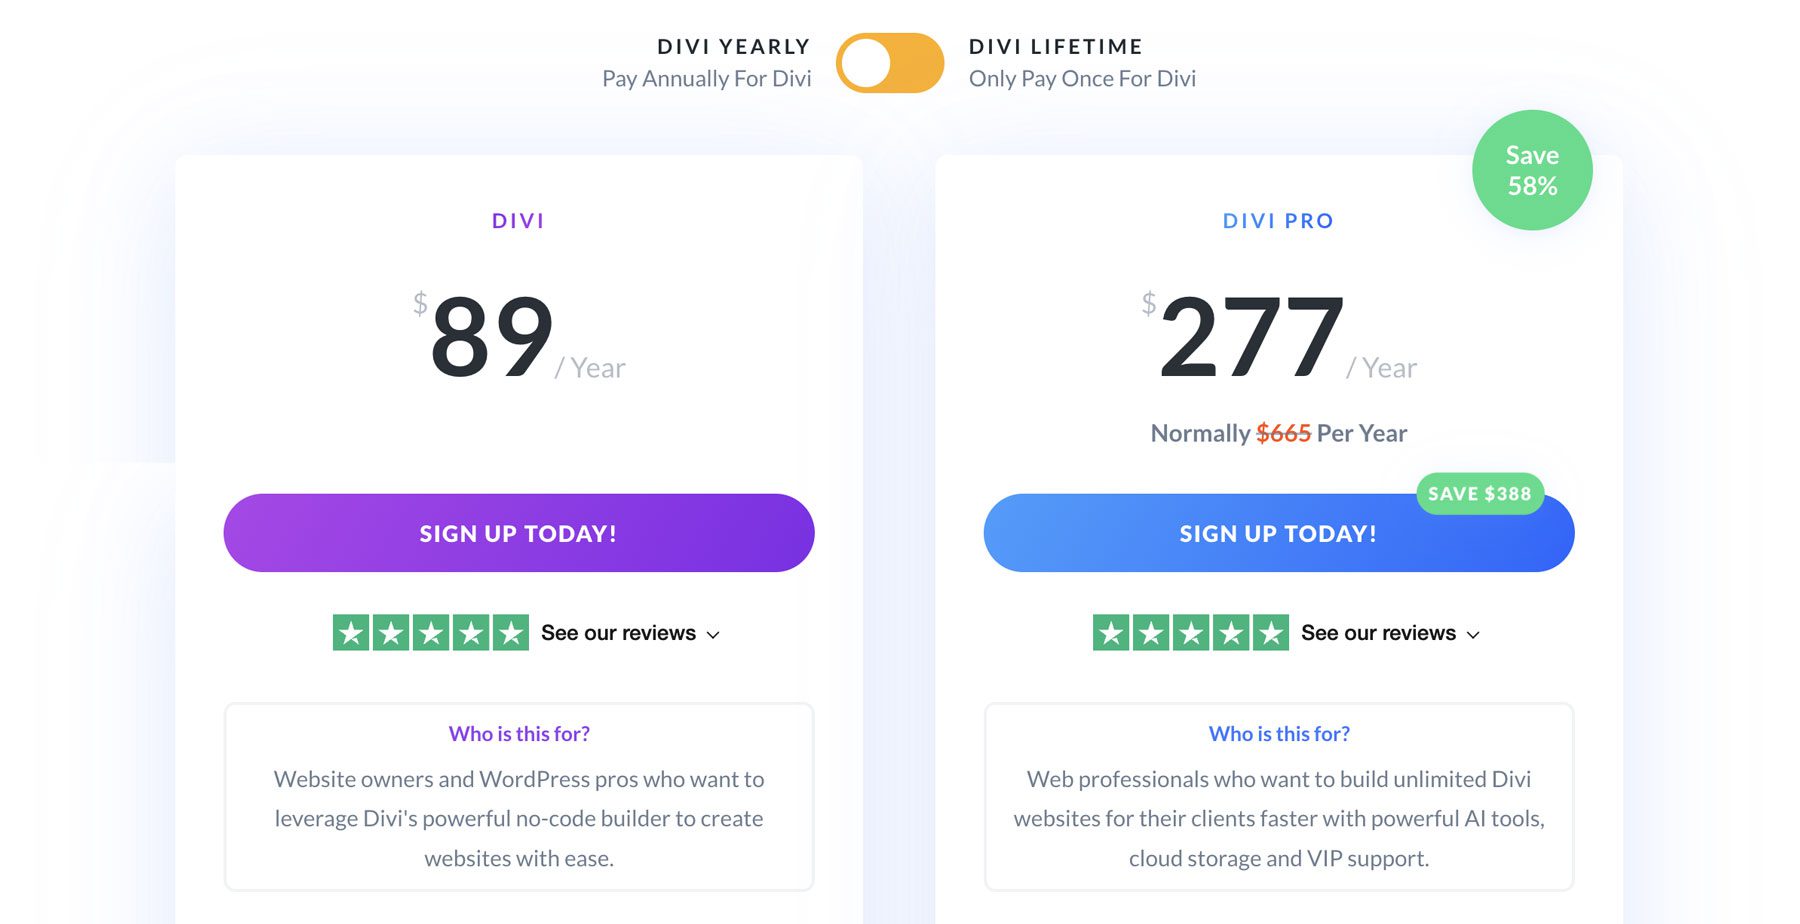
Divi is available either with a yearly or lifetime license. For just $89 per year or $249 for life, you can build unlimited Divi websites and manage them for free with Divi Dash. To ensure you’re 100% satisfied, Elegant Themes offers a 30-day, risk-free trial.
To purchase Divi, click the Join Today button to get started.

Next, choose whether to purchase a yearly or lifetime license. You also have the option to acquire Divi Pro, which comes with every product in the Divi Ecosystem for $277 per year or $297 per year with a lifetime license. You’ll gain access to Divi, Divi AI, Divi Cloud, Divi VIP, and Divi Teams for one low price!
Step 2: Access Divi Dash
Once you complete your purchase, log in to the Elegant Themes member area. This gives you access to all your Divi products, including Divi Dash.
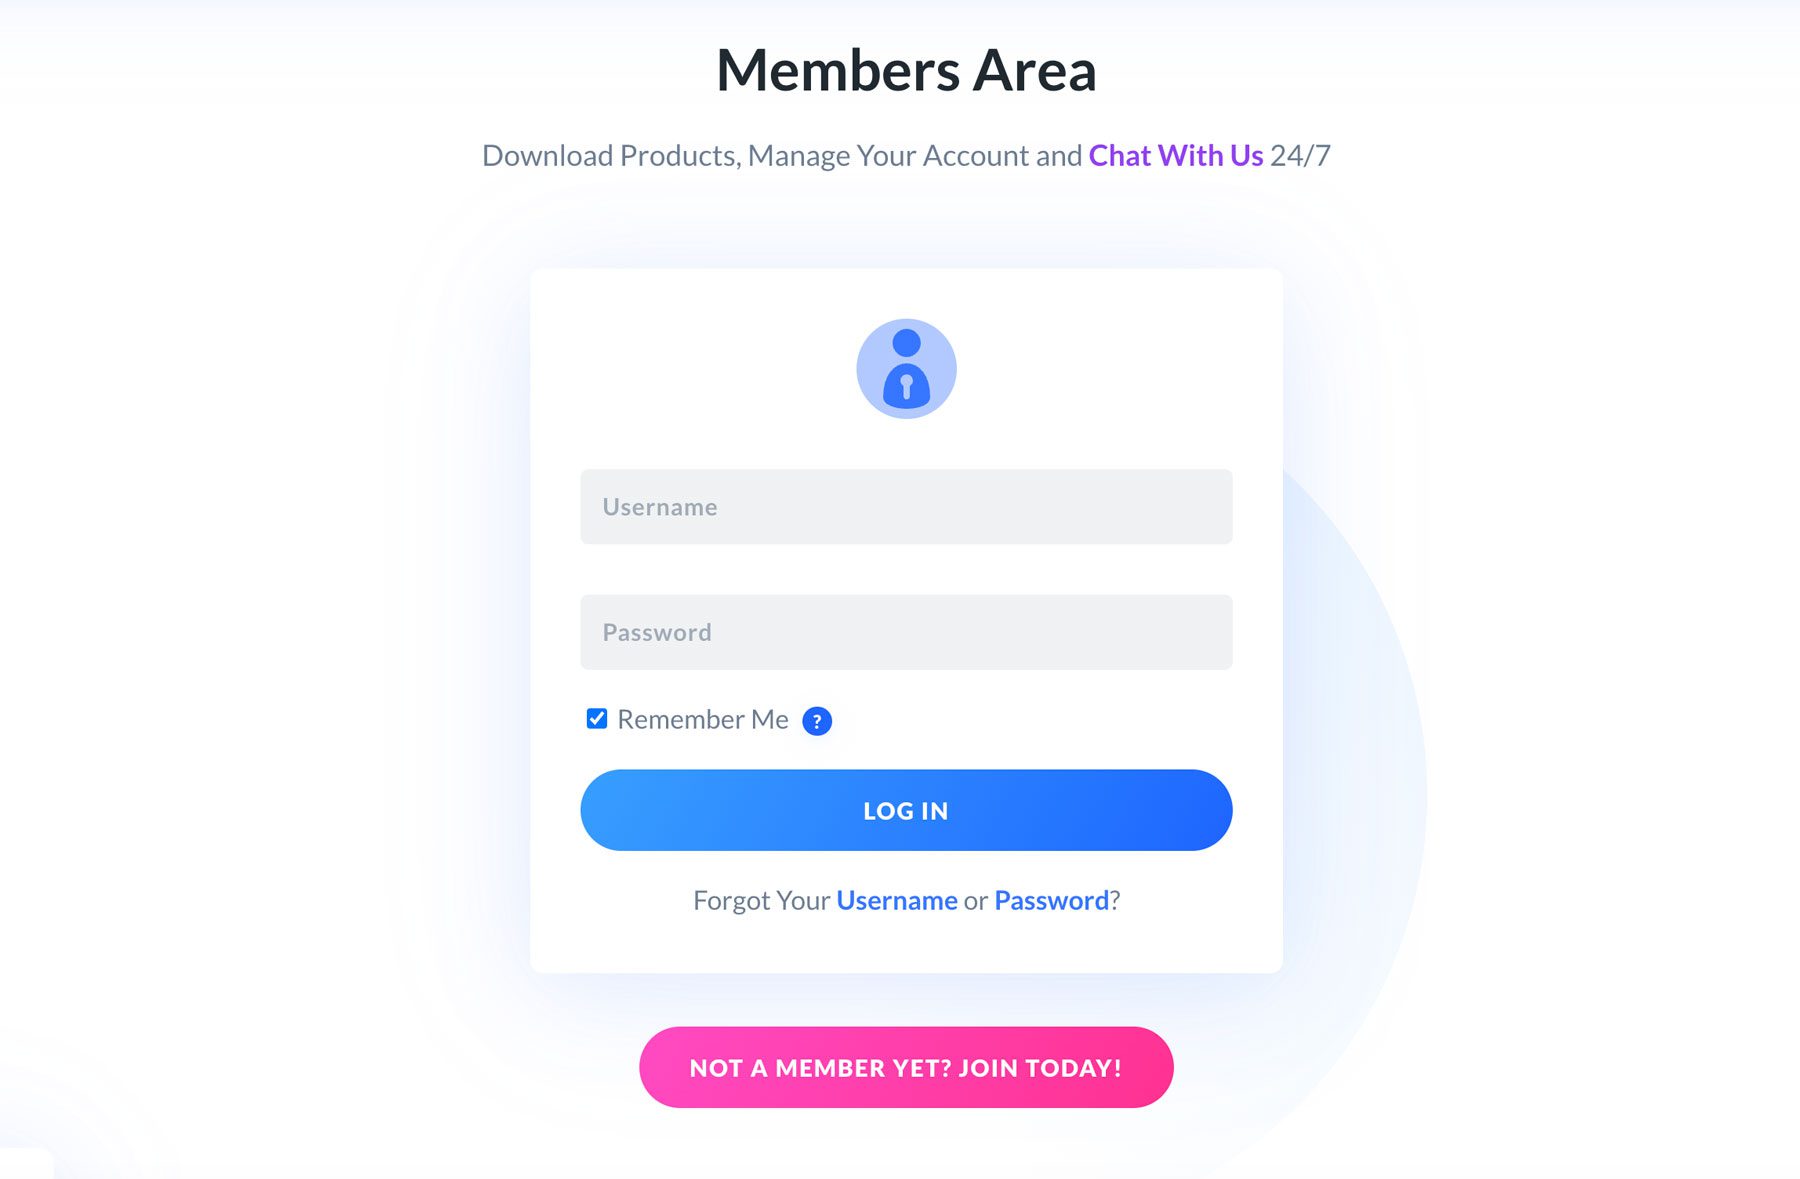
To access Divi Dash, click the Dash tab within the member area.
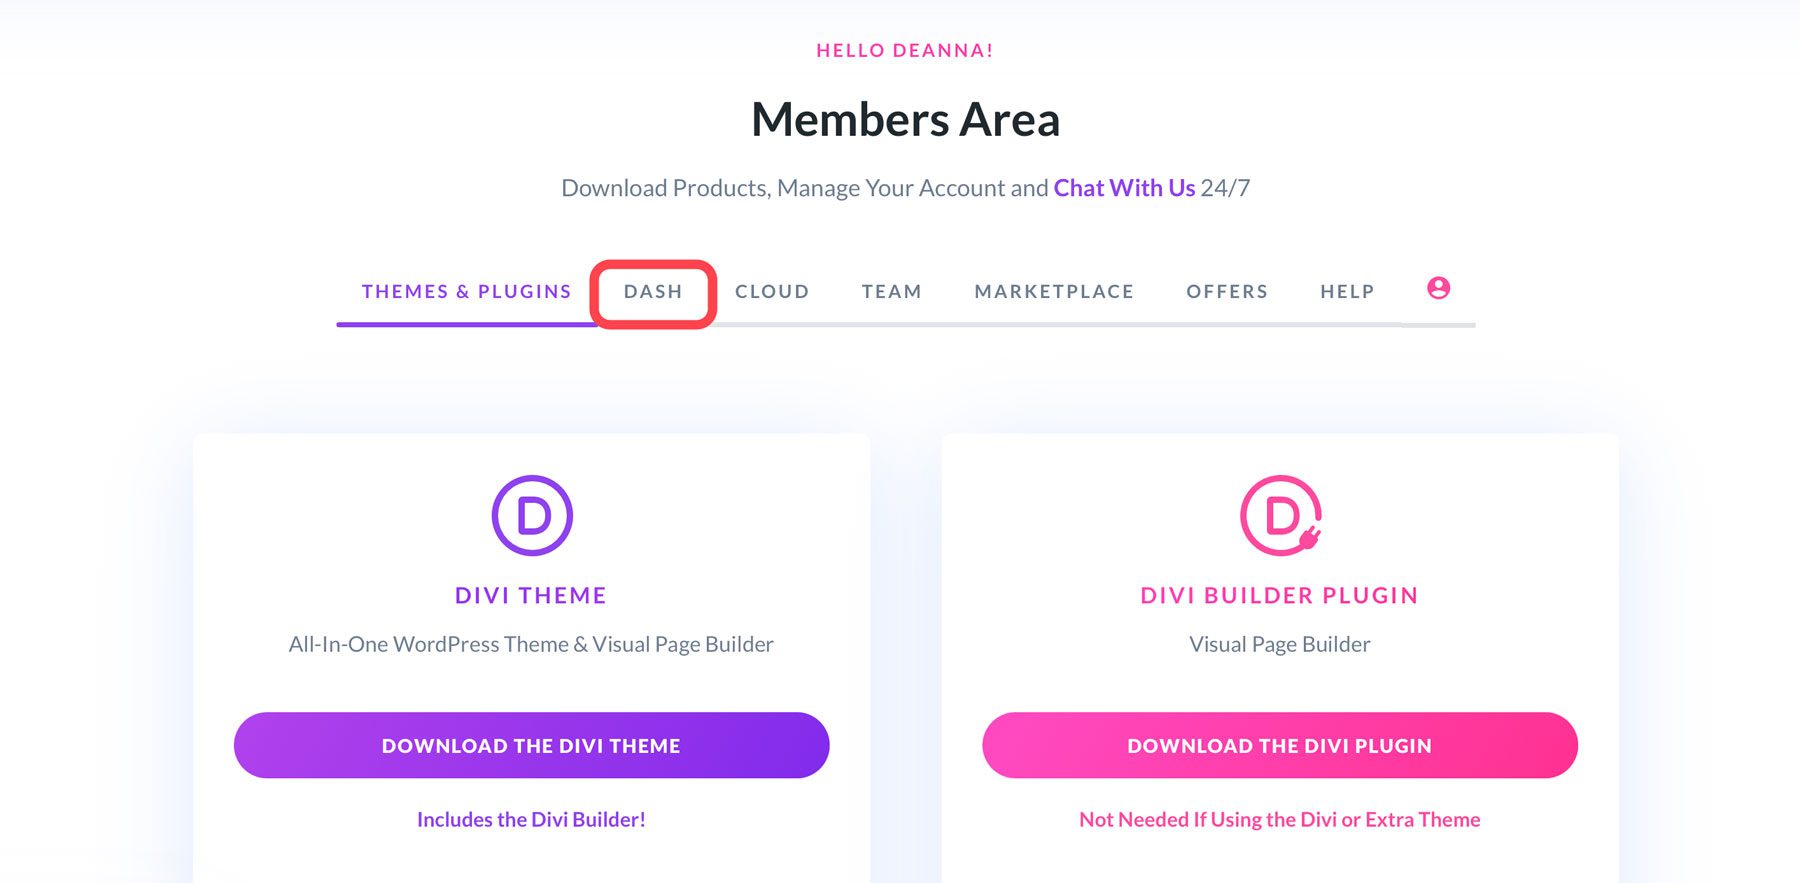
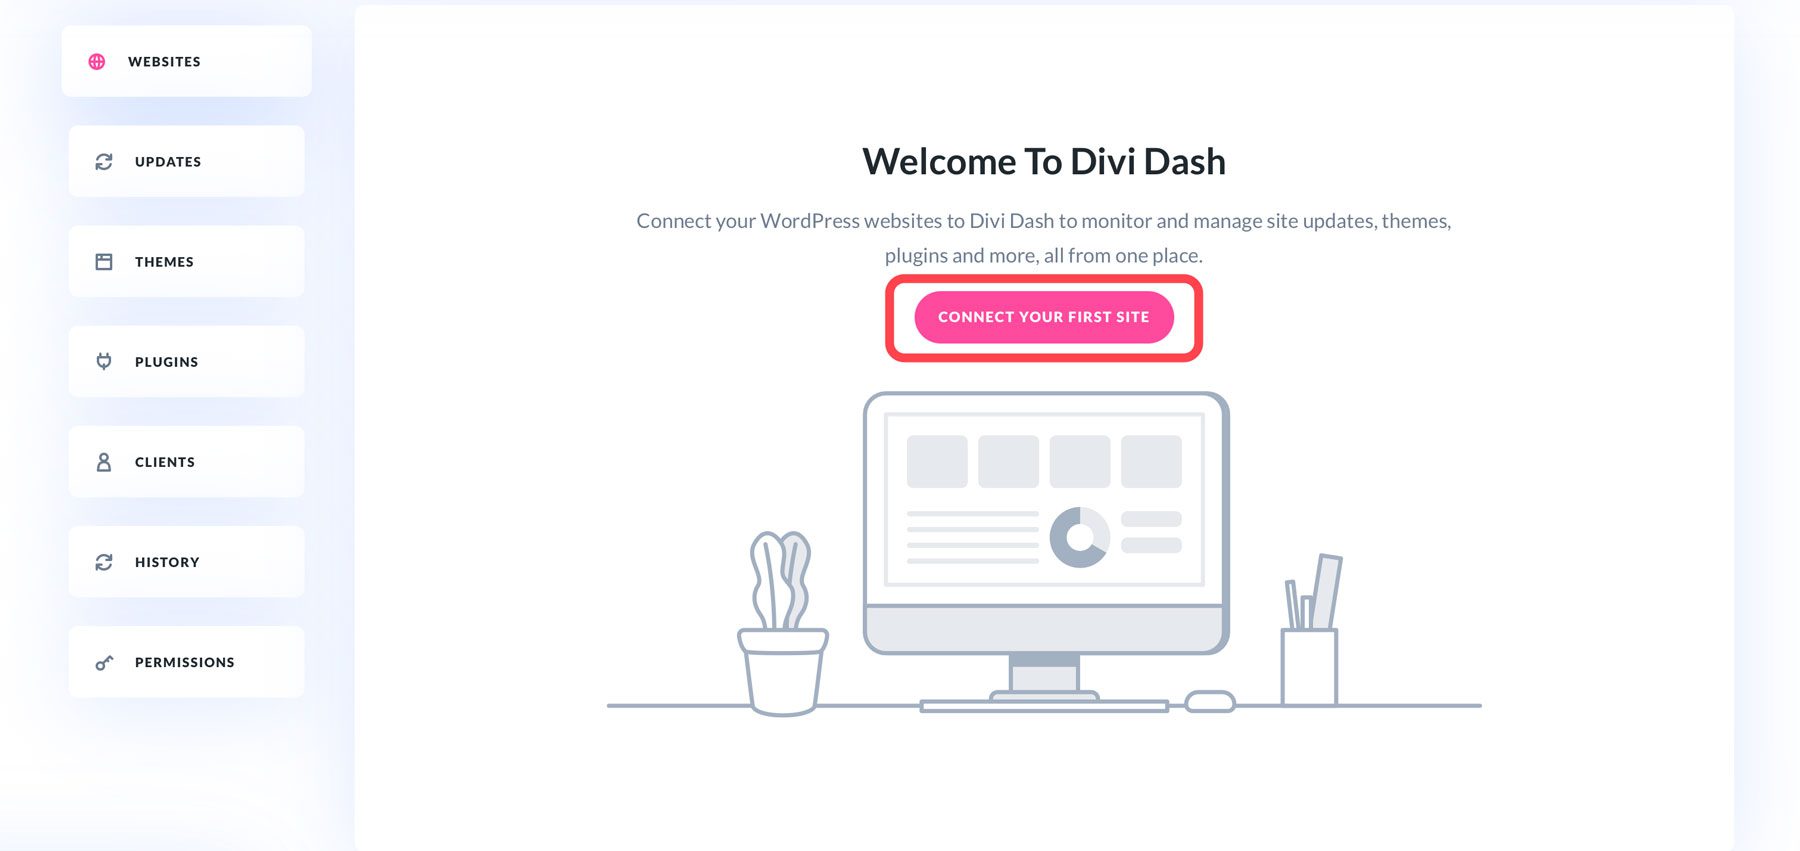
Step 3: Add A New Website To Divi Dash
To enable auto updates on WordPress, you must add your first website to Divi Dash. Click the Connect Your First Site button to get started.
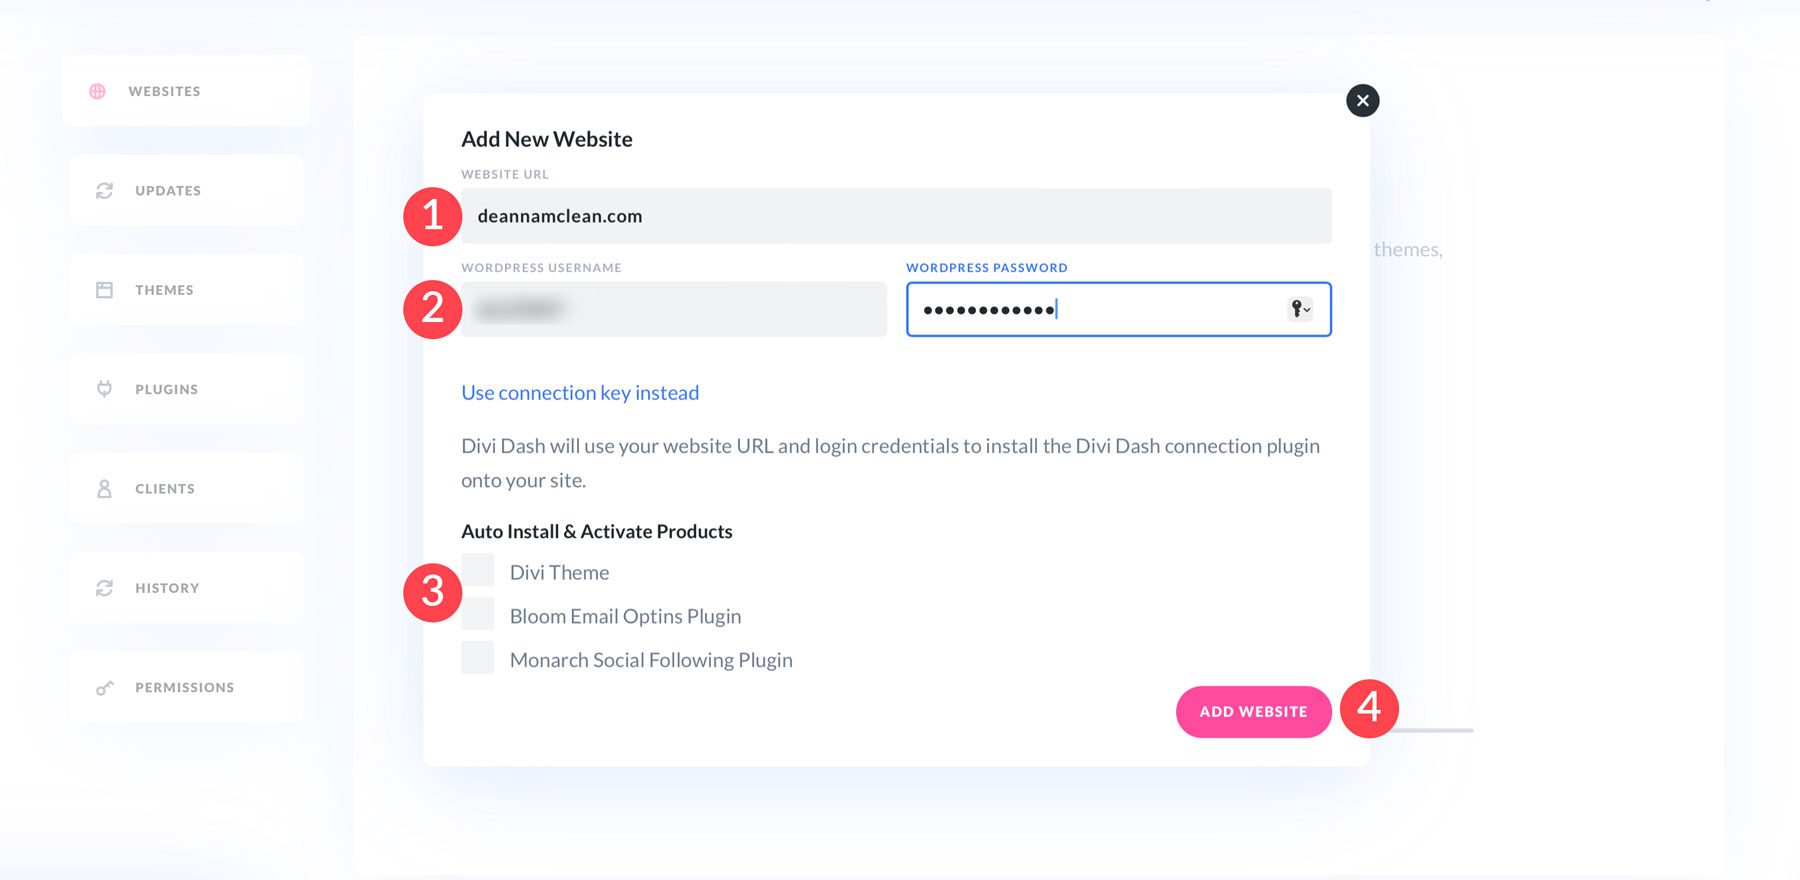
When the dialog box appears, add your website’s URL and login information, and choose whether to install Divi, Bloom, and Monarch. Once all settings are in place, click the Add Website button to add your website.
Repeat the steps above to add as many websites as you’d like.
Step 4: Set Up Automatic Updates
To enable WordPress auto updates in Divi Dash, select the websites tab and select a website from the list.
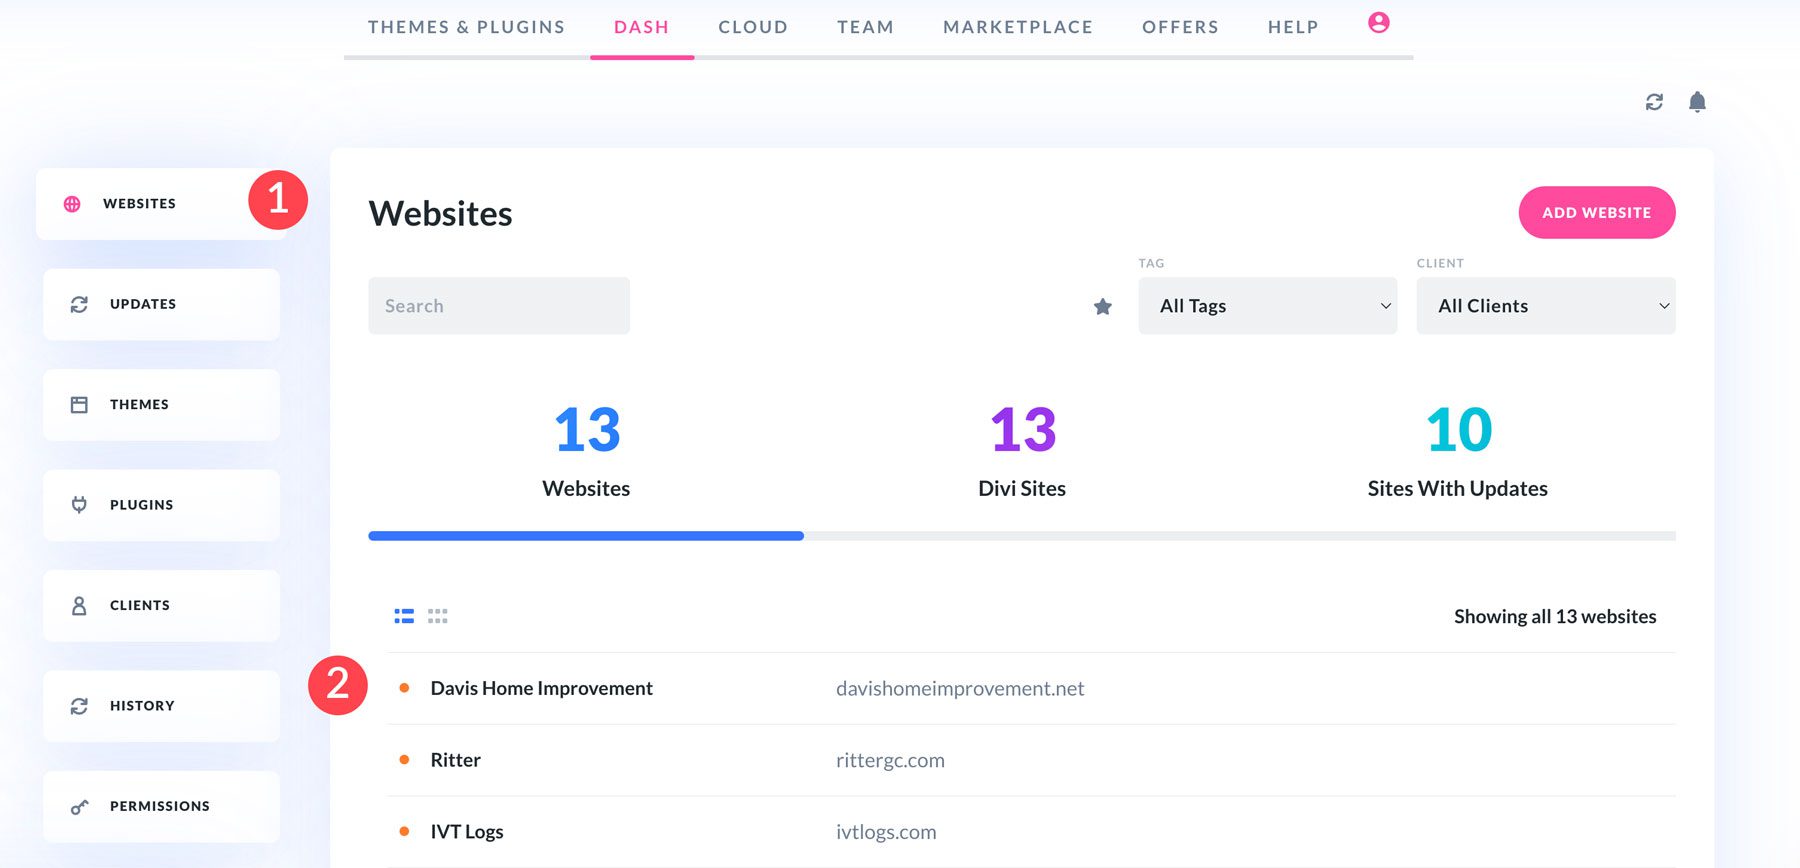
When the page refreshes, locate the Themes & Plugins section. Next, select the Auto Updates tab.
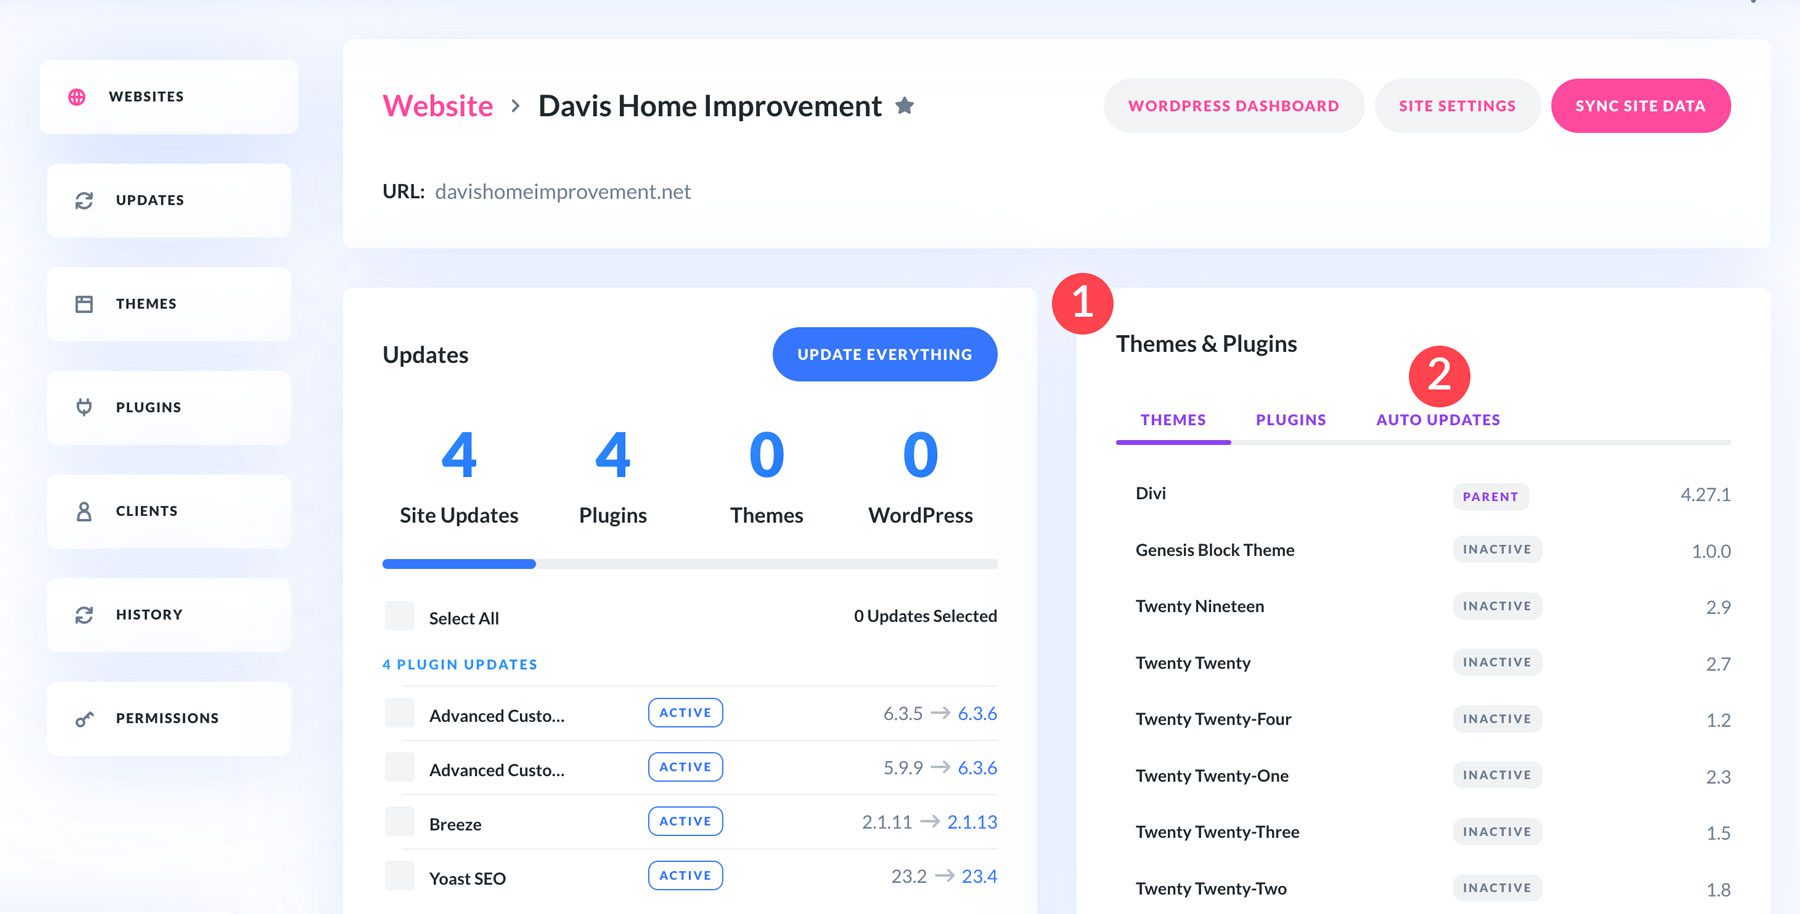
Switch the enable auto updates toggle to yes.
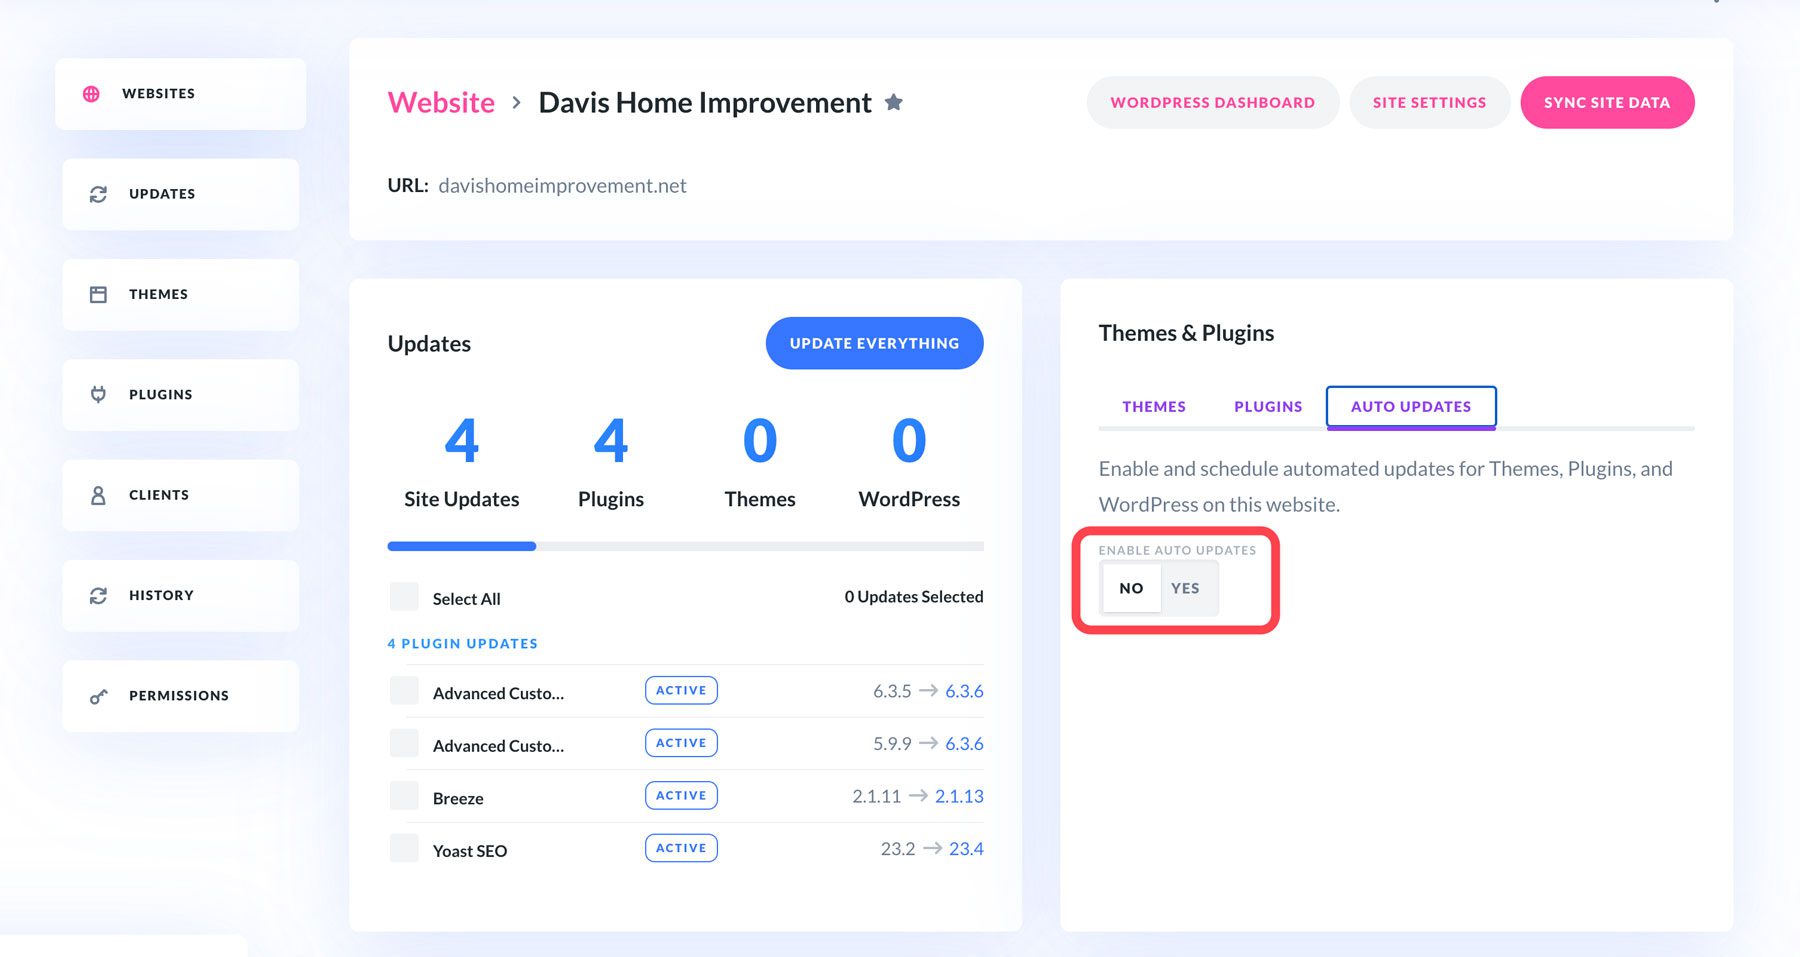
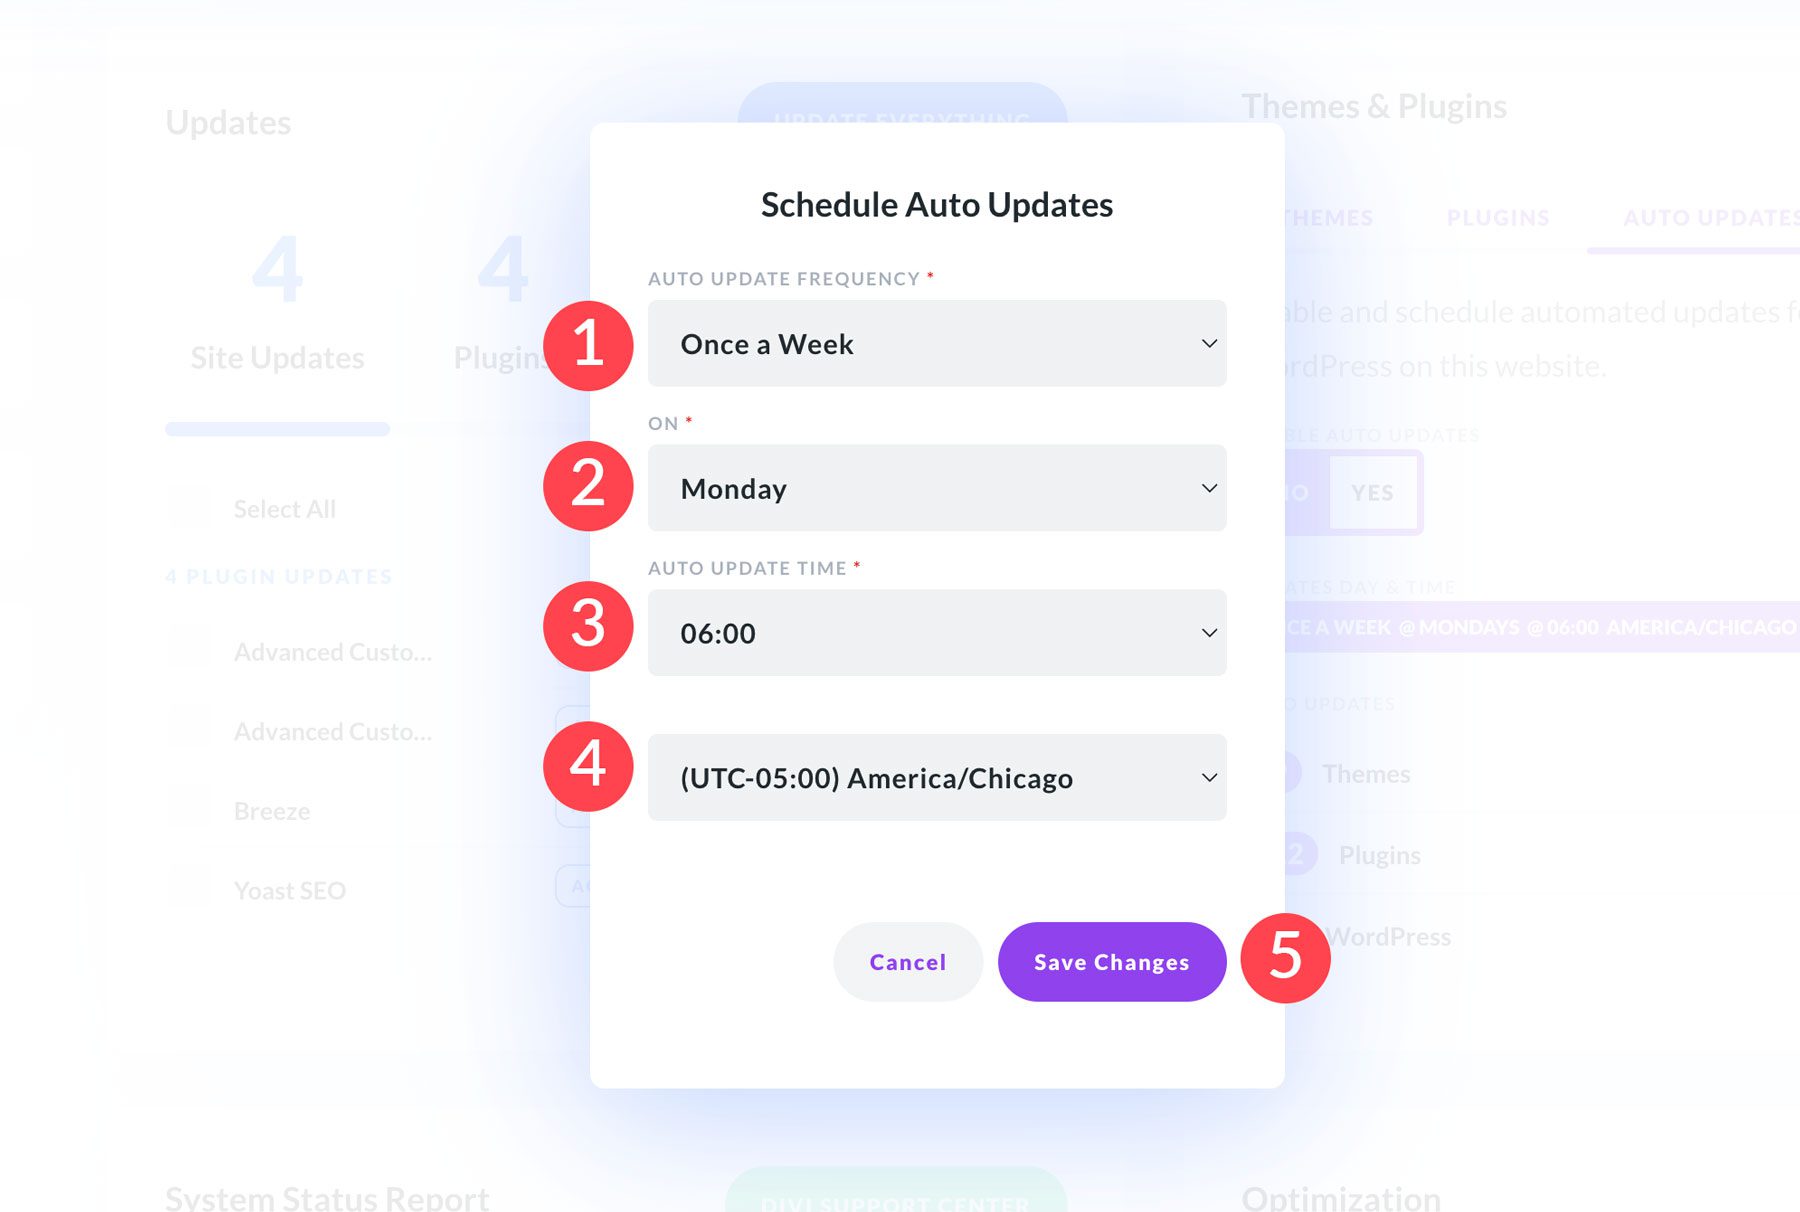
Next, click the settings icon next to the updates day & time section.
A dialog box will appear allowing you to set the frequency (every day, every weekday, once a week, or once a month), auto update time, and time zone. Once your preferences are set, click the Save Changes button to continue.
After auto updates are set, you can customize which themes and plugins are updated by expanding the dropdown menu next to each tab.
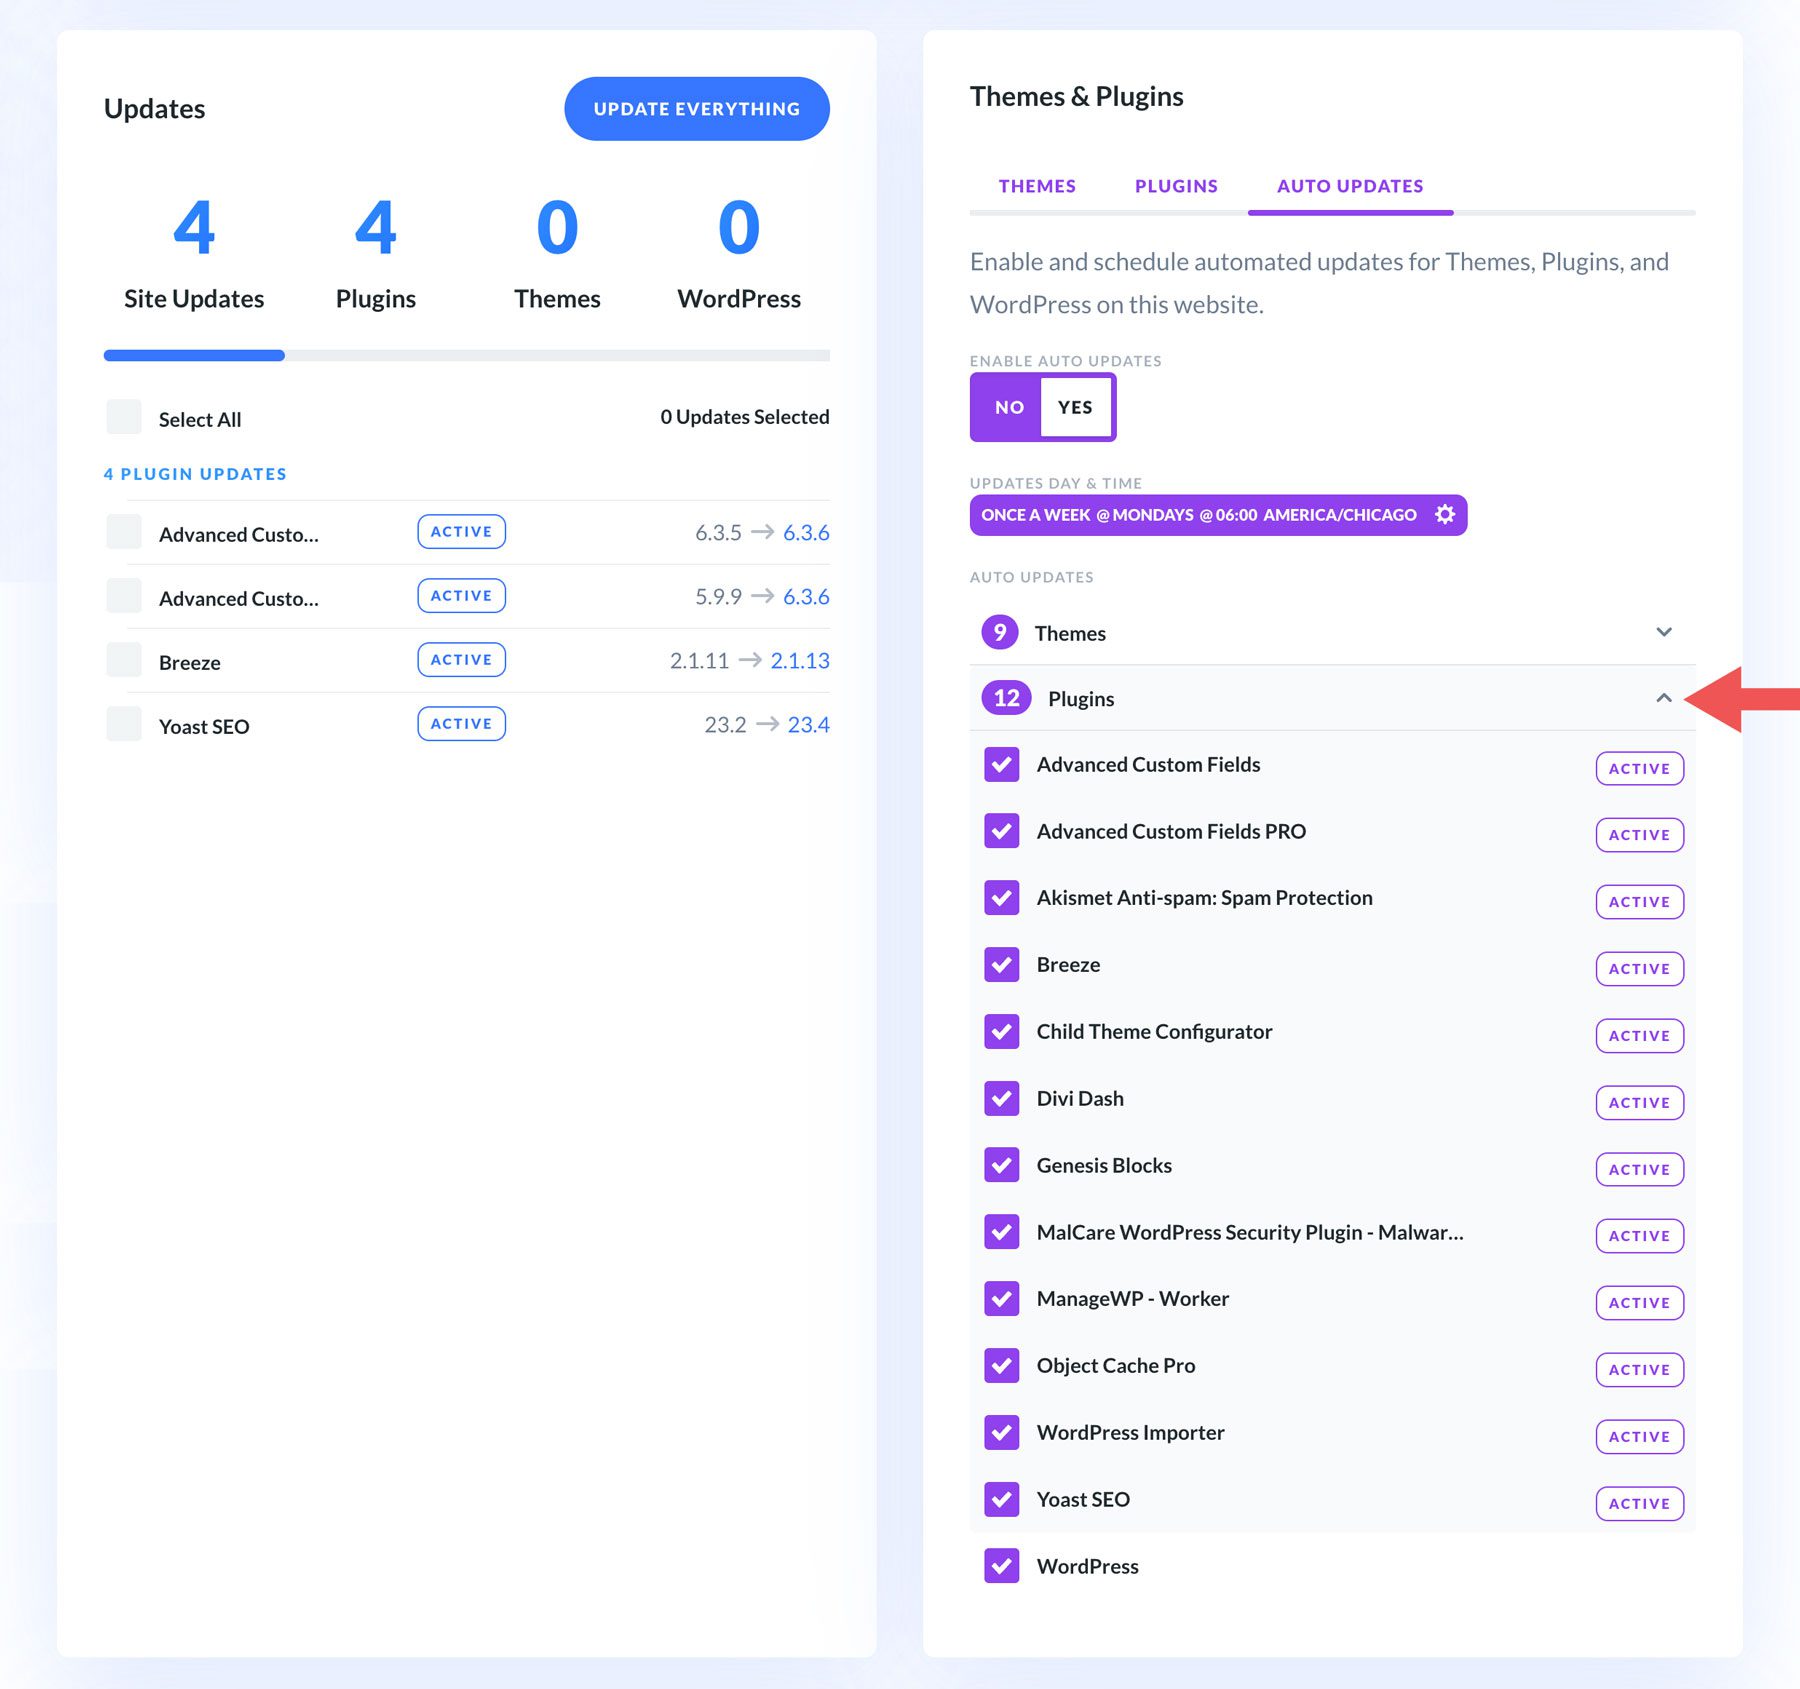
That’s it! As you can see, Divi Dash makes it incredibly easy to automate your plugin updates to suit your preferences. Simply repeat the steps above to manage auto-updates for all websites you add to Divi Dash.
Streamline Automatic Website Updates With Divi Dash
Keeping your WordPress website updated is essential for its security, performance, and functionality. By enabling automatic updates, you can ensure your site is always protected against vulnerabilities, runs smoothly, and benefits from the latest features. While WordPress offers built-in automatic update options, tools like Divi Dash provide a centralized and efficient way to manage multiple websites. Whether you want to enable auto updates on WordPress or easily manage all of your websites and clients in one place, Divi Dash can streamline website maintenance so you can focus on creating beautiful Divi websites.
The post How to Enable Auto Updates on Your WordPress Website appeared first on Elegant Themes Blog.
# A Step-by-Step Guide to Enabling Auto Updates on Your WordPress Website
Keeping your WordPress website updated is crucial for maintaining security, performance, and functionality. WordPress offers an auto-update feature that can help you manage updates for core software, themes, and plugins automatically. This guide will walk you through the steps to enable auto updates on your WordPress website.
## Why Enable Auto Updates?
Before diving into the steps, let’s discuss why enabling auto updates is beneficial:
1. **Security**: Many updates include security patches that protect your site from vulnerabilities.
2. **Performance**: Updates often come with performance improvements that can enhance your website’s speed and efficiency.
3. **New Features**: Updates can introduce new features and functionalities that improve user experience.
4. **Time-Saving**: Automating updates saves you time, allowing you to focus on content creation and other important tasks.
## Step 1: Check Your WordPress Version
First, ensure that your WordPress installation is up to date. Auto updates are available in WordPress version 3.7 and later. To check your version:
1. Log in to your WordPress admin dashboard.
2. Navigate to **Dashboard > Updates**.
3. If you see a message indicating that you are using an outdated version, follow the prompts to update.
## Step 2: Enable Core Auto Updates
WordPress automatically enables minor core updates by default. However, you can enable major updates as well. To do this, you can add a line of code to your `wp-config.php` file:
1. Connect to your website using an FTP client or access your hosting control panel.
2. Locate the `wp-config.php` file in the root directory of your WordPress installation.
3. Open the file in a text editor and add the following line before the line that says `/* That’s all, stop editing! Happy blogging. */`:
“`php
define( ‘WP_AUTO_UPDATE_CORE’, true );
“`
4. Save the changes and upload the file back to your server.
This code enables all core updates, including major releases.
## Step 3: Enable Auto Updates for Plugins and Themes
By default, auto updates for plugins and themes are disabled. To enable them, you can either use a plugin or add code to your theme’s `functions.php` file.
### Option A: Using a Plugin
1. Install and activate the **Easy Updates Manager** plugin.
2. Navigate to **Dashboard > Updates Options**.
3. In the **General** tab, you can enable auto updates for all plugins and themes with a simple toggle.
### Option B: Using Code
If you prefer not to use a plugin, you can add the following code to your theme’s `functions.php` file:
“`php
// Enable auto updates for all plugins
add_filter( ‘auto_update_plugin’, ‘__return_true’ );
// Enable auto updates for all themes
add_filter( ‘auto_update_theme’, ‘__return_true’ );
“`
1. Access your theme’s `functions.php` file via FTP or the WordPress admin panel.
2. Add the above code at the end of the file.
3. Save your changes.
## Step 4: Monitor Updates
While auto updates can save you time, it’s essential to monitor your website for any issues that may arise after an update. Here are some tips:
1. **Regular Backups**: Ensure you have a reliable backup solution in place. This way, if an update causes issues, you can quickly restore your site.
2. **Check for Compatibility**: Occasionally, updates may conflict with existing plugins or themes. After an update, check your website’s functionality to ensure everything is working correctly.
3. **Review Update Logs**: WordPress provides update logs that you can review to see what has been updated. This can help you stay informed about changes.
## Step 5: Test Your Site
After enabling auto updates, it’s a good practice to test your site periodically:
1. Visit your website and check for any broken links or missing functionalities.
2. Test forms, e-commerce features, and other interactive elements to ensure they work as expected.
3. Use tools like Google PageSpeed Insights or GTmetrix to check your site’s performance.
## Conclusion
Enabling auto updates on your WordPress website is a straightforward process that can significantly enhance your site’s security and performance. By following the steps outlined in this guide, you can ensure that your WordPress core, themes, and plugins are always up to date, allowing you to focus on creating great content for your audience. Remember to monitor your site regularly and maintain a backup strategy to safeguard against any potential issues. Happy blogging!

Recent Comments