

The default WordPress dashboard can quickly become cluttered with widgets like the Welcome panel or WordPress Events and News and hides essential tools. Adding plugins can make it even harder to navigate and manage.
By customizing your WordPress dashboard—organizing widgets, removing distractions, and tailoring the workspace—you can create a streamlined workflow that boosts productivity and enhances navigation.
This guide will show you simple ways admins can customize their WordPress dashboard for style and efficiency. We’ll also share how Divi users can use Divi Dash to manage all their WordPress sites from one dashboard.
Why Customize Your WordPress Dashboard?
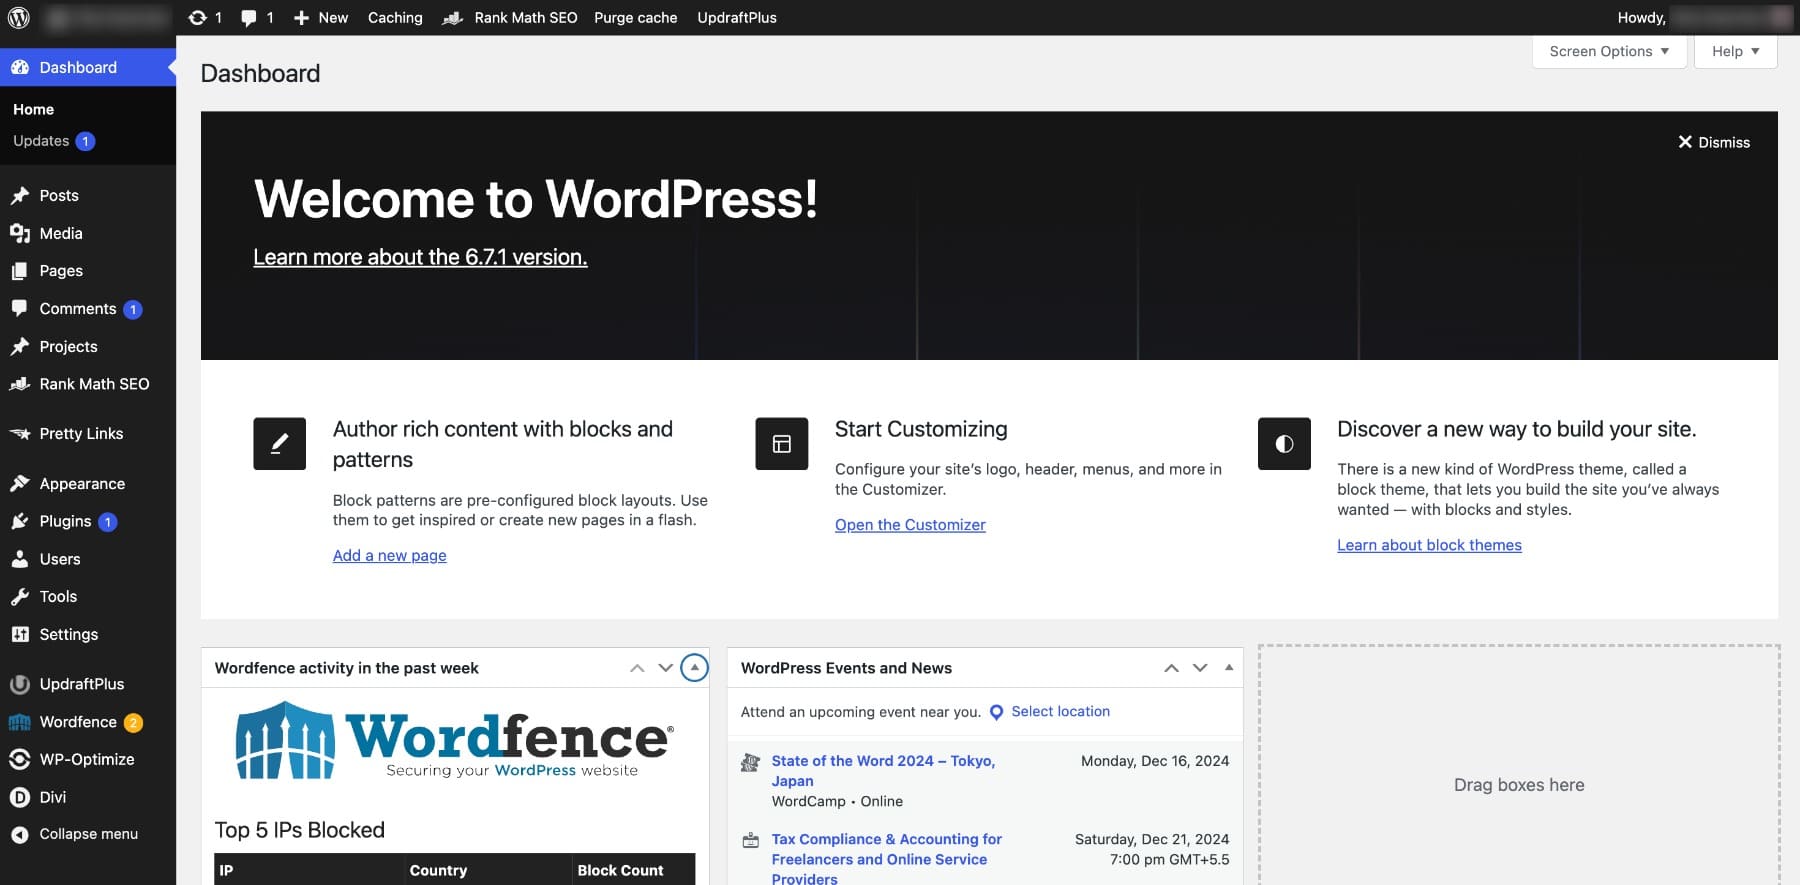
Your WordPress dashboard is more than a navigation hub—it’s the foundation of your workflow. Customizing it ensures that your tools and information are exactly where you need them.
- Streamline Your Workflow: Remove unnecessary widgets and reorganize tools to focus on what matters most. For example, bloggers can prioritize the Quick Draft widget to jot down content ideas, while small business owners might keep analytics and performance insights front and center.
- Enhance Usability: A clutter-free dashboard is easier to navigate, helping you find what you need faster. Minor tweaks like hiding the Welcome panel or moving the Updates widget to the top save precious time, especially for users managing content-heavy websites.
- Reinforce Branding: For client-facing sites, customization adds a professional touch. Add logos, brand colors, and custom welcome messages to impress clients and keep their experience consistent with your service quality. You can also create a custom WordPress dashboard for your clients.
- Save Time on Repetitive Tasks: Simplify daily actions by keeping critical tools like SEO plugins or performance dashboards visible. This reduces back-and-forth clicks and ensures a smoother workflow.
With simple customizations, you can create a workspace tailored to your needs—whether you’re a content creator, small business owner, or freelancer managing client projects.
7 Ways to Customize Your WordPress Dashboard
WordPress includes built-in tools that make it easy to personalize and optimize your dashboard for a more efficient workflow.
1. Declutter Your Dashboard with Screen Options
The WordPress Screen Options feature allows you to declutter your dashboard by hiding unnecessary widgets. For example, you can remove the welcome message, which takes up space without providing critical information, while keeping essential widgets like Activity and Updates visible. This helps create a cleaner, more focused workspace tailored to your needs.
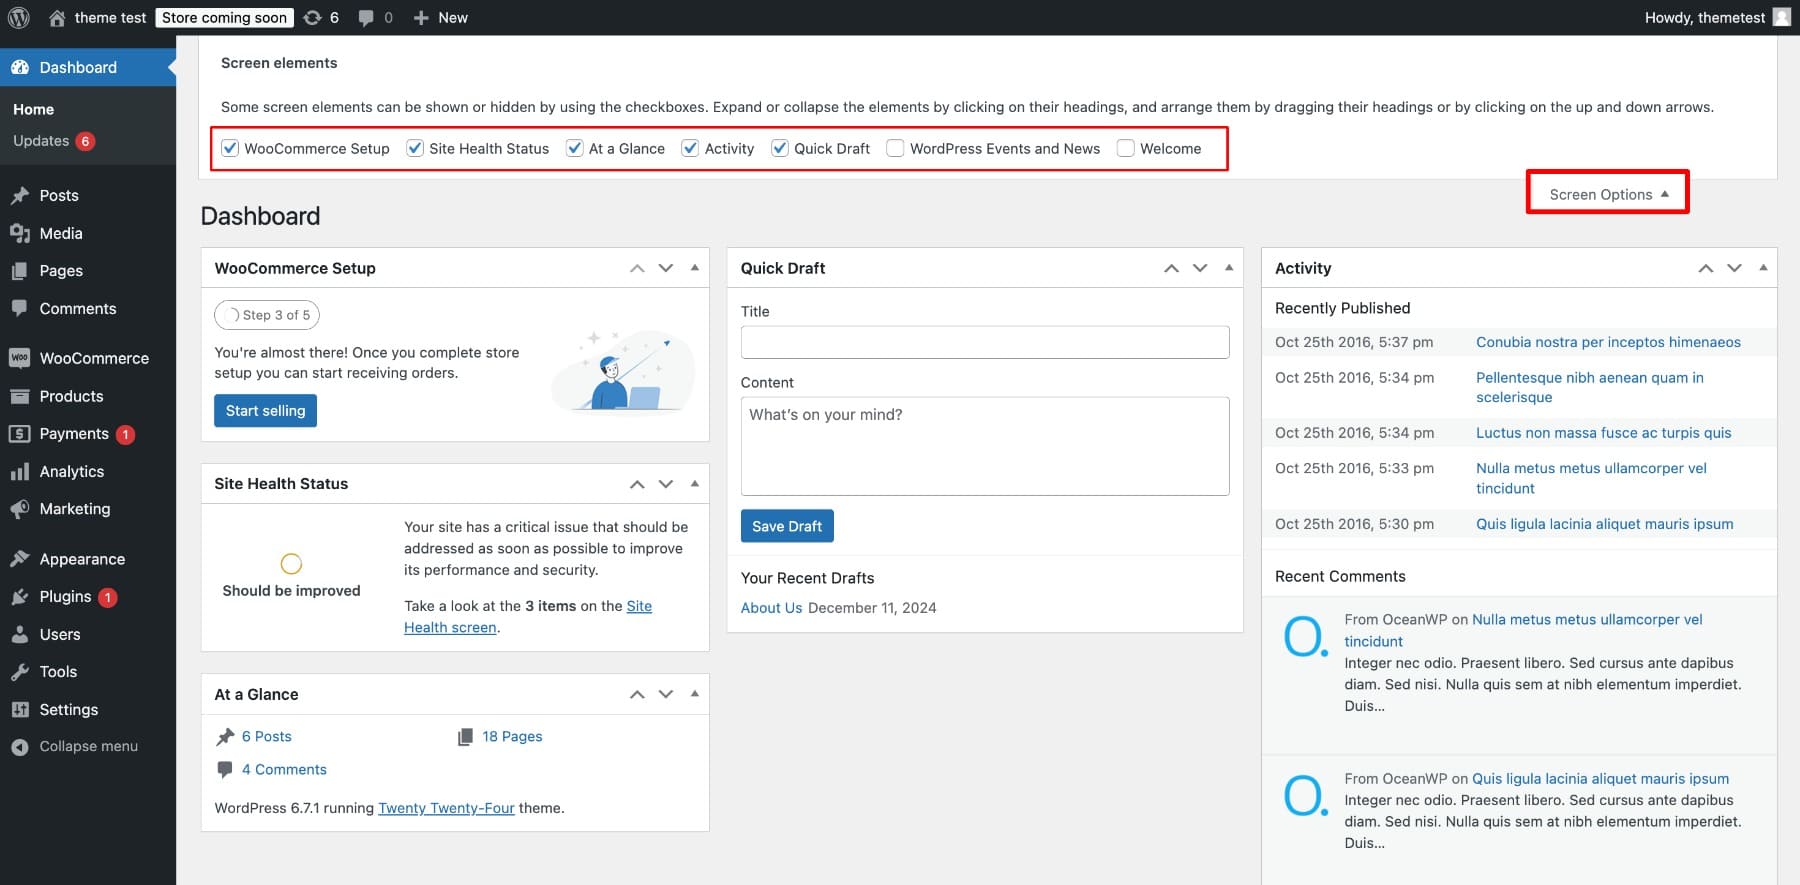
Don’t worry—these changes are reversible if you want to adjust your layout later.
2. Rearrange Your Dashboard Widgets
With WordPress’s drag-and-drop feature, you can quickly rearrange widgets to keep your most important tools above the fold. For instance, placing the Quick Draft widget at the top helps capture content ideas easily, while widgets like Performance Overview or Site Health Status ensure key insights are always visible.
This functionality allows you to prioritize essential tools like analytics or quick links, creating a more streamlined and efficient workflow.
3. Personalize the Look with the Admin Color Scheme
Customize your WordPress dashboard’s appearance by selecting a color scheme that fits your style. Go to Users > Profile, locate the Admin Color Scheme section, and choose your preferred theme. For instance, choosing a high-contrast theme can make navigation easier for users working long hours or in low-light environments.
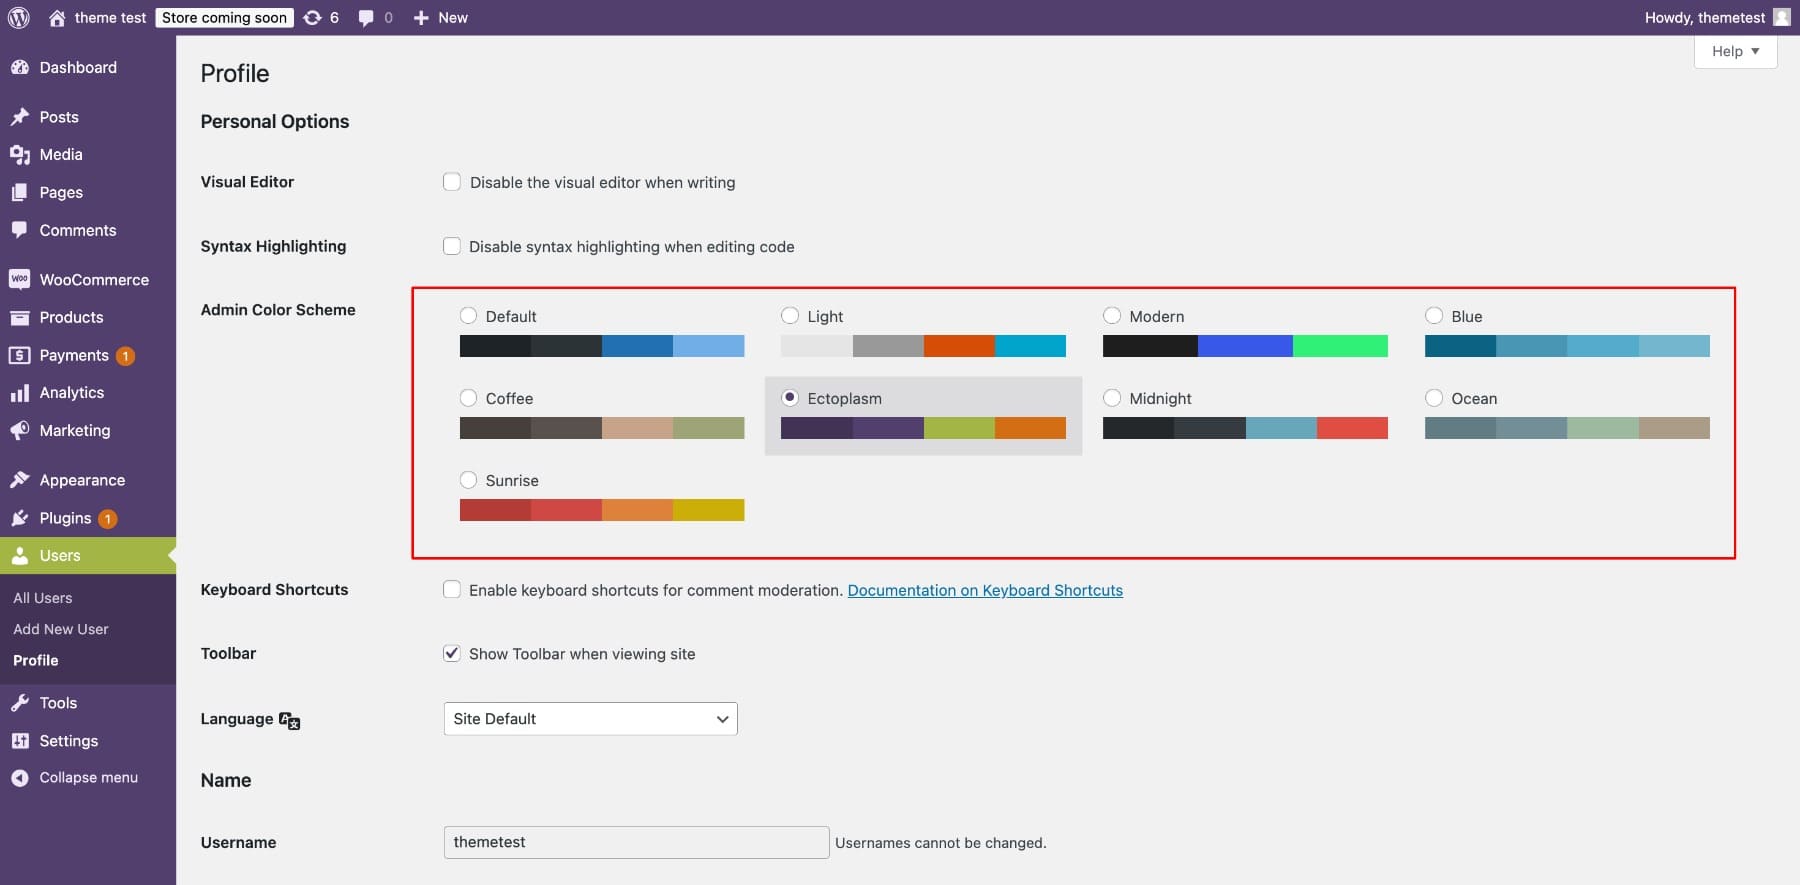
Don’t forget to save your changes by clicking Update Profile. For more options, the Ultimate Dashboard plugin allows you to create custom schemes and even enables a sleek dark mode for a modern look.
4. Customize the Admin Sidebar Menu
To customize your WordPress sidebar menu, you can use plugins like Ultimate Dashboard or Admin Menu Editor.
Here’s how to edit your sidebar menu with the Admin Menu Editor:
After activating the plugin, navigate to Settings > Menu Editor and rearrange menu items by dragging and dropping elements.
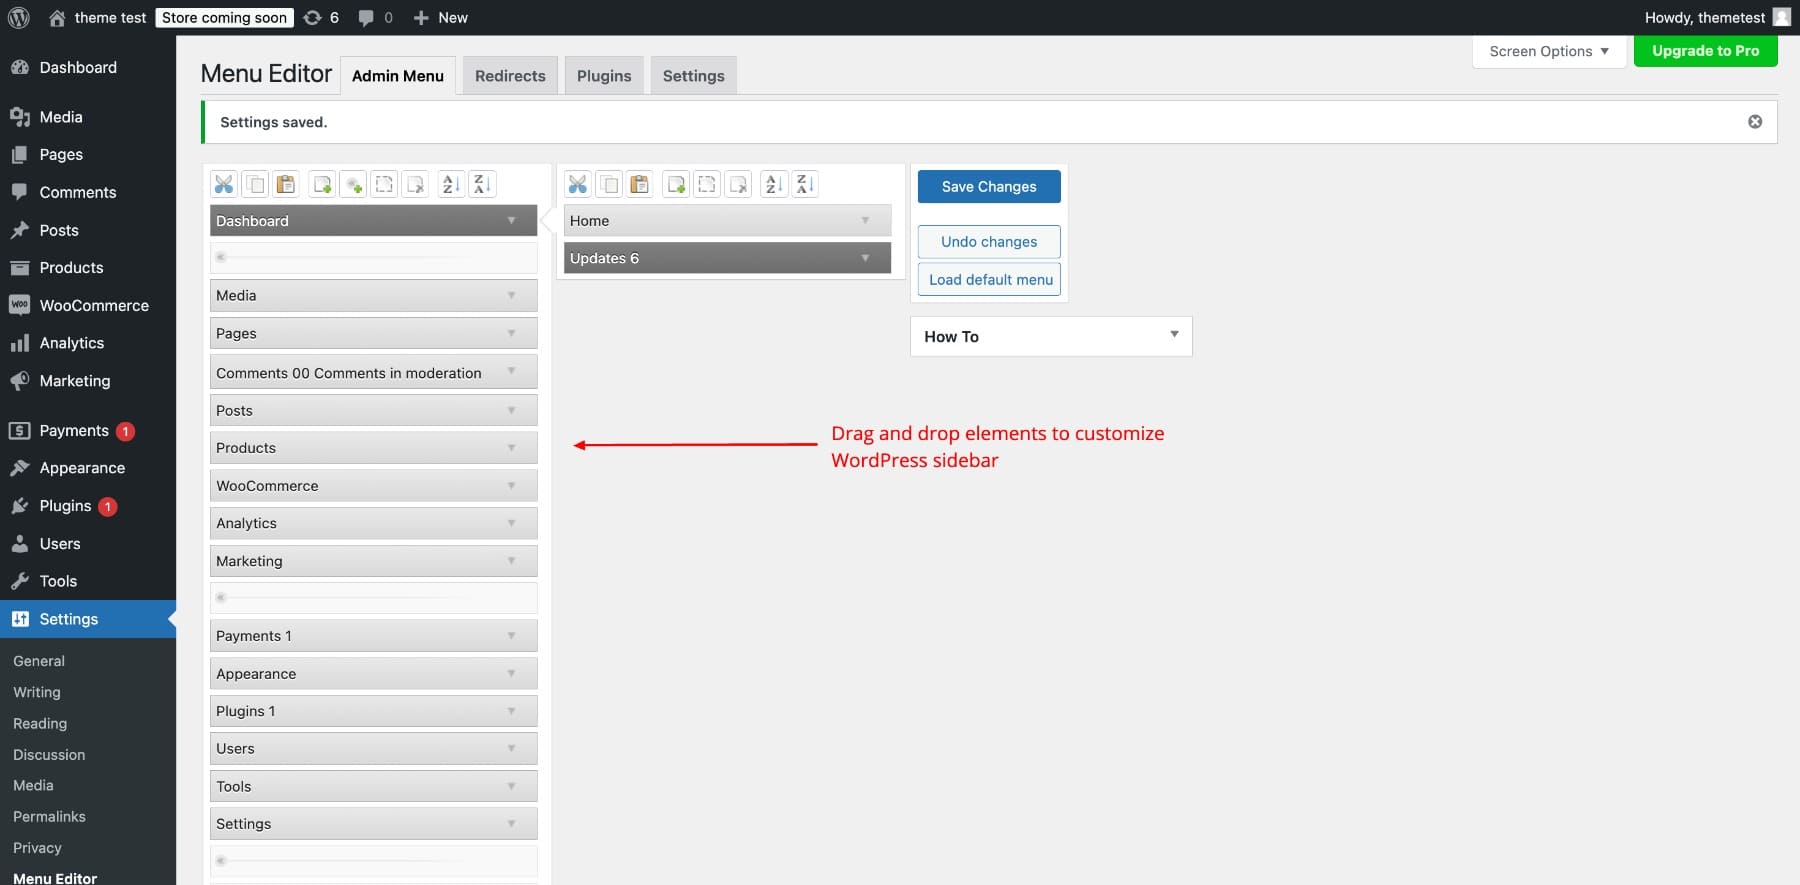
You can also remove unnecessary menu items to simplify your interface. Select the menu item you want to remove and click the Scissors icon.
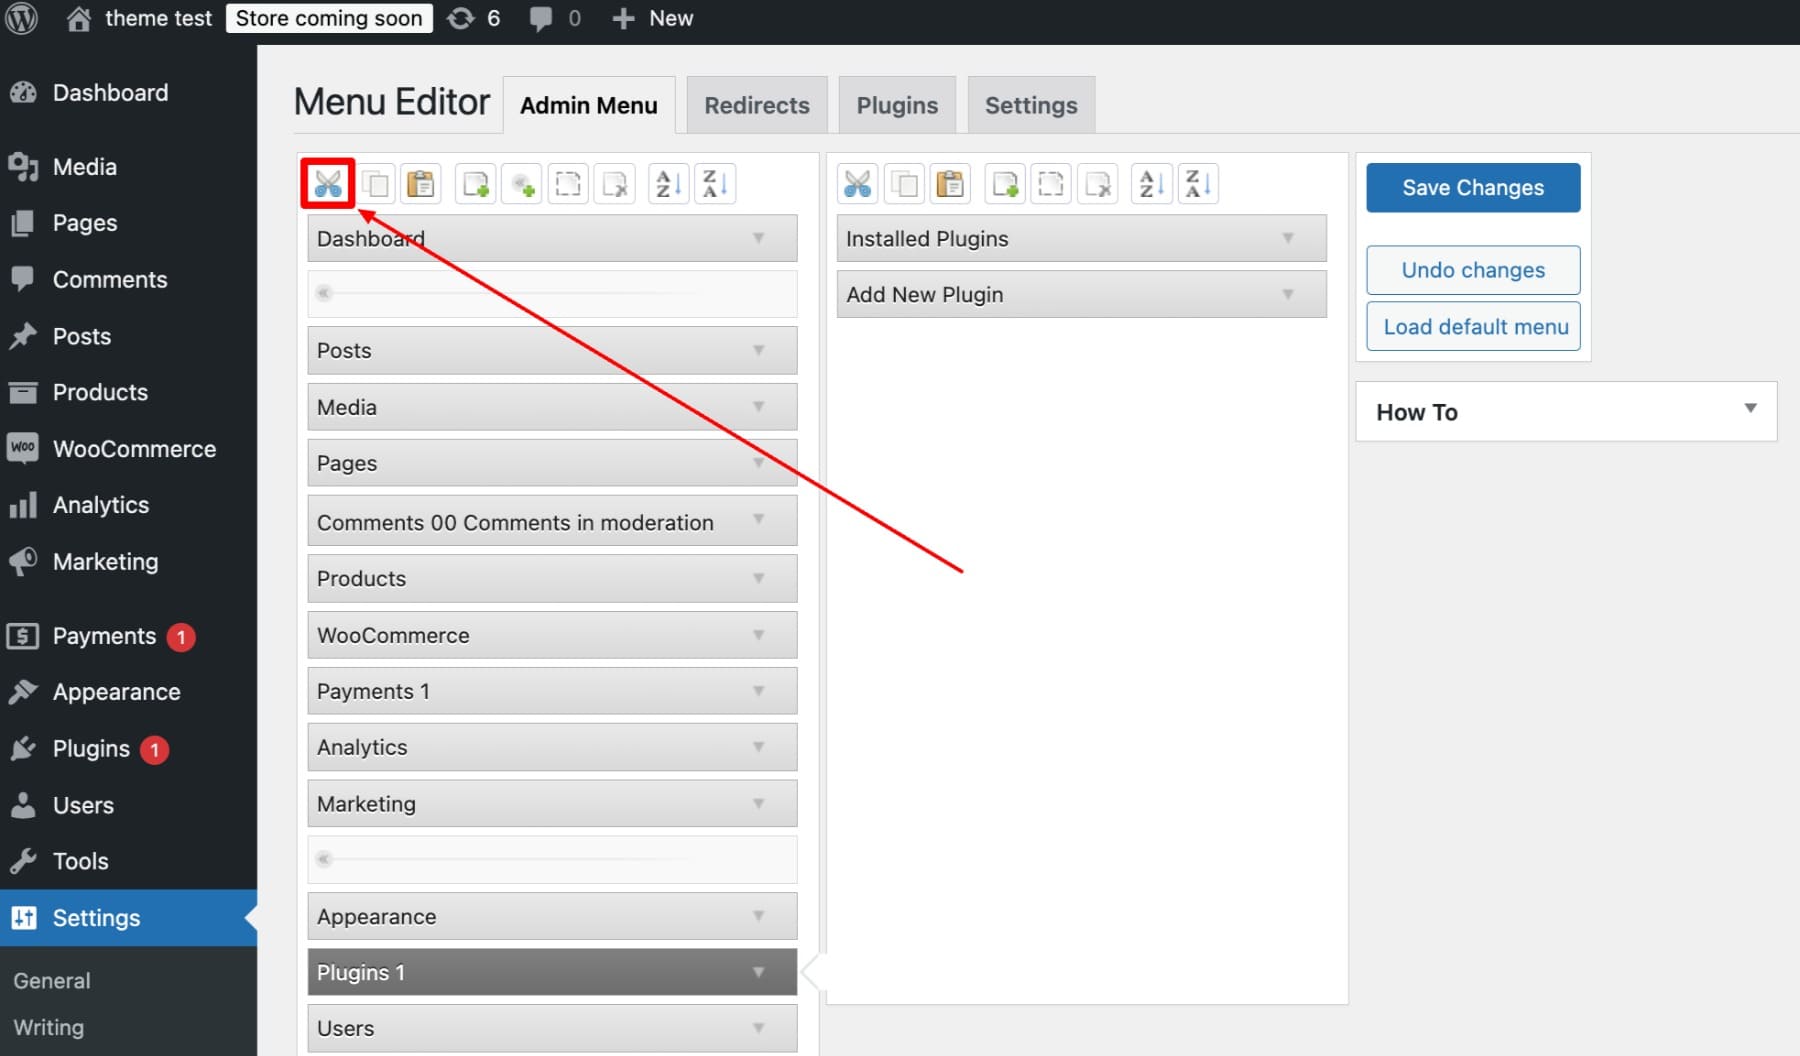
If needed, you can restore deleted items using the Load Default Menu option. So, if you’re experimenting, don’t worry, you can easily reset any changes.
5. Hide/Show Menu Items Based on User Roles
For client sites or team members with different roles, you can hide menu items to display only essential tools. For example, authors may only need access to Posts and Pages without seeing WooCommerce options.
Using the Ultimate Dashboard plugin, navigate to the Admin Menu Editor and select a user role. Then, click the Eye icon to hide specific menu items.
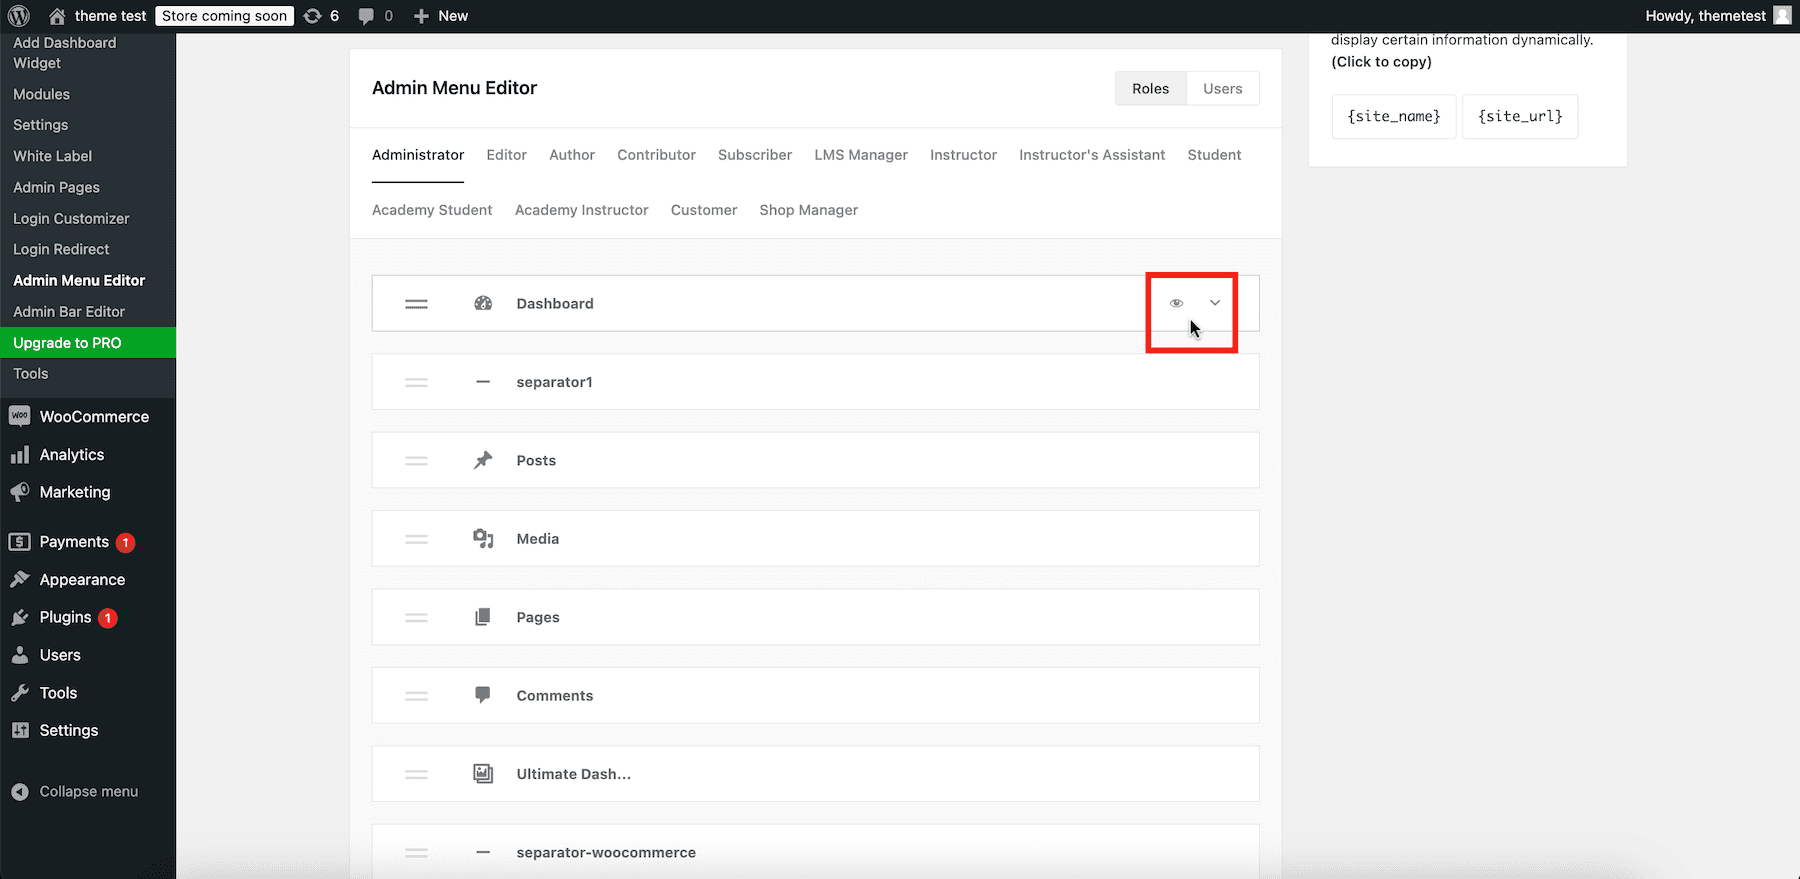
You can also customize menu options for individual users by switching to the Users tab and selecting a specific user.
6. Add Custom Dashboard Widgets
Custom dashboard widgets allow you to make your WordPress admin area more functional and user-friendly. For example, you can create a to-do list widget with instructions like “Add new blog posts here” or include quick links to frequently accessed areas such as SEO settings, analytics, or your content library.
To create a custom quick link widget using Ultimate Dashboard, go to Add Dashboard Widget, select Icon Widget in Widget Type, add your link, and click Publish.
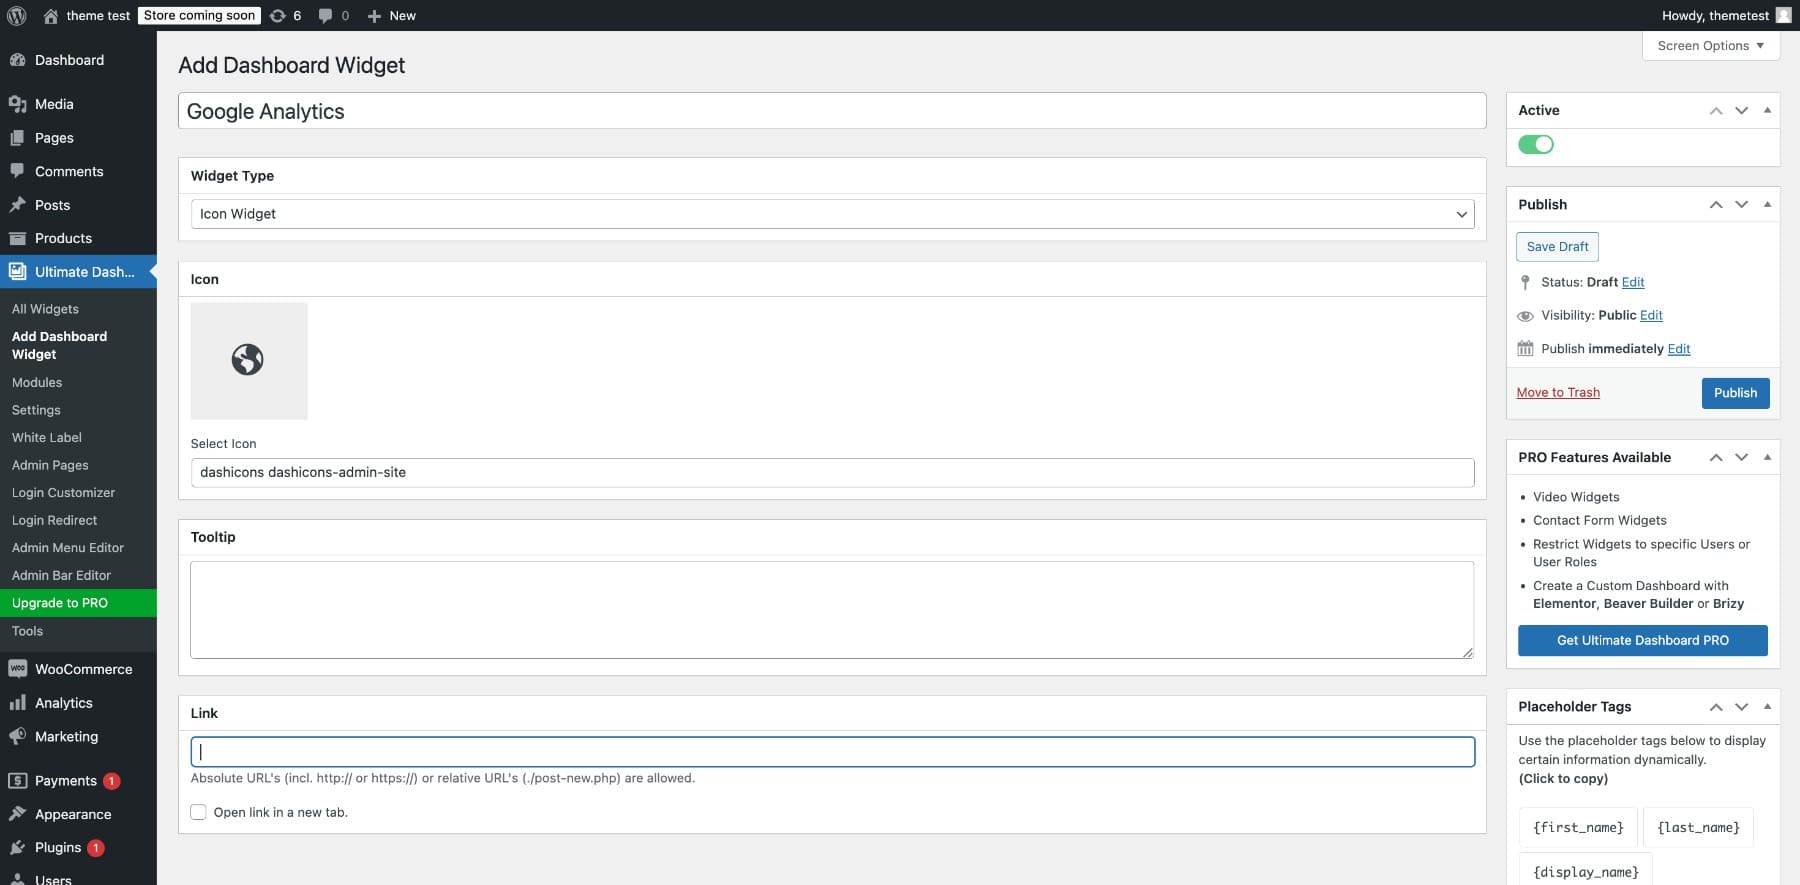
Widgets like a Client Resources hub with support links or tutorials can make your dashboard a tailored productivity hub, helping users navigate tasks effortlessly. If you’re new to custom widgets, start with a simple text widget to add helpful reminders or instructions.
7. Secure and Customize Your WordPress Login Page
Enhancing your WordPress login page boosts security and creates a professional experience. Start by changing the default login URL and setting up redirects to prevent unauthorized access. Use Login Redirect to create a custom URL and redirect users based on their roles.
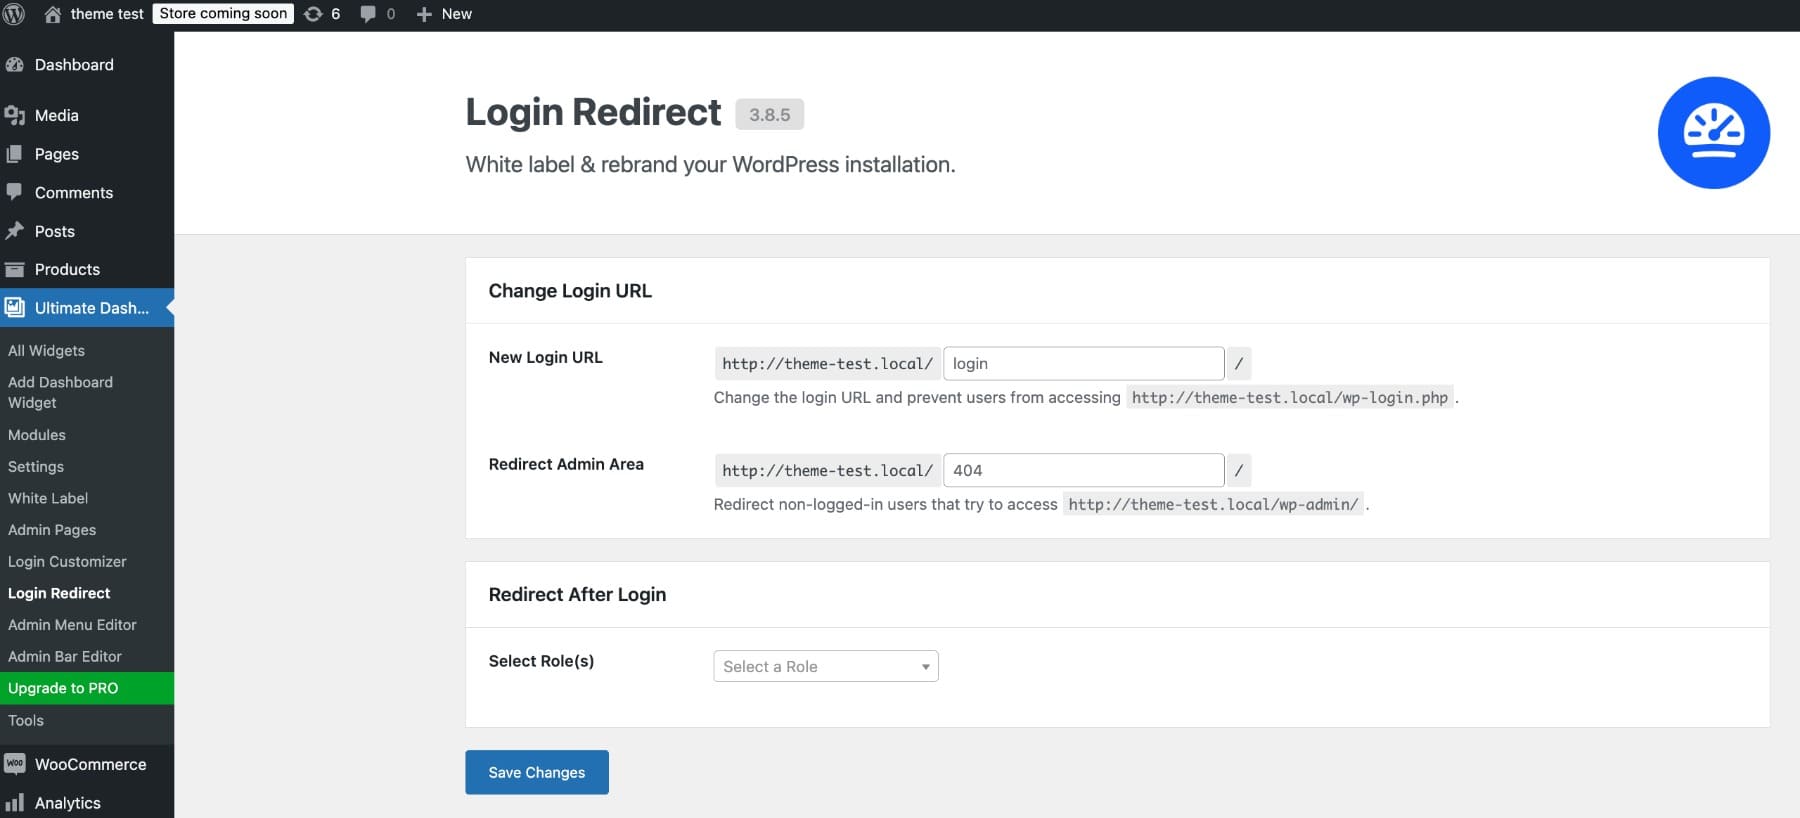
Next, customize the login page to match your branding with logos, colors, and styling. If you’re using Ultimate Dashboard, click Login Customizer to easily personalize your login page. Most login customizations are simple to apply and can be easily reverted if needed, so play with features and see what works for you.
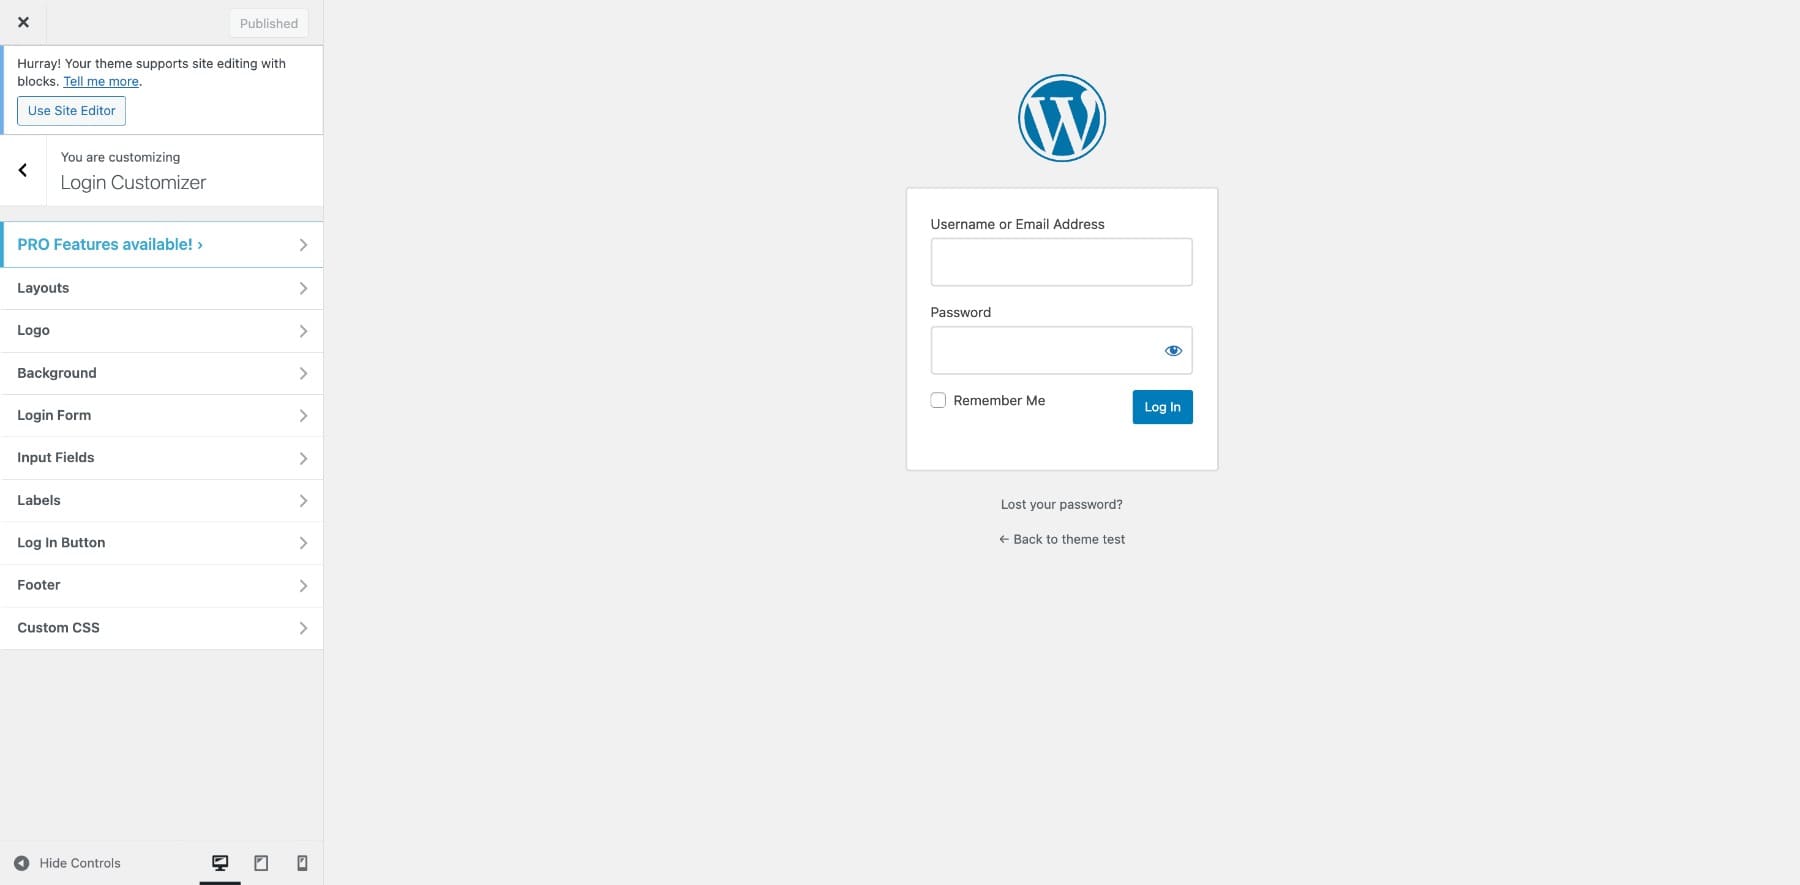
To further secure your site, combine a custom URL with additional measures like limiting login attempts and enforcing strong passwords. These steps ensure your WordPress admin remains both secure and functional.
There are many more plugins to explore, such as WP Custom Admin Interface for admin interface tweaks and White Label CMS for branding enhancements.
While plugins are excellent for advanced customization and branding, they may be unnecessary for basic tweaks. For simpler needs, WordPress’s built-in tools and drag-and-drop functionality can streamline your dashboard without extra add-ons.
Streamlining Multi-Site Management with Divi Dash
Managing multiple WordPress websites can be time-consuming, with tasks like updating plugins, tracking performance, and keeping everything organized. Divi Dash simplifies this process with a centralized platform designed to streamline site management. For example, if you manage ten client websites, you can monitor all updates and performance metrics from one place instead of logging into each site individually.
Why You Need Divi Dash for Multi-Site Management
Divi Dash is designed for freelancers, agencies, and businesses managing multiple WordPress websites, helping you streamline tasks and improve efficiency. Here’s how it works:
1. Save Time with Centralized Updates
Divi Dash helps you stay on top of WordPress updates. You can update plugins, themes, or core files across all your WordPress sites from a single dashboard, saving hours of work. You can even schedule updates and enable Auto-Updates for selected plugins or themes.
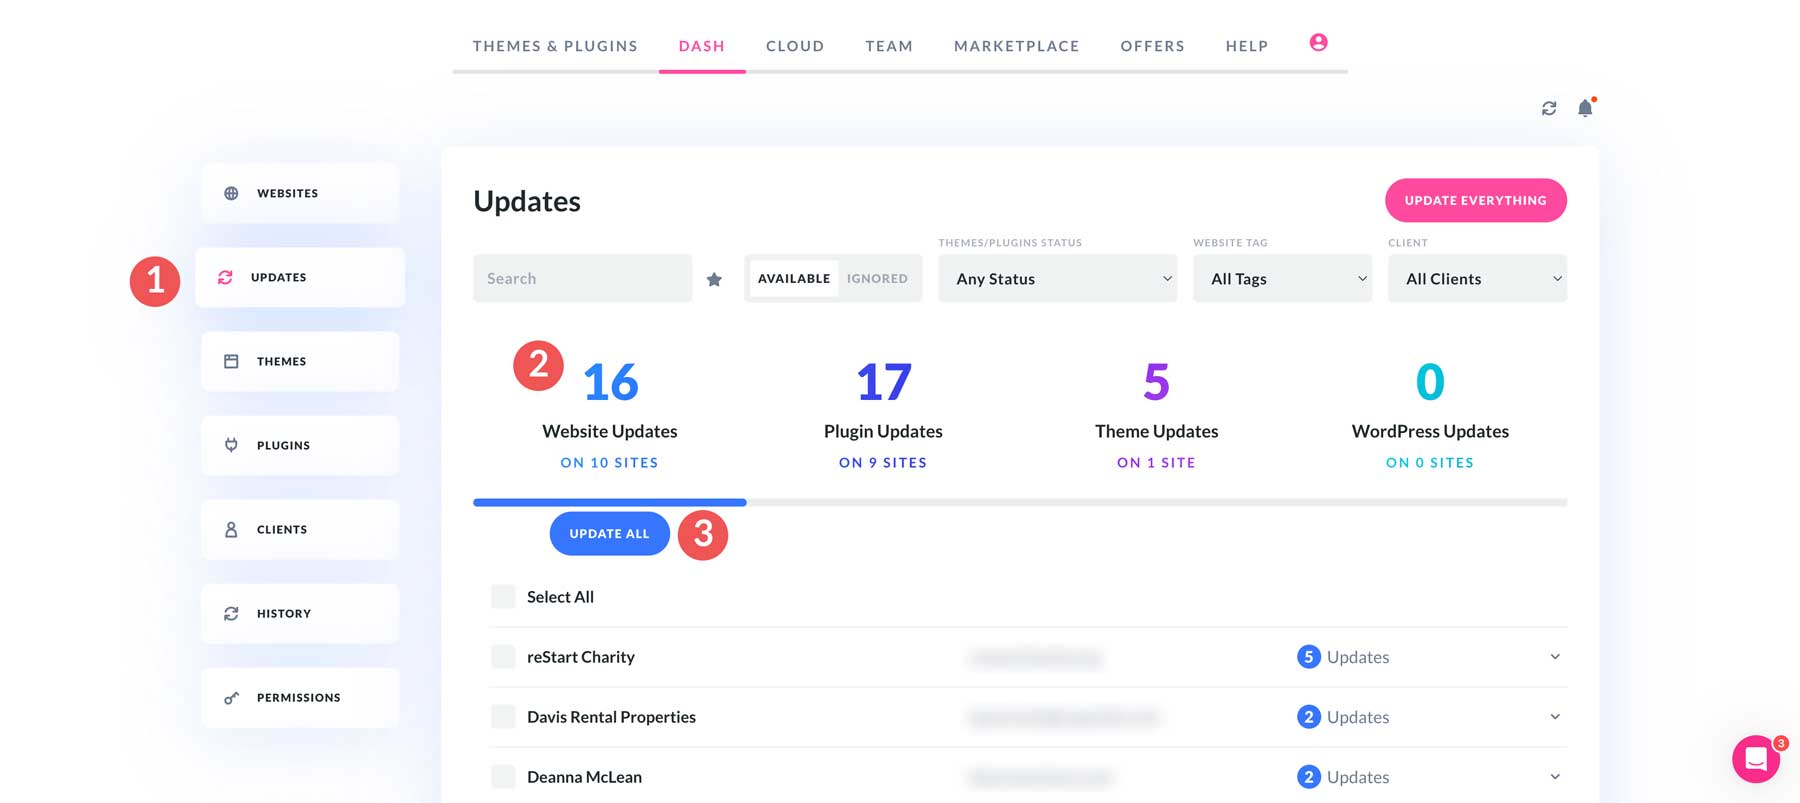
2. Monitor All Your Websites at a Glance
Divi Dash provides a real-time overview of your entire WordPress network, tracking uptime, performance metrics, and pending updates. If a site has outdated plugins or downtime, you’ll be notified immediately to give you time to act quickly.
3. One-Click Login to WordPress Dashboards
Divi Dash simplifies accessing multiple WordPress dashboards with its one-click login feature. This eliminates the need to enter credentials for each site which saves time and reduces hassle.
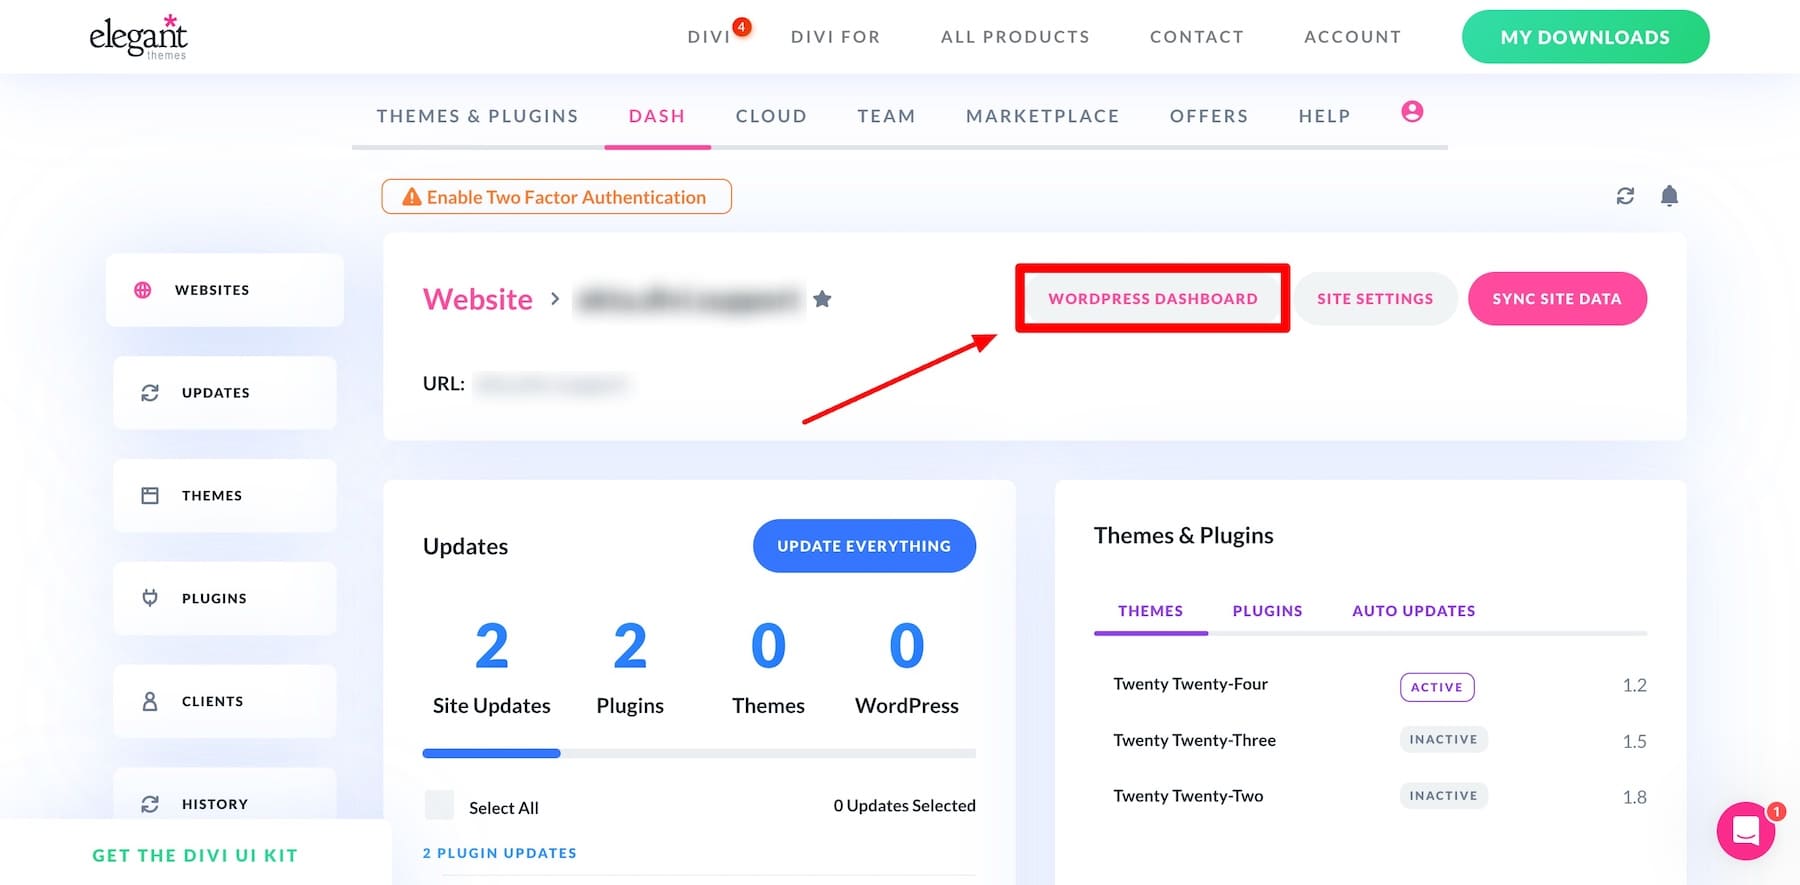
4. Simplify Client Management
Divi Dash helps agencies and freelancers manage multiple client websites efficiently. It allows you to organize sites, track performance, and ensure timely updates—all from one platform. For instance, you can monitor plugin updates and performance for a client’s eCommerce site, keeping it optimized with minimal effort.
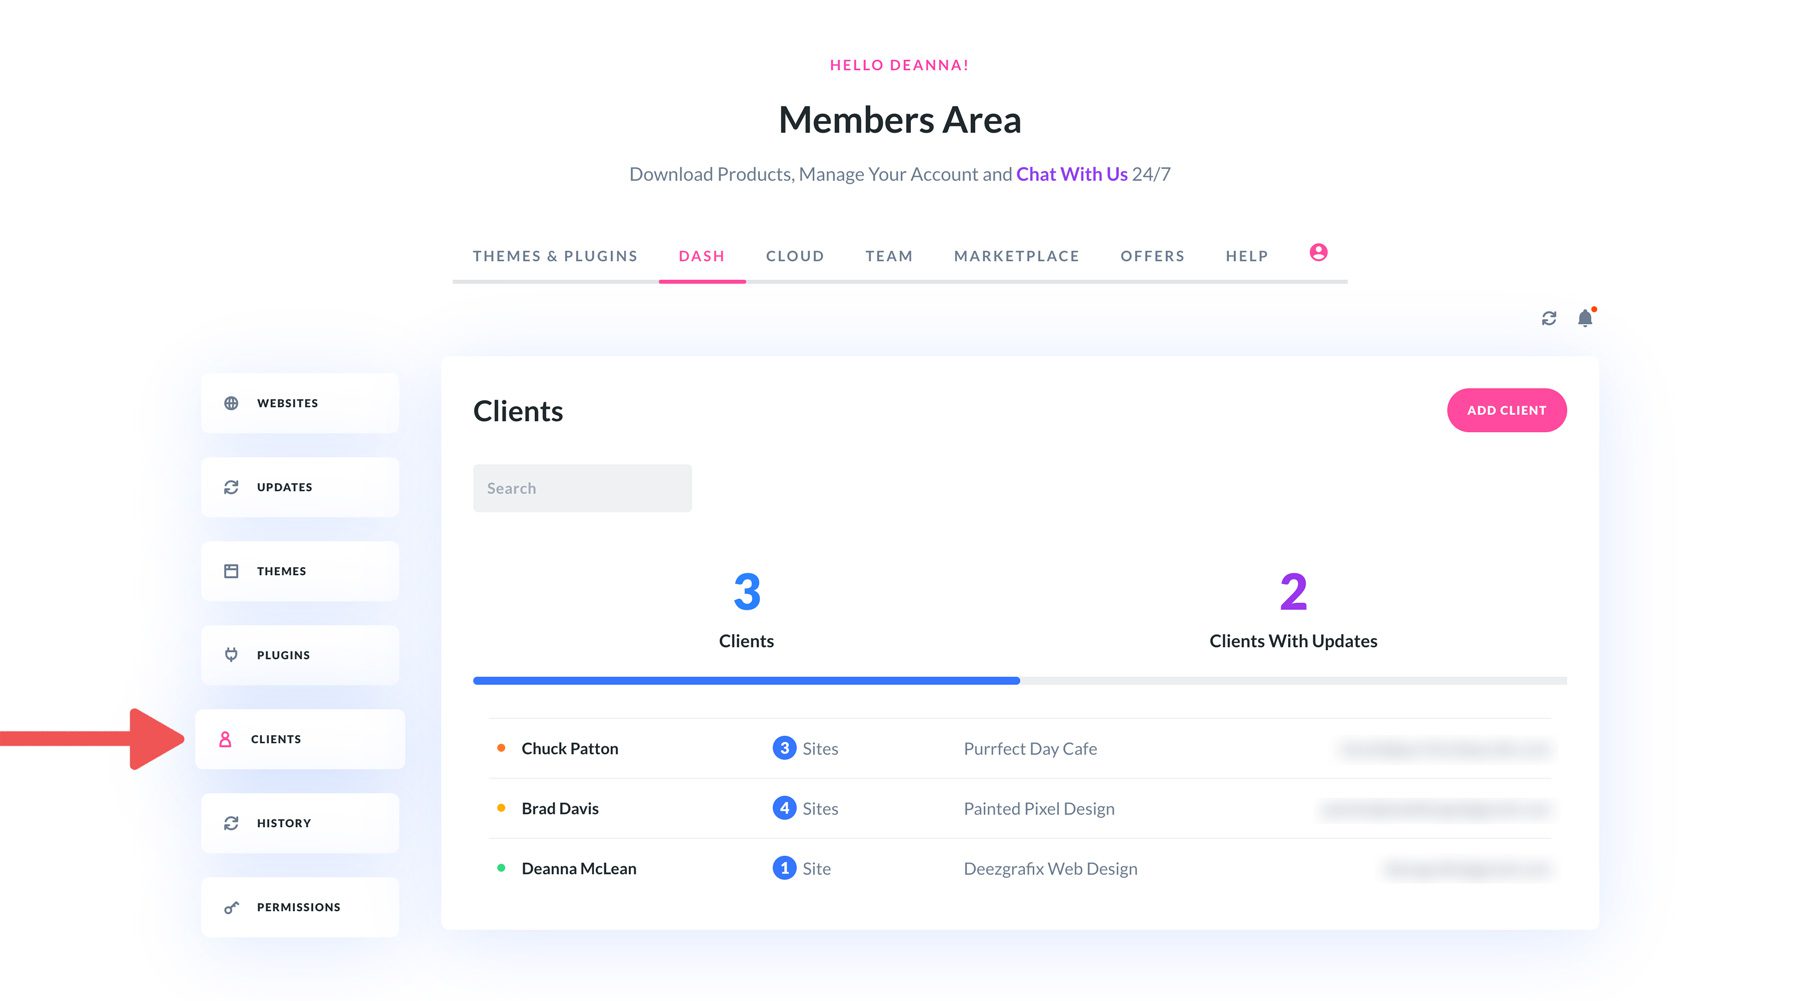
Why Choose Divi Dash Over Manual WordPress Management?
The default WordPress dashboard is great for single sites, but it’s not designed to manage multiple websites. Divi Dash solves this by centralizing updates, performance tracking, and site management into one intuitive dashboard, saving you time and effort.
As a smarter and more organized way to manage multiple sites, Divi Dash helps you focus on delivering results. Plus, it’s included free with your Divi membership, making Divi an all-in-one solution for efficient WordPress site management.
Here’s your step-by-step guide to setting up Divi Dash so you can add websites and start monitoring them.
FAQs on Customizing WordPress Dashboard
How to customize a WordPress dashboard page?
What is a widget in WordPress?
How to organize a WordPress dashboard?
How do I add widgets to my WordPress dashboard?
The post 7 Easy WordPress Dashboard Customizations for Site Managers appeared first on Elegant Themes Blog.
# 7 Simple Customizations for WordPress Dashboards to Enhance Site Management
WordPress is one of the most popular content management systems (CMS) in the world, powering over 40% of all websites. One of the reasons for its widespread adoption is its flexibility and ease of use. However, the default WordPress dashboard can sometimes feel cluttered or overwhelming, especially for users managing multiple sites or those new to the platform. Fortunately, there are several simple customizations you can implement to enhance your WordPress dashboard, making site management more efficient and user-friendly. Here are seven effective strategies to consider:
## 1. **Customize the Dashboard Widgets**
The WordPress dashboard comes with several default widgets that may not be relevant to your needs. You can easily customize these widgets by dragging and dropping them to rearrange their positions or removing those you don’t use. To do this, simply click on the “Screen Options” tab in the upper right corner of the dashboard. This allows you to toggle the visibility of various widgets, helping you create a more streamlined and focused workspace.
## 2. **Add Custom Dashboard Widgets**
If the default widgets don’t provide the information you need, consider adding custom dashboard widgets. There are several plugins available, such as “WP Dashboard Notes” or “Custom Dashboard Widgets,” that allow you to create your own widgets. These can be used to display important site statistics, reminders, or even links to frequently used resources, making it easier to access critical information at a glance.
## 3. **Use the Admin Menu Customization Plugin**
The WordPress admin menu can become cluttered, especially if you have multiple plugins installed. Using a plugin like “Admin Menu Editor,” you can customize the admin menu by rearranging, hiding, or renaming menu items. This helps you prioritize the tools you use most often and declutter your dashboard, making navigation more intuitive.
## 4. **Set Up User Roles and Permissions**
If you manage a team or have multiple users accessing your WordPress site, it’s essential to set appropriate user roles and permissions. By customizing user roles, you can control what each user can see and do within the dashboard. This not only enhances security but also simplifies the experience for users by limiting their access to only the tools they need. You can manage user roles through the “Users” section in the WordPress admin area.
## 5. **Utilize the Quick Draft Feature**
The Quick Draft feature is a handy tool that allows you to jot down ideas or draft posts quickly without navigating away from the dashboard. You can find this feature on the main dashboard page. By using Quick Draft, you can capture your thoughts and ideas instantly, making it easier to manage your content creation process.
## 6. **Implement a Custom Welcome Message**
A personalized welcome message can enhance the user experience for anyone accessing your WordPress dashboard. You can use a plugin like “Admin Customizer” to create a custom welcome message that greets users when they log in. This can be particularly useful for teams, as you can include reminders, updates, or motivational quotes to inspire productivity.
## 7. **Optimize the Admin Bar**
The admin bar at the top of the WordPress dashboard provides quick access to various site management features. You can customize this bar by adding or removing links based on your preferences. For example, if you frequently access certain pages or tools, you can add them to the admin bar for quicker access. This can be done using plugins like “Admin Bar Disabler” or “Adminimize,” allowing you to tailor the admin bar to suit your workflow.
## Conclusion
Customizing your WordPress dashboard can significantly enhance your site management experience. By implementing these seven simple customizations, you can create a more efficient, user-friendly environment that caters to your specific needs. Whether you’re a solo blogger or managing a team, these adjustments can help streamline your workflow, improve productivity, and make the most of your WordPress site. Take the time to explore these options, and enjoy a more organized and effective dashboard!


Recent Comments