

Keeping your WordPress site running smoothly and securely means staying on top of plugin updates. While it’s easy to forget, these updates often include critical bug fixes and security patches.
Fortunately, managing plugin updates doesn’t have to be a hassle. You can use several approaches to updating your WordPress plugins. In this post, we’ll explore those options, one of which is through Divi Dash. We’ll also explain why plugin updates are essential.
Let’s get to it!
Why Updating Plugins Are Necessary
Plugins open up a world of possibilities for your website but require regular attention to keep things running smoothly. Staying current with plugin updates is crucial for maintaining a secure and user-friendly site. These updates do more than add new features – they play a vital role in your site’s overall health and performance.
Outdated plugins can be a weak link in your site’s defenses. Hackers often discover and exploit vulnerabilities in older versions of plugins, potentially gaining unauthorized access to your site and its sensitive information.
By keeping your plugins up-to-date, you’re patching these security gaps and strengthening your site’s protection against cyber threats.
Beyond security, updated plugins often come with refined code to speed up your site and make it more efficient. This improved performance translates to a better experience for your visitors, encouraging them to explore what you offer.
Plus, many updates introduce fresh functionalities that let you expand your site’s capabilities. Incorporating these new features keeps your website dynamic and up-to-date with the latest digital trends. Remember, a well-maintained website with current plugins is more secure, capable, faster, and better equipped to serve your audience’s needs.
Things to Remember Before Updating Plugins
Before updating WordPress plugins, it is essential to prioritize a backup of your website, including both files and databases. Most WordPress hosts let you make backups, or you can do it yourself using a backup plugin like UpdraftPlus or Solid Backups. This precaution is a safety net, enabling fast restoration in case of unforeseen complications.
Verifying compatibility between the new plugin versions, your current WordPress installation, and other active plugins is important. Incompatibilities can lead to functional anomalies or even system failures. Carefully reviewing the changelog or release notes provided by plugin developers offers valuable insights into the changes and improvements incorporated in the update.
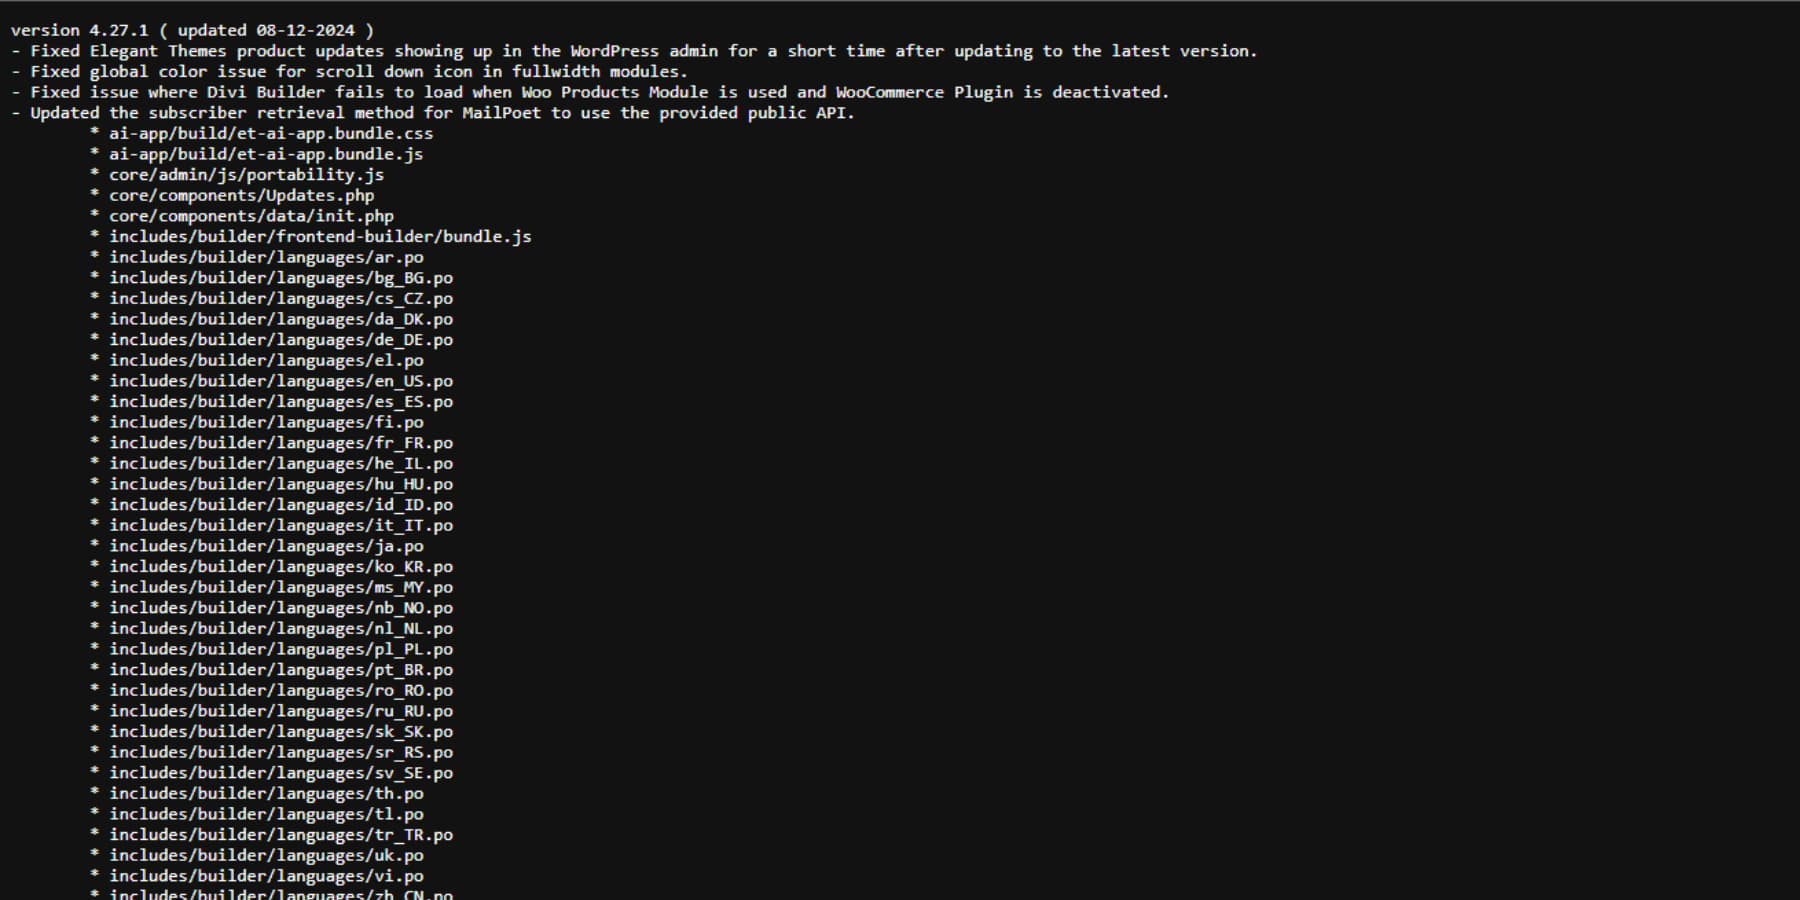
Representative image of how a changelog might look like
Moreover, it is generally a good idea to go through support threads to find any persistent issues or wait for a few days before updating to the latest version (except for hotfixes or vulnerability patches), as developers may fix things that may otherwise been an issue in the newest update.
To mitigate potential risks, consider testing updates on a staging or development site to identify and address any conflicts or issues before implementing changes on your live site. Furthermore, selecting a time of low website traffic minimizes disruptions to your visitors.
Finally, upon completing the update, we suggest you thoroughly test your website’s functionality, including forms, eCommerce features, and critical integrations, to ensure nothing is broken.
How to Update Plugins: 3 Ways
Now that we’ve covered the essential practices to follow before updating plugins on WordPress, let’s dive into the actual process of updating them. It is easier than you think!
1. Easiest Method: Using Divi Dash
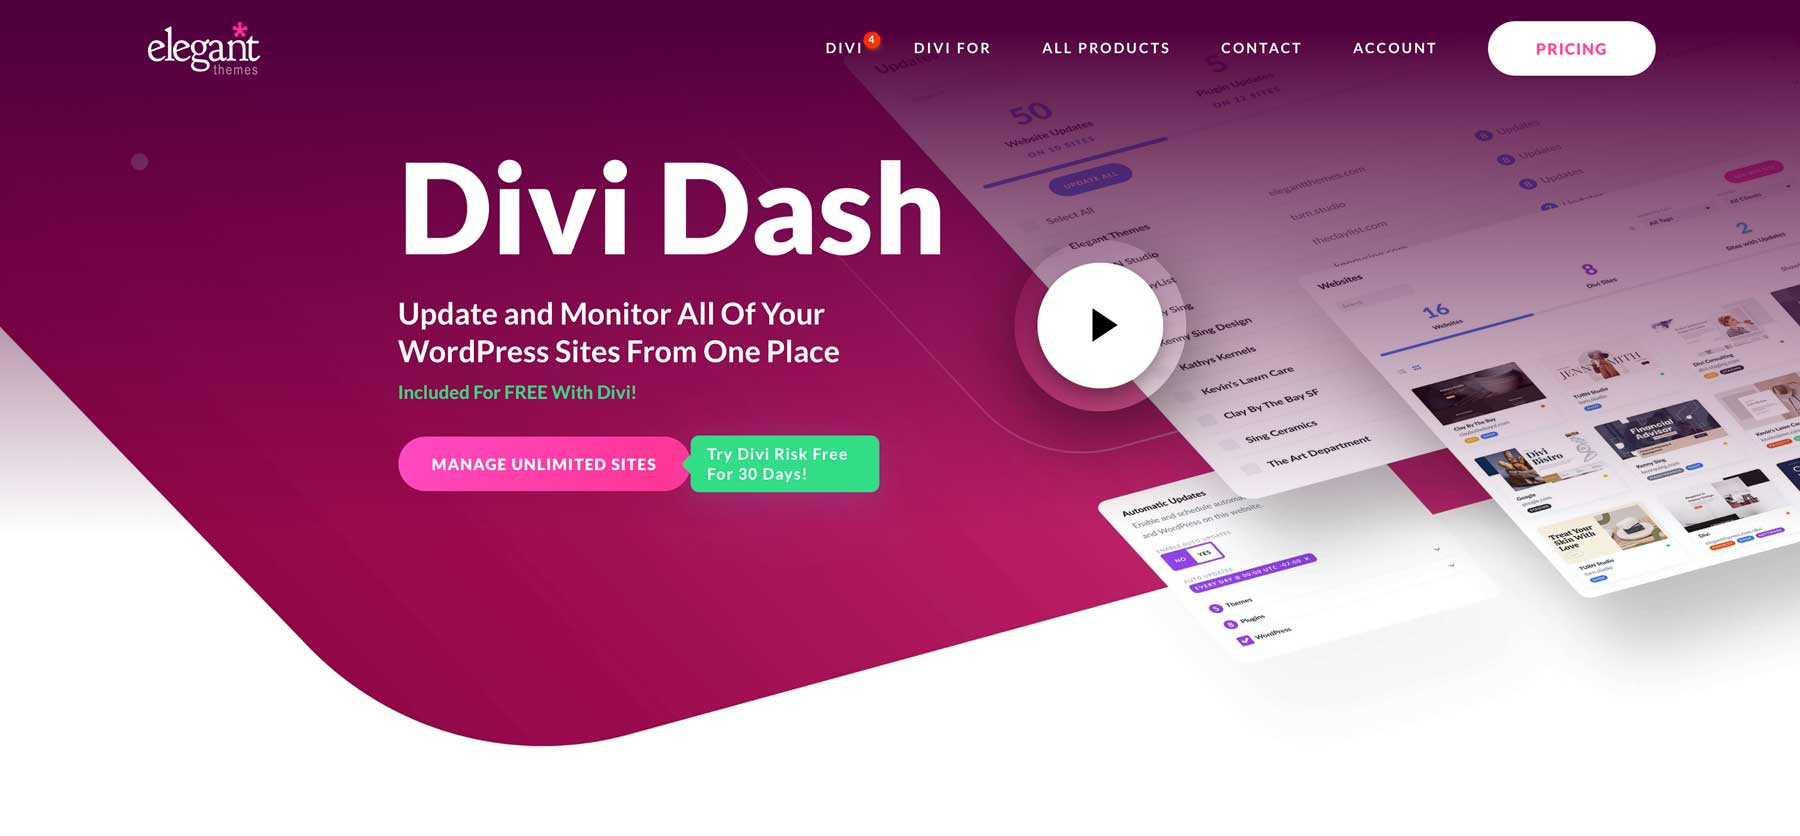
If you’re a freelancer or managing multiple websites, you’ve probably experienced the hassle of updating plugins on each site individually. Although this task isn’t difficult, doing it repeatedly across various websites can become quite draining.
That’s where Divi Dash comes in—it’s a revolutionary tool designed to simplify website management for Divi users.
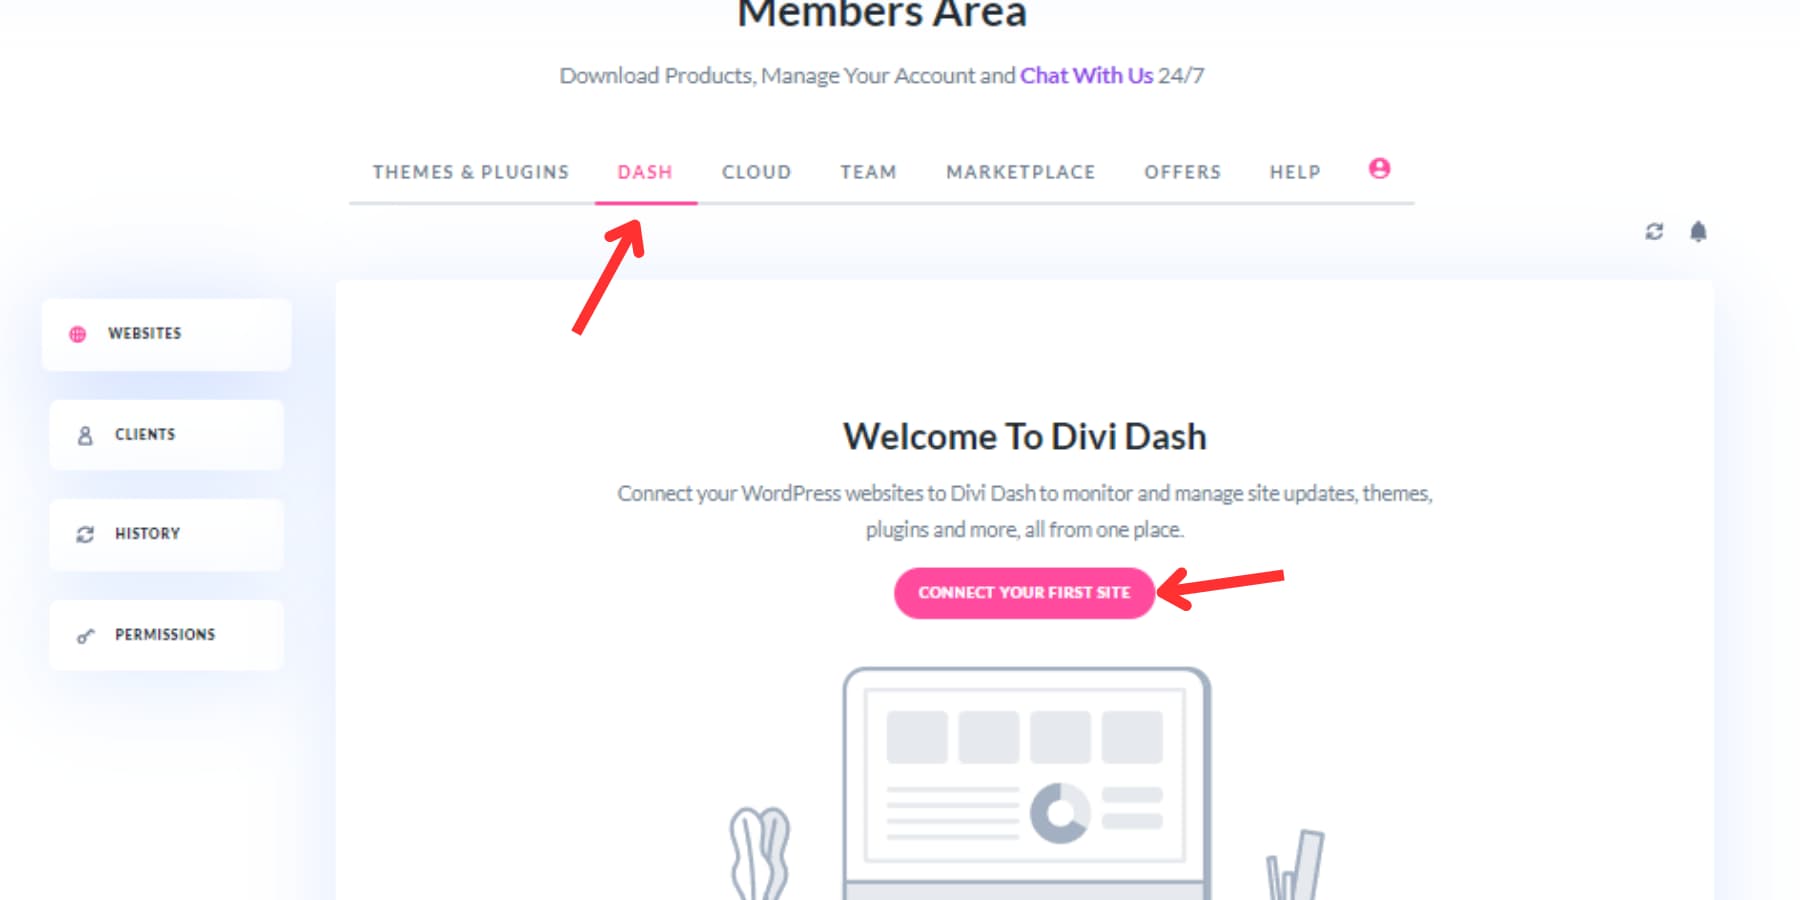
To start with Divi Dash, head to the Elegant Themes’ Members Area and find the ‘Dash’ option in the main menu. From there, click on the ‘Add Your First Website’ button. This guide assumes you’re already a Divi member. If you haven’t joined, now is a great time to sign up and take advantage of these robust features.
In the popup that appears, input your website’s URL, administrator username, and password. If you don’t want to enter your password, you can use a connect key.
During this setup process, you can install the Divi Theme and any other Elegant Themes plugins—this is particularly beneficial for new client websites and saves time. Once you’ve added your site, you’ll be welcomed by a detailed dashboard that puts all your management tools at your fingertips. Follow the same process for adding the rest of the websites to your Divi Dash.
Divi Dash is designed to simplify the management of WordPress updates across your websites. This tool lets you quickly check how many sites need updates and perform a bulk update with just a single click under the updates tab.
If you prefer a more hands-on approach, you can update specific websites by clicking on their name on the dashboard, going to the updates box, and clicking the update icon.
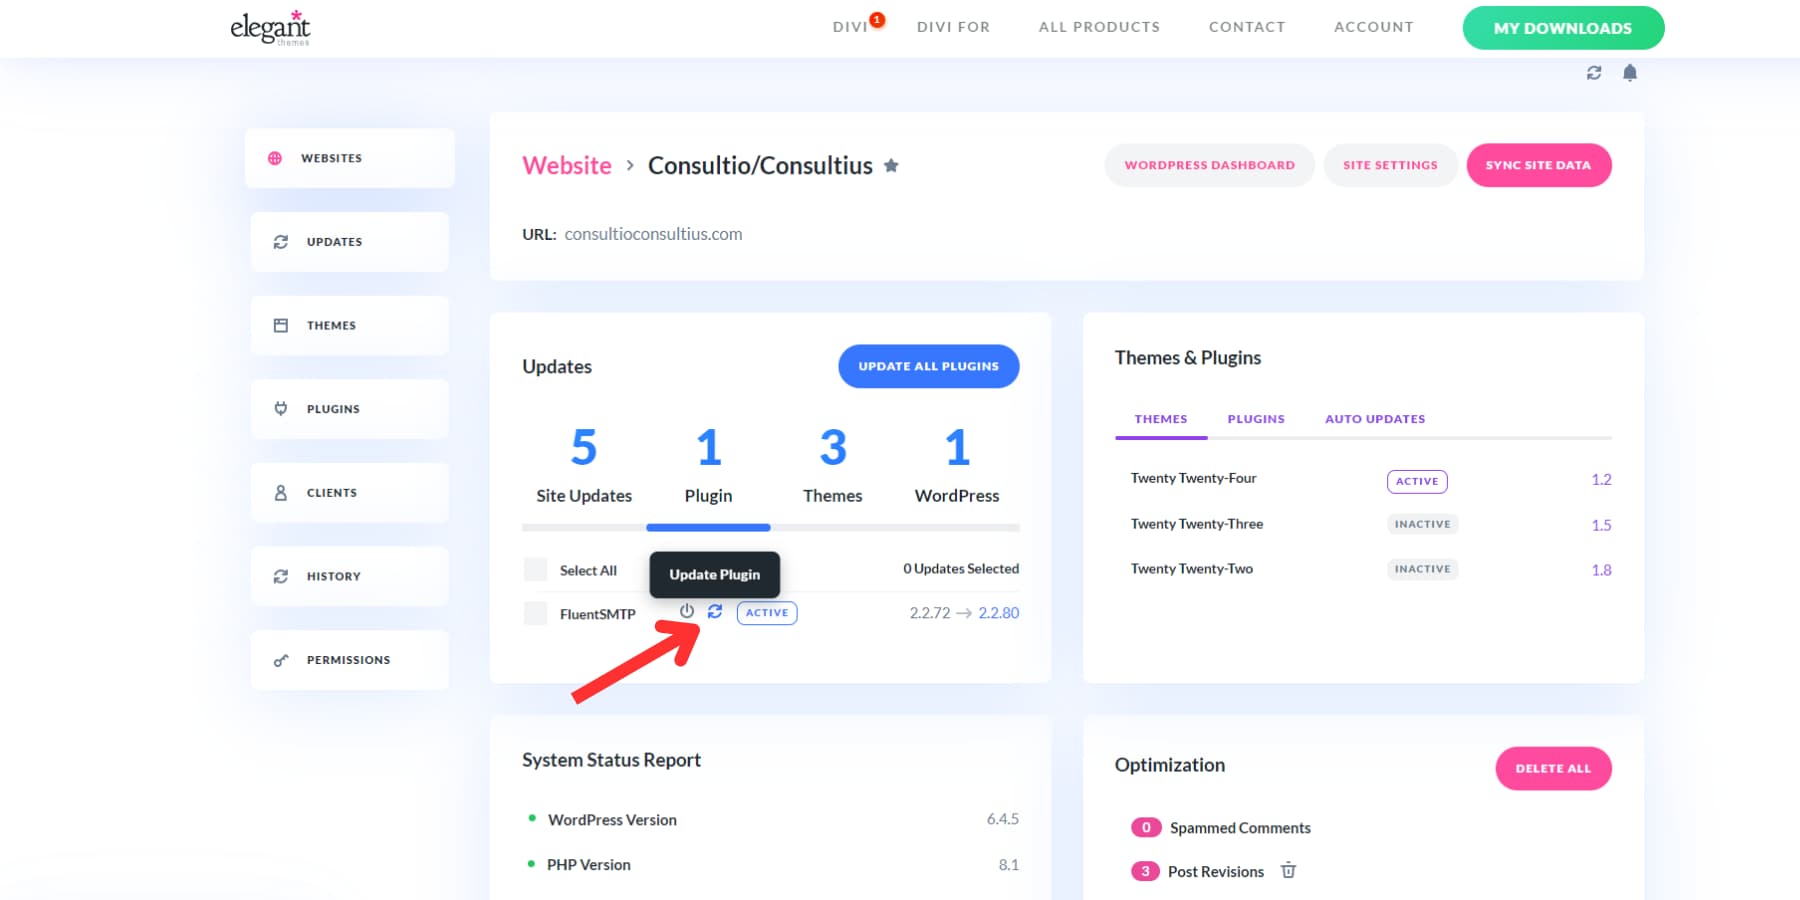
If you have multiple plugins to update, you may also click on the update everything button.
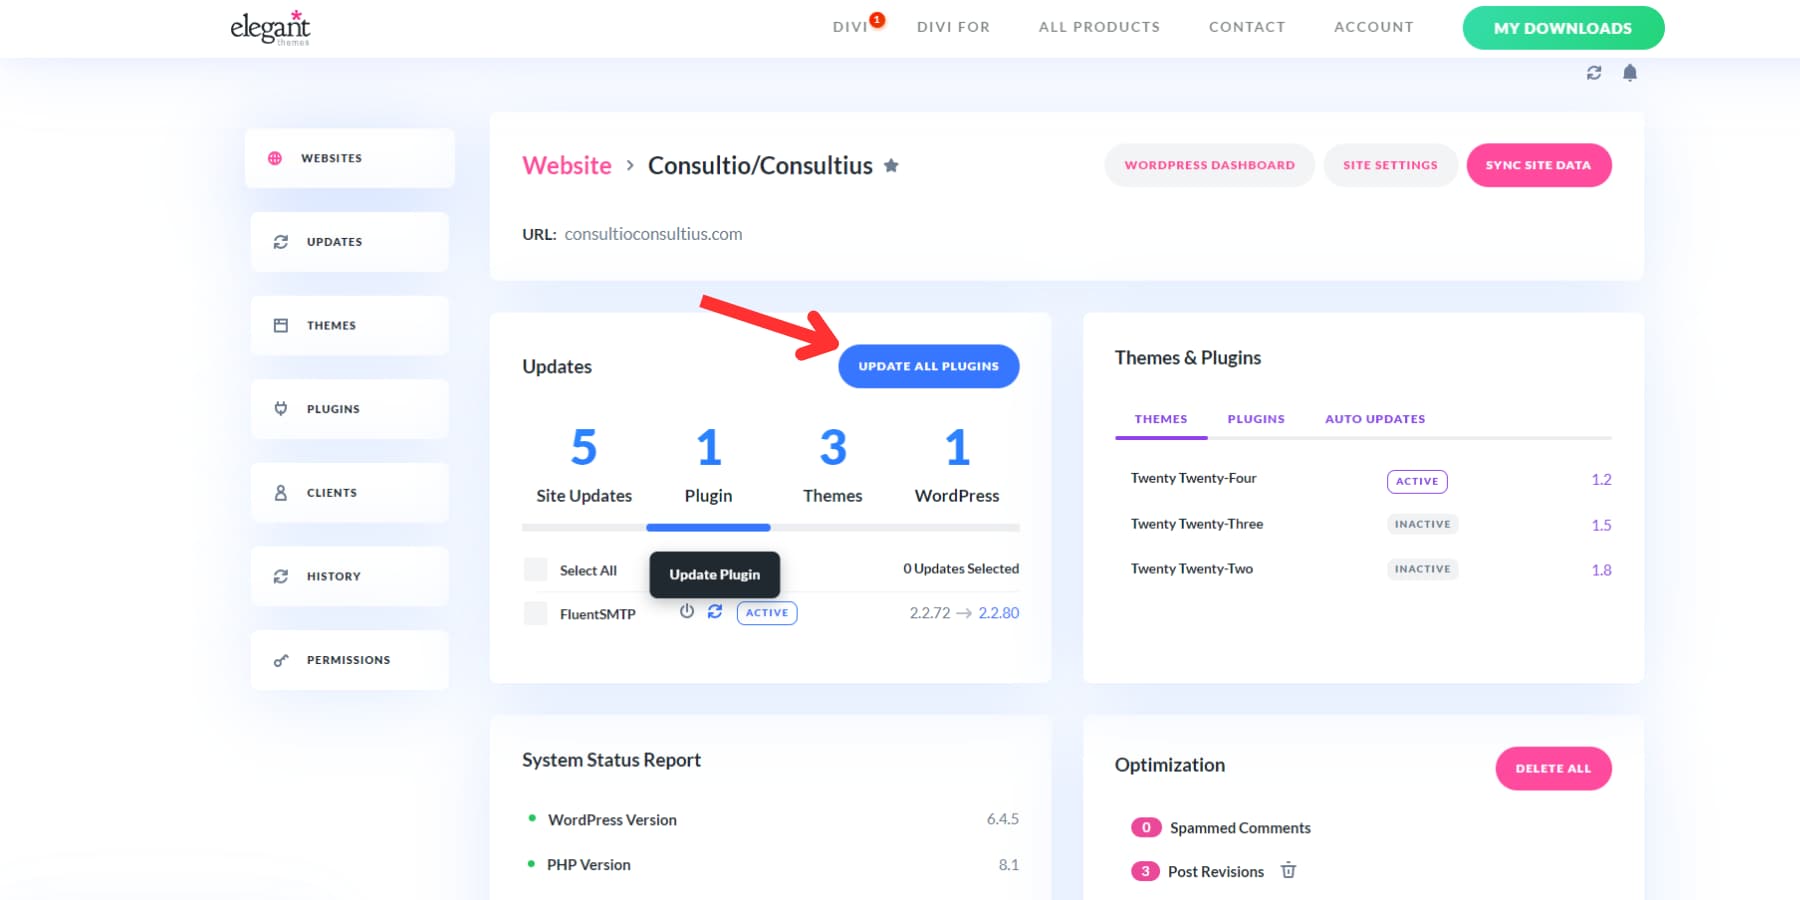
You may also update particular plugins across multiple sites by going to the plugins tab, clicking on the plugin name you want to update, and clicking the “Update All” button.
Another standout feature of Divi Dash is the ability to automate updates by creating a custom schedule for each website. You can determine what gets updated and when tailoring the process to fit your needs.
Additionally, Divi Dash provides a comprehensive overview of all the plugins utilized on your sites. You can manage updates, turn plugins on or off, and effortlessly remove inactive ones no longer in use. This makes it a powerful tool for keeping your WordPress environment organized and up-to-date. Beyond plugin updates, you can add and manage users, delete spam comments, clean databases, and more across all your websites with a few clicks.
2. Updating Automatically
WordPress makes the updates easy with its built-in automatic update system. When you log into your admin area, you’ll notice notifications about available updates for your plugins, themes, and core software.
Go to the Dashboard → Updates page or navigate to Plugins → Installed Plugins. There, you’ll find a comprehensive list of plugins needing attention. Look for the orangish notifications beneath each plugin—these indicate updates that are ready for installation.
Use the ‘Update Now’ link next to each plugin. Just remember to update one at a time and wait for each to complete before moving on to the next.
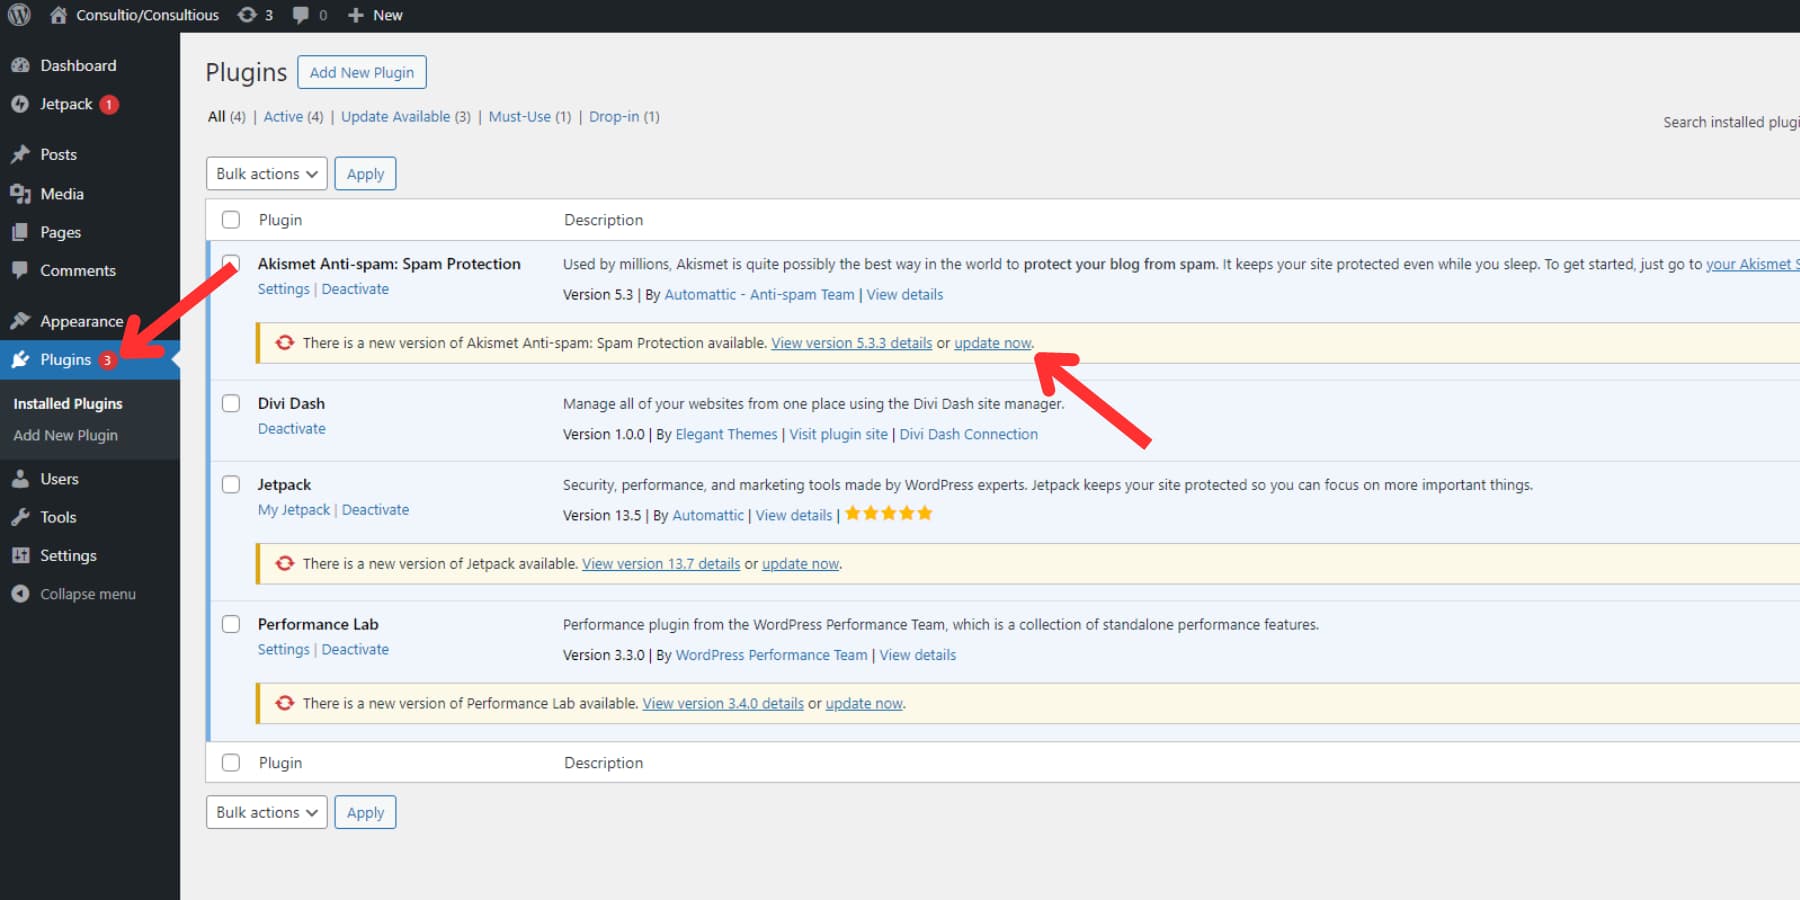
Updating Plugins Automatically In Bulk
Updating multiple WordPress plugins can be done quickly and efficiently if you haven’t made updates. On your dashboard, navigate to Plugins → Installed Plugins and click “Update Available” tab. This shows all plugins with pending updates. Alternatively, you can manually scroll to find plugins with updates. You can select the ones you want to update by checking their boxes or using the top select all checkbox to select all.
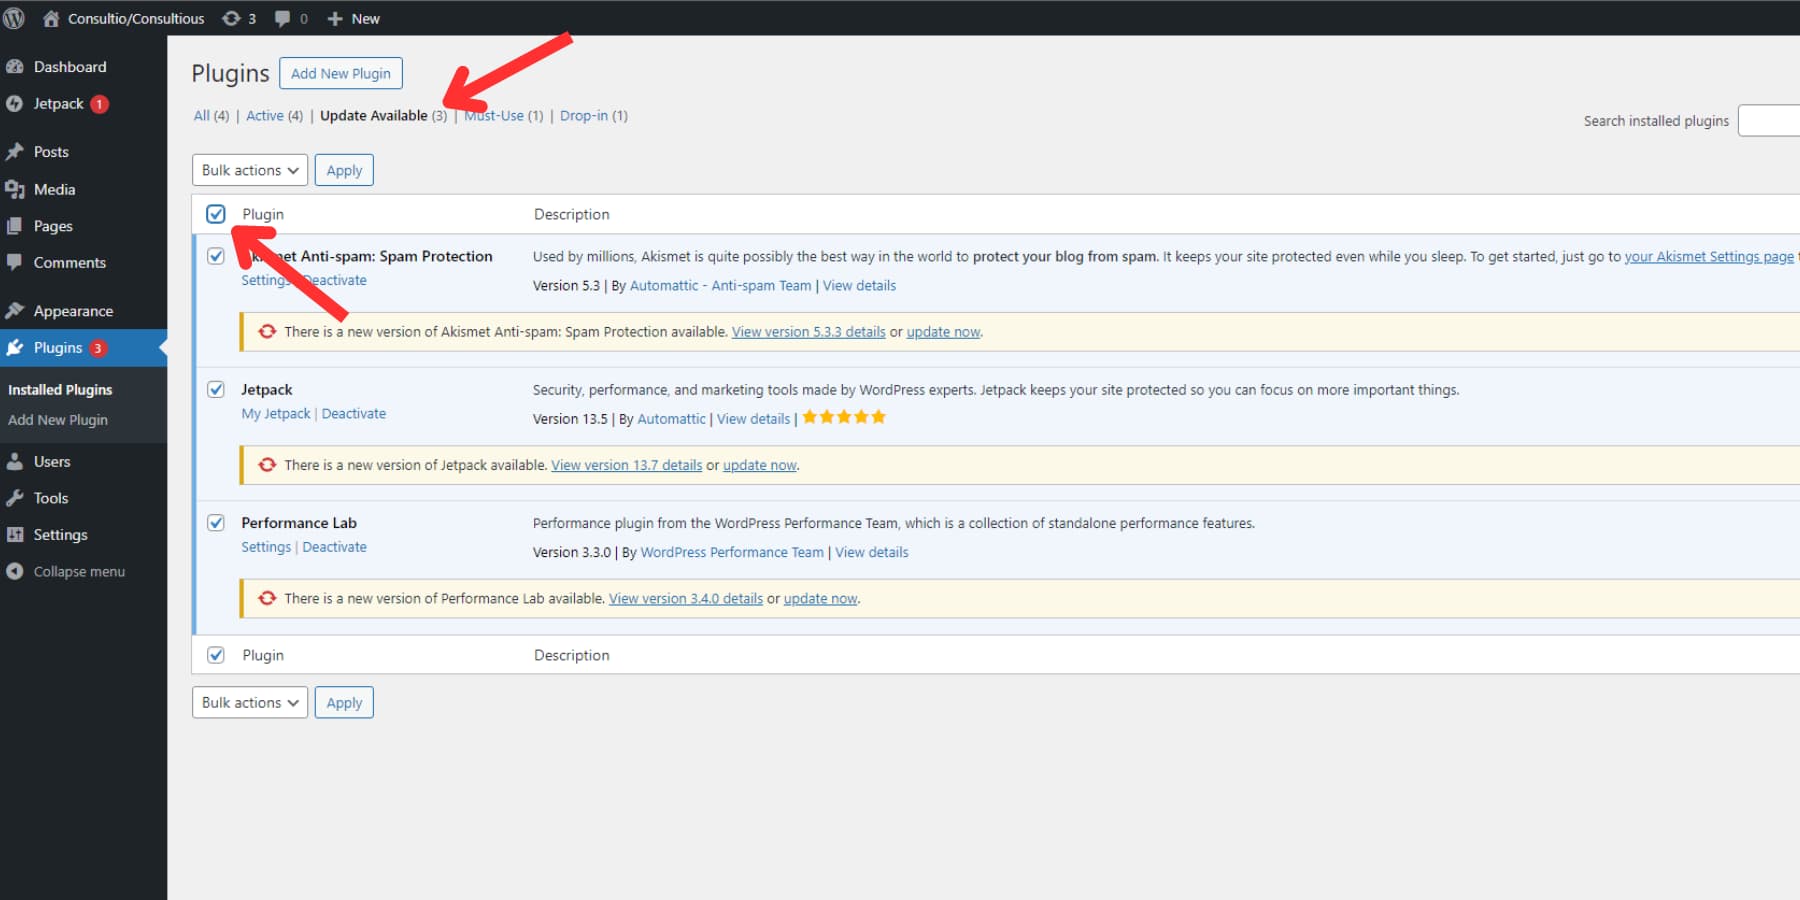
From the Bulk Actions dropdown, choose “Update,” then click “Apply.”
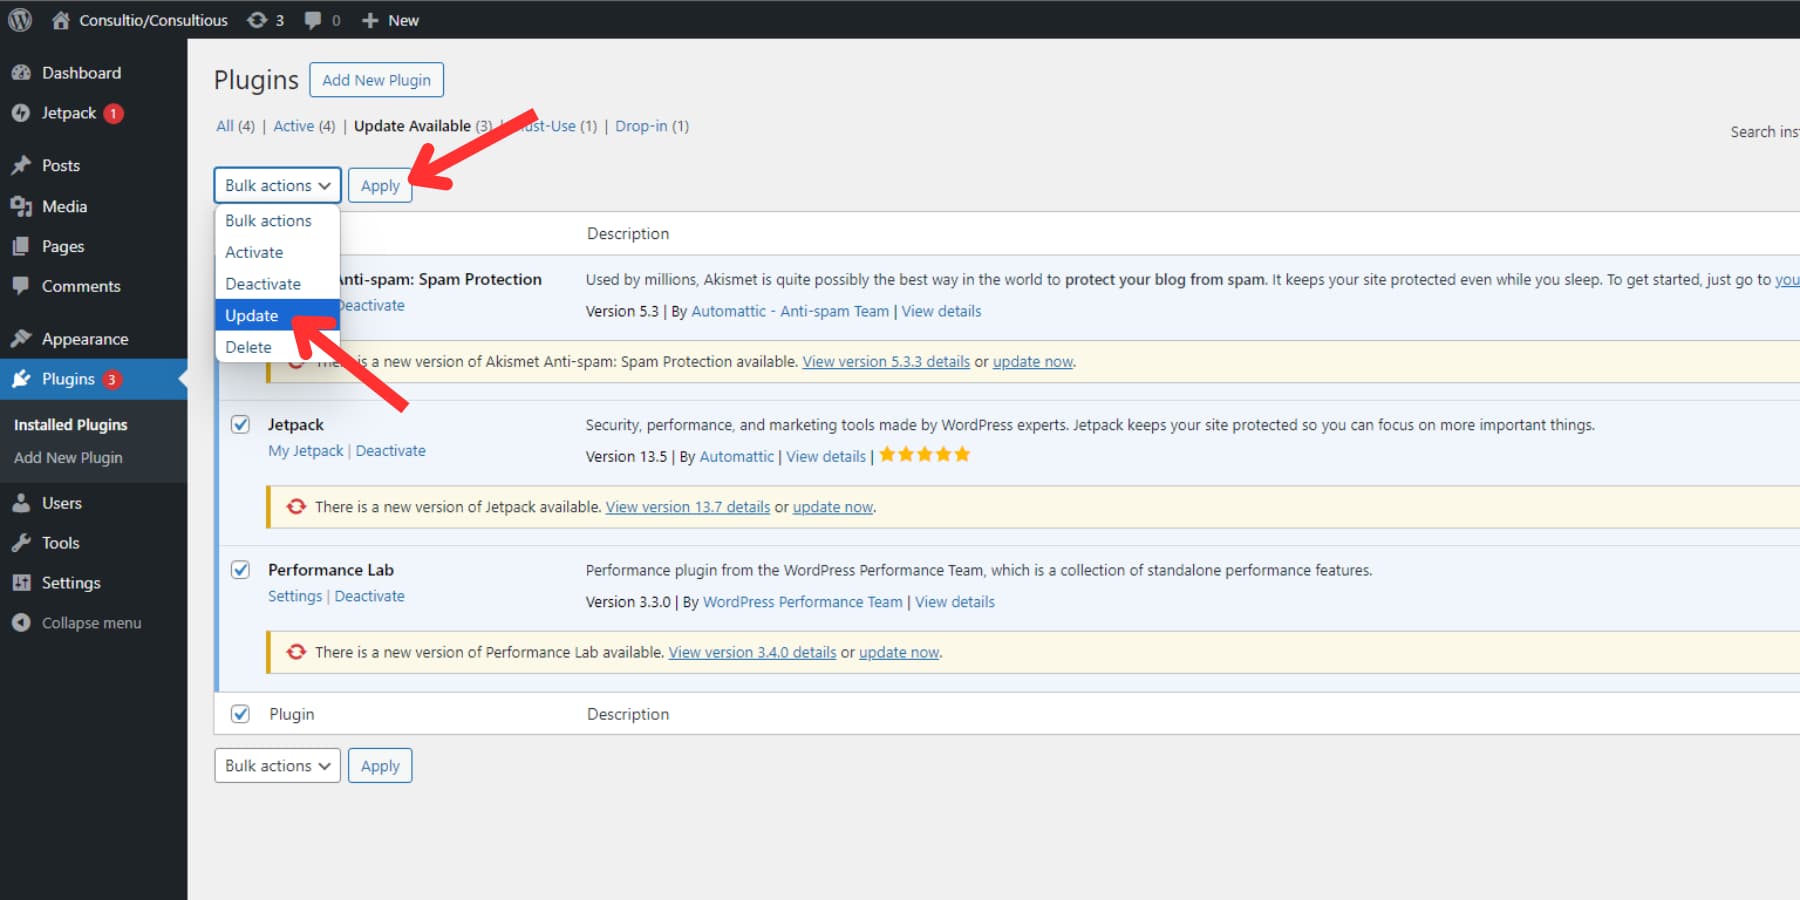
This process streamlines plugin maintenance, keeping your site current and secure with minimal effort.
Setting up Auto-Updates
Since WordPress 5.5, you can set up automatic core, plugins, and theme updates. This feature lets you keep your site up-to-date with the latest security patches and bug fixes without manual intervention.
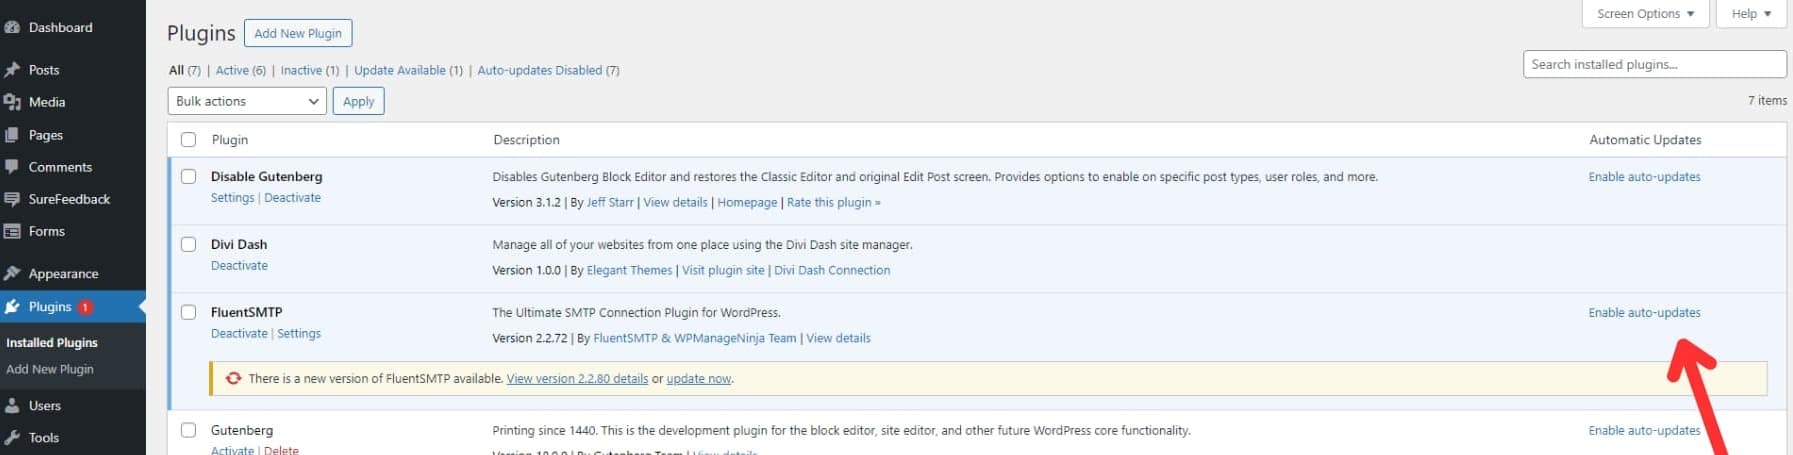
To enable automatic updates for a specific plugin or theme, navigate to your WordPress dashboard’s ‘Plugins’ page. Next to each plugin or theme, you’ll find an ‘Enable auto-updates’ link. Clicking this will activate automatic updates for that particular item.
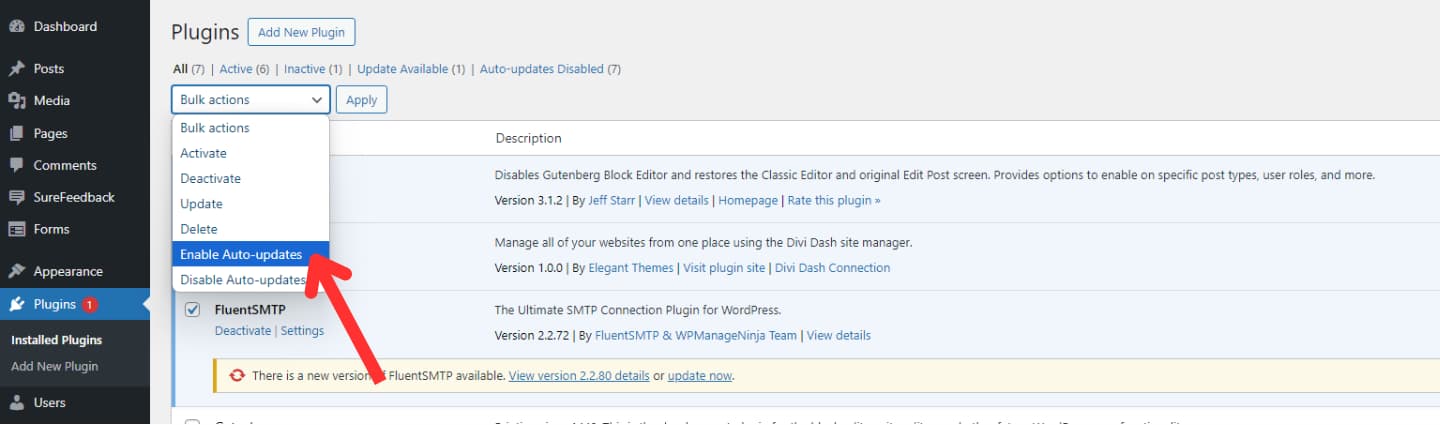
You can even select the desired plugins (like the bulk updates) and use the ‘Bulk Actions’ dropdown to choose ‘Enable auto-updates’ for the selected plugins.
While automatic updates offer convenience, it’s essential to consider the trade-offs. While they can help maintain site security, updates may occasionally introduce compatibility issues or bugs.
Consider enabling automatic updates for smaller, single-feature plugins or those from developers you trust. If you’re concerned about potential issues, consider using a backup plugin like UpdraftPlus to create a site backup before updates are applied. This provides a safety net in case of any unforeseen problems.
3. Updating Manually
Updating plugins in WordPress is straightforward. While it’s not always necessary, doing it manually can be very helpful, especially with custom plugins or those that don’t work well with automatic updates. It’s also a good option if you’re encountering technical difficulties that stop you from using the built-in update feature.
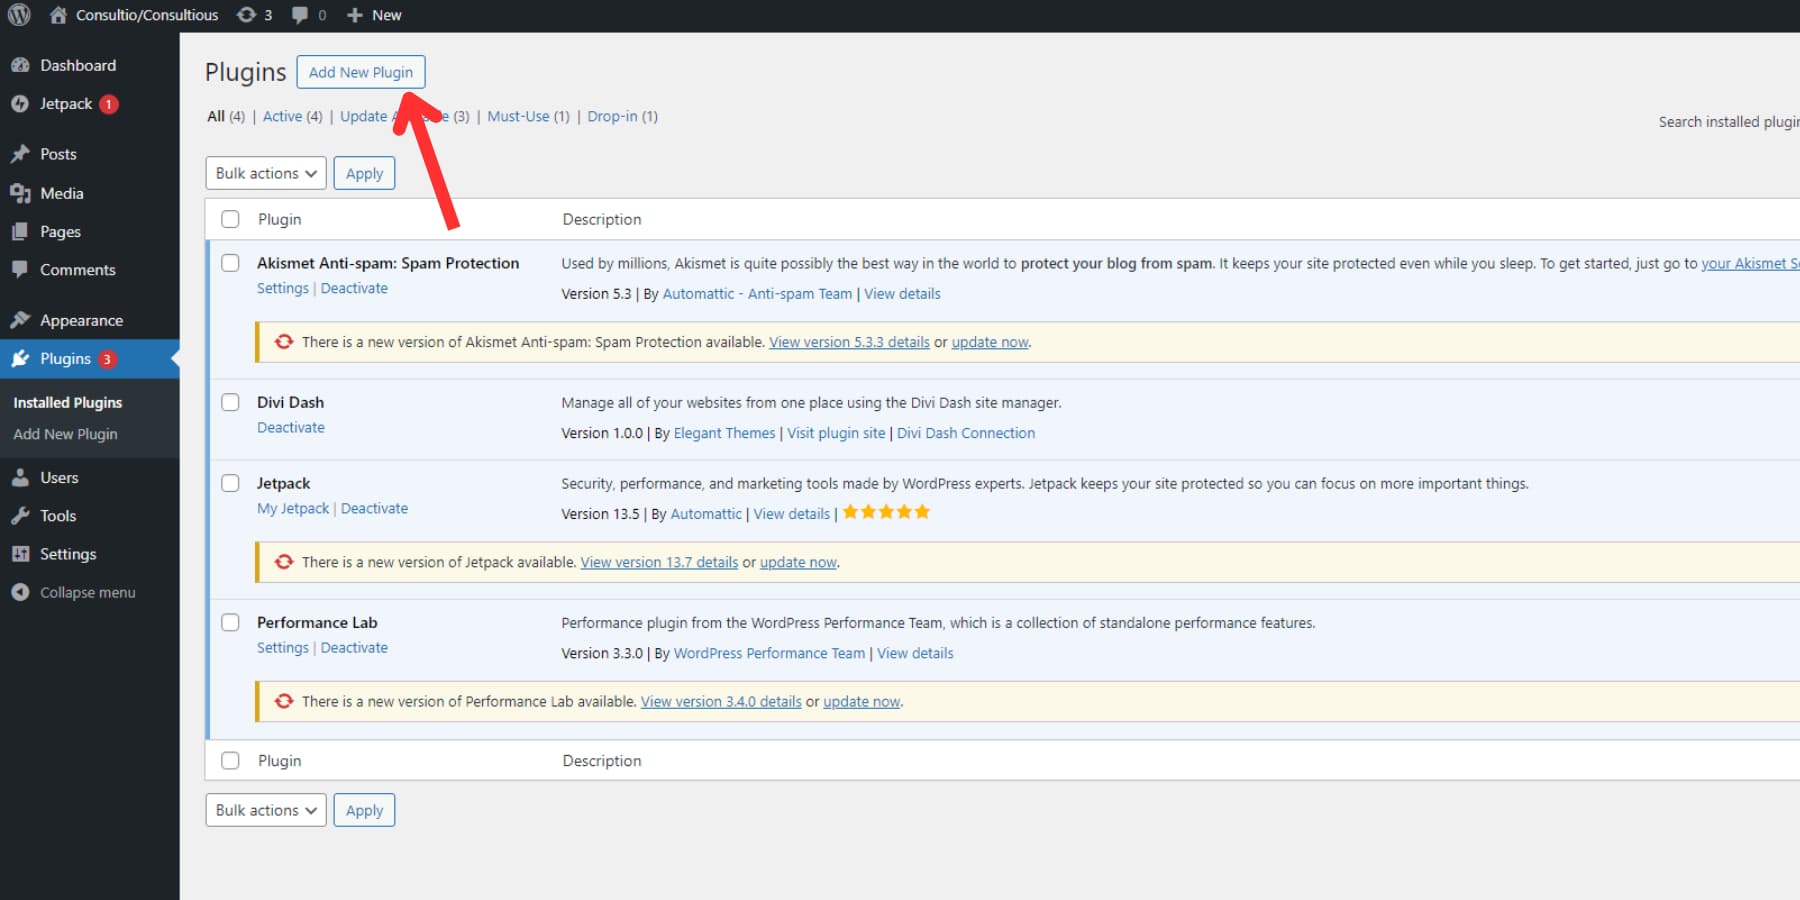
To update a plugin manually, go to your plugins page and click the “Add New Plugin” button at the top.
Next, on the Add Plugins page, find and click the “Upload Plugin” again at the top to upload the zip file of the updated plugin. WordPress will recognize that an older version of the plugin is already installed and will ask if you want to proceed with the update. Just click on the “Replace Current with uploaded” button, and it will update the plugin for you.
And that’s all there is to it! Although automatic updates are more efficient, knowing how to update plugins manually can be useful in specific situations.
In Conclusion
Keeping your website secure and running smoothly hinges on regular plugin updates. These bolster security and introduce new features, enhancing user experience. With proper safety checks like backups in place, numerous ways to update plugins efficiently and securely exist.
Divi Dash is a game-changer for freelancers and business owners juggling multiple websites. This powerful tool, free for Divi Members, simplifies user management across all your sites. It is a centralized hub where you can make site-wide updates, oversee users, manage themes, and handle various other tasks efficiently. Click on the button below to access Divi Dash along with Divi’s no-code website builder and Divi Quick Sites.
The post How to Update Your WordPress Plugins appeared first on Elegant Themes Blog.
# A Step-by-Step Guide to Updating Your WordPress Plugins
Keeping your WordPress site up to date is crucial for maintaining its security, performance, and functionality. One of the key components of this maintenance is regularly updating your plugins. Plugins enhance the capabilities of your WordPress site, but outdated plugins can lead to security vulnerabilities, compatibility issues, and performance problems. This guide will walk you through the process of updating your WordPress plugins step by step.
## Why Update Your Plugins?
Before diving into the update process, it’s important to understand why keeping your plugins updated is essential:
1. **Security**: Outdated plugins can be a significant security risk. Developers regularly release updates to patch vulnerabilities that could be exploited by hackers.
2. **Performance**: Updates often include performance improvements that can enhance the speed and efficiency of your site.
3. **Compatibility**: As WordPress itself is updated, older plugins may become incompatible with the latest version of WordPress, leading to functionality issues.
4. **New Features**: Updates often come with new features and enhancements that can improve the user experience.
## Step-by-Step Guide to Updating Your WordPress Plugins
### Step 1: Backup Your Website
Before making any updates, it’s crucial to back up your website. This ensures that you can restore your site to its previous state if something goes wrong during the update process.
– **Use a Backup Plugin**: There are several plugins available, such as UpdraftPlus or BackupBuddy, that can help you create a complete backup of your site.
– **Manual Backup**: Alternatively, you can manually back up your WordPress files and database using tools like phpMyAdmin or your hosting provider’s backup options.
### Step 2: Log into Your WordPress Dashboard
1. Open your web browser and go to your WordPress login page (usually `yourwebsite.com/wp-admin`).
2. Enter your username and password to access the dashboard.
### Step 3: Navigate to the Plugins Section
1. In the left sidebar of your WordPress dashboard, click on **Plugins**.
2. You will see a list of all installed plugins, along with their current version and any available updates.
### Step 4: Check for Available Updates
1. Look for plugins that have an update notification. You will see a message indicating that an update is available, along with the version number.
2. You can also click on the **Updates** option in the sidebar to view all available updates for plugins, themes, and WordPress itself.
### Step 5: Update Plugins
There are two methods to update your plugins: individually or in bulk.
#### Updating Individually
1. Find the plugin you want to update in the list.
2. Click on the **Update Now** link below the plugin name.
3. Wait for the update process to complete. You will see a success message once the update is finished.
#### Updating in Bulk
1. If you have multiple plugins that need updating, you can select them all by checking the box next to each plugin.
2. From the **Bulk Actions** dropdown menu, select **Update**.
3. Click the **Apply** button to update all selected plugins at once.
4. Wait for the updates to complete, and check for any success messages.
### Step 6: Test Your Website
After updating your plugins, it’s essential to test your website to ensure everything is functioning correctly.
1. Visit your website and navigate through different pages and features.
2. Check for any errors or issues that may have arisen from the updates.
3. If you encounter problems, you can revert to your backup to restore your site to its previous state.
### Step 7: Review Plugin Settings
Some plugin updates may change settings or introduce new features. After updating, it’s a good idea to review the settings of your plugins to ensure they are configured correctly.
1. Navigate to the settings page of each plugin to check for any new options or changes.
2. Adjust the settings as necessary to optimize performance and functionality.
### Step 8: Regular Maintenance
To keep your WordPress site secure and running smoothly, make it a habit to regularly check for plugin updates. Set a schedule (weekly or bi-weekly) to review and update your plugins, and always back up your site before making changes.
## Conclusion
Updating your WordPress plugins is a vital part of maintaining your website’s security, performance, and functionality. By following this step-by-step guide, you can ensure that your plugins are always up to date, minimizing risks and maximizing the potential of your WordPress site. Remember, a well-maintained website not only provides a better user experience but also helps in achieving your online goals. Happy updating!

Recent Comments